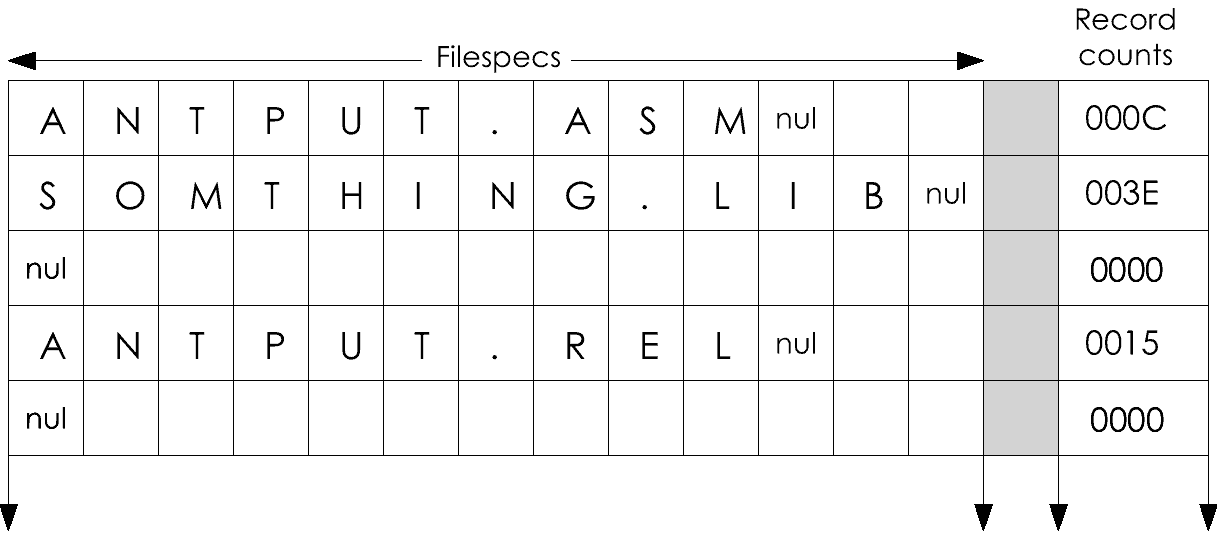
Figure 8-8. The layout of array FS in storage.
In this 1985 book, as in its predecessor (A Programmer's Notebook, 1983) I was trying to demonstrate a professional's thoughtful, systematic approach to software design for the benefit of the generation of enthusiastic amateur programmers that sprang up with the advent of small, cheap computers.
The book did not do well commercially, for a couple of reasons that are obvious in hindsight. First, my own choices: I used RMAC and its associated LINK and LIB tools. There was nothing wrong with these programs as tools, and the ability to build a library of relocatable object modules is absolutely essential to modular software design. However, the RMAC/LINK/LIB package was an extra-cost purchase from Digital Research, and most of the CP/M programmers who might have bought the book didn't have them and weren't interested in getting them.
I felt (and still feel) it was essential to exploit the Z80's instruction set, but once I'd chosen RMAC I had to use the Intel-like assembler mnemonics and syntax that it supported for the Z80 instructions. That put another barrier in the reader's way. However, relocating assemblers that supported Zilog's more appealing syntax were even less available and more costly than RMAC.
What really doomed the book, however, was that it was ridiculously late to market. By the time it reached print the IBM PC and MS-DOS had completely taken over the world of personal computing. Z80-based CP/M computers were still being sold, but hardly anyone cared. Had I written the same book but for the 8086 and IBM's assembler, the story might have been different.
Twenty-five years later, it seems there are still a few CP/M programmers in the world. For their sakes I am putting the book online. A few typos have been corrected and the figures have been redrawn and are somewhat clearer than the original. Otherwise it is the same. Look nearby for access a ZIP archive with the files distributed with the book.
This is a book of programs, and a book about programming. It contains a variety of software, all written in assembly language for a computer equipped with CP/M and a Z80 processor. The software is useful, but the book is about the process of constructing programs: how they are conceived, designed, and coded.
The book is in two parts. Part I contains complete programs, each worked out from an initial specification, through a design in a high-level pseudo-code, to working assembly language.
These programs are built from a kit of simpler parts: a comprehensive set of subroutines for manipulating integers, strings, and especially files. It brings to assembly language much of the convenience of the standard C runtime library, and it makes writing assembly language utilities a lot easier. Part II describes how that toolkit was designed and how it works.
The software in this book requires the CP/M-80 operating system (either CP/M 2.2 or CP/M Plus). It also requires a Zilog Z80 processor chip. I found that certain Z80 features were absolutely necessary to doing the file-handling modules right. While unavoidable, this is a pity; it means that such excellent dual-processor machines as the CompuPro and the Zenith Z-100, which use an Intel 8085 on their 8-bit side, cannot use these programs.
If you obtain the software in machine-readable form, you can execute the programs of Part I immediately. To modify them, however, you will need the RMAC assembler. To link the toolkit modules with programs of your own you must have the LINK-80 linker and the LIB library manager. RMAC, LINK-80, and LIB are products of Digital Research, Inc. (and trademarks as well). They are distributed free with CP/M Plus and are available separately for CP/M 2.2. There may be other assemblers and linkers that will work, but none have been tested.
Assembly language a bad reputation. Most books on programming tell you to use a simple language like BASIC, a clear one like Pascal, or an efficient one like C. I echo that advice: in many cases you should write programs in a higher-level language. This is especially true if you are new to programming. Until you are thoroughly at home with the fundamentals of programming -- until you know the loop, the subroutine, the array and the file in all their varieties, and have practiced breaking a problem down and composing a program from its pieces -- you should avoid assembly language. Once you have mastered those things, you are free to choose a language to suit the task at hand.
As compared to BASIC, Pascal, or C, assembly language is inherently more tedious and difficult to use. Worse, it is not portable; assembly-language programs can only run in the combination of processor and operating system for which they are written. However, assembly language code is normally much smaller and faster than the code generated by the simple compilers available for CP/M. And assembly language gives you access to all the features of the machine and operating system, including many that aren't available in higher languages. Sometimes speed and access to the hardware is crucial to the success of an application.
Commercial programmers avoid assembly language because its extra difficulty raises the cost of a project, while its lack of portability cuts down the size of the market. Still, I heard Mitch Kapor, president of Lotus Development, say that Lotus 1-2-3^ had to be written in assembly language because a prototype written in C was too big and slow to be saleable. And though Apple's MacIntosh owes some of the speed of its graphics to brilliant algorithms, its designers credit a well-honed assembly language toolbox for most of its speed.
Once you decide to use assembly language, your first concern should be to minimize the inevitable extra cost in effort. That's best done through a disciplined approach to design and coding, and by making full use of a library of subroutines. This book aims to demonstrate both those things.
I started out to do a simple update of an earlier book (A Programmer's Notebook: Utilities for CP/M-80, Reston, 1983; now out of print) to make it work under CP/M Plus. But the longer I looked, the less I liked the older book, especially its library of subroutines which was incomplete and had many inconsistencies.
For this book I began by designing and building a comprehensive toolkit of subroutines. I packaged them as functional modules and gave them macro interfaces that were as simple and as consistent as I could make them. (For example, all of the CP/M file operations, even to the testing and setting of file attributes, can be done with simple macro calls and no use whatever of the CP/M File Control Block.) Only then did I write the programs that would use the subroutines.
Half way through, I heard of a comparable package, called SYSLIB, that was in the public domain. I was careful to avoid seeing SYSLIB or any other subroutine package, so as to avoid even a hint of plagairism.
The work was finished in September 1984, just as the market for computer books in general, and books on CP/M in particular, collapsed like a pricked balloon. The publisher that had contracted for the book had, like much of the software industry, become fixated on the IBM Personal Computer. They decided the book wouldn't sell and gave it back to me.
Fortunately the present publisher realizes that there are more than a million CP/M machines in daily, productive use. The people who own them have been using computers longer than the typical PC owner, and since their abandonment by an industry they have become more knowledgeable and self-reliant. A lot of them, we hope, are getting ready to write their own software. Those are the people this book is for.
D. E. Cortesi
Palo Alto, 8/84 and 9/85
Programming is a craft like cabinetry or needlework. After all, a programmer, like any craftsperson, first draws a plan, then uses tools to shape materials in order to produce a useful object. This chapter is a brief review of the programmer's raw materials: the machine's instruction set and the assembler.
The review is necessary, but there can be no correct length for it. If you know little about assembly language, you'll find it too short and it will drive you out, fuming, to find one of the many good tutorials on the subject. If you know the subject well, the only interest will lie in whatever new light I can cast on old information.
If you're primed for disappointment, then, let's begin.
The heart of any computer is a Central Processing Unit (CPU). This chip has a limited repertoire of simple operations. It reads a stream of bytes from storage and decodes them as operations to perform. A program, when expressed as a sequence of bytes ready for execution by a CPU, is a machine-language program. The final goal of programming is to produce a machine-language program, but it's impractical to write programs in the binary numbers of true machine language.
A simple assembler makes it easier to write a program. An assembler is a program that translates symbols into machine language. It recognizes predefined symbols like "M" or "ADD" as standing for CPU operations or machine registers. It recognizes numbers written in decimal and hexadecimal digits and converts them to binary. It lets us define our own symbolic names for numbers and for locations in storage.
In Figure 1-1 you see a simple program. It's about as trivial as it can be; it writes one ASCII character, the control character BEL, to the console. I call it beep.
; BEEP -- toot the console
ProgramBase equ 0100h ; start of any program
BdosJump equ 0005h ; entry to the BDOS
BdosType equ 2 ; request to type 1 byte
AsciiBEL equ 7 ; the BEL byte
org ProgramBase
mvi c,BdosType
mvi e,AsciiBEL
call BdosJump
ret
end
Figure 1-1. A simple program written for an absolute assembler like asm.
I hope you have composed assembly programs as complicated as beep before now. If so, you know that what you see in Figure 1-1 is the source text of a program, which would be prepared with an editor program and stored as a file on disk. The file would, very likely, be named beep.asm.
The program could be assembled with the CP/M command
A>asm beep
The assembler, a program named asm, is called; it reads the source file and performs the translation from readable symbols to binary machine language. The translated program is called an object program. It is recorded as another file, beep.hex in this case.
That file is still not executable. In fact, although all the symbolic names have been stripped from it and replaced with their binary equivalents, beep.hex is still in a symbolic form. A hex file represents the machine-language program as a series of ASCII characters, one for each hex digit (group of four bits). This hex-file format was originally designed for storing object programs on paper tape, but it still has its uses.
CP/M includes a program that will convert the hex form of an object program to true, binary, machine language. It is called load in CP/M 2.2 and hexcom in CP/M Plus. The command
A>load beep
in CP/M 2.2, or
A>hexcom beep
in CP/M Plus will read the file beep.hex. The assembler's output will be converted to binary and written as a new file, beep.com. This file is an exact copy of the machine language program as it must appear in storage before the CPU can execute it. Once beep.com exists, the operator may give the command
A>beep
In response, CP/M will copy beep.com into storage and apply the CPU to it. The result will be a single "beep" from the terminal.
All assemblies go through these two translation steps. First the assembler converts symbols to binary values and records them in an intermediate file. Then a second program converts the intermediate file into an exact, binary image of the program. The operating system can load this image as a command, and run it.
In a simple assembly, the assembler is asm, the intermediate file is a hex file, and the second program is load (or hexcom). In the rest of this book, however, we'll use a relocating assembler, rmac, and a program linker, link, as the second program.
In order to construct a program of machine instructions, we have to know what instructions are available for use. A CPU's repertoire, the vocabulary of its machine language, is called its instruction set. These instructions, and the machine resources they can manipulate, are the raw materials of assembly language programming.
In this book we will use the instruction set of the Zilog Z80 CPU. However, the assembler we will use was originally designed to handle the simpler instruction set of the Intel 8080 CPU, and that causes some problems.
Intel's 8080 CPU was the first microprocessor to have an instruction set with enough power to be useful for general data processing. Its successor, the very similar 8085, is still a useful machine.
The 8080 offers us a very small set of hardware resources with which to work. The first one is an address space of 65,536 bytes of RAM, or "memory," or (as I prefer to call it) working storage. The CP/M operating system preempts two portions of this. It reserves the first 256 bytes, and its code occupies the highest addresses -- typically the top 8 or 12 kilobytes. The remaining addresses are available for our programs and their data.
A second resource is an 8-bit accumulator called register A. Except for loading and storing data, almost everything that the machine does, it does in register A. Only in register A, for instance, may we perform decimal arithmetic or manipulate the bits of a byte.
A third resource is a group of four 8-bit registers known as B, C, D, and E. These may be used to hold single bytes, or they may be paired as BC and DE to hold 16-bit words. In that guise they can be used as addresses for loading and storing a byte from register A. These registers may be incremented or decremented, but they can't receive the result of any other arithmetic operation.
A fourth resource is another pair of byte registers, H and L. Paired as the HL register, these can be used as a 16-bit accumulator. That is, the unsigned 16-bit word in HL may be added to itself, or the BC or DE word may be added into it. The contents of DE and HL may be swapped in a single instruction (but not the contents of BC and HL).
An important feature of the 8080 is that the storage byte whose address is in HL can be used as if it were another 8-bit register on a par with B, C, D or E. In the assemblers used here, that byte is referred to as register M.
A fifth resource is a pushdown stack of words in working storage. The CPU contains a 16-bit register, the stack pointer, which points to the last byte pushed onto the stack. Any of the register pairs may be pushed on the stack, which grows downward (from larger to smaller addresses). A useful oddity of the instruction set is that the word in HL may be swapped with the top word on the stack in one instruction.
The Intel company specified an assembly syntax for the 8080's instructions. Now, remember that there is no necessary relation between the binary bytes that the CPU reads on one hand, and the syntax rules of the assembler that prepares those bytes on the other. The assembly language is merely some engineer's idea of a concise, readable way to write down instructions.
The syntax Intel chose was simple. We might quarrel with some of the choices for operation code symbols -- the use of mov (move) where most other assemblers use "load" can be confusing, and if they had to use it, why couldn't they have spelt it out in full? -- but it is much too late to quibble.
The CP/M operating system was designed to support the 8080, and asm, the assembler that was part of it, naturally supported the Intel syntax for instructions.
Zilog designed the Z80 CPU as a faster, more powerful replacement for the 8080, and it was a quick success. In order to be a true replacement, the Z80 had to be compatible with the 8080; that is, it had to process the same instructions the same way, so that programs written for the 8080 could run on a Z80 without significant changes. Zilog succeeded in this. The machines differ in certain very subtle points about the way the flags are set after certain operations, but it's a rare 8080 program that won't run on a Z80.
The Z80 provides us with more resources. The most important ones are the IX and IY registers. These two 16-bit registers are used to address storage, just as the HL register can address a byte as "register" M. However, while we can reach only one byte through HL, we can reach any of 128 bytes on either side of the address in IX or IY.
The best use of an index register is to hold the base address of a block of related data. Then any byte of the block is just as accessible as any other, and any of them may be used as an operand in an arithmetic or logical instruction. If you persevere into Part II of this book, you'll find that the file-handling subroutines make extensive use of IX to access a block of information about the present state of some file.
The Z80 added yet more features to those of the 8080. It can test, set to 1, or set to 0 any single bit in any byte register. And while the 8080 can shift and rotate the bits of register A, the Z80 extends these operations to all registers. The Z80 can also subtract, as well as add, unsigned words into register HL. That makes it a lot easier to write subroutines for general binary arithmetic.
The repeating instruction was another Z80 innovation. It has six of them, each amounting to a short subroutine wrapped up in a single operation code. The ldir instruction is the best-known; it allows us to copy a block of storage from one place to another in a single operation. In the discussion of string operations in chapter 14 you will find an analysis of the use of Z80 operations like ldir versus the comparable 8080 loops.
The 8080 gives us a set of conditional jump instructions. The Z80 supplements these with a group of "relative" jumps. While an 8080 jump always specifies the full, 16-bit address of the place to jump to, a relative jump contains only an 8-bit number from -128 through +127. When the jump is taken, this offset is added to the present instruction address.
Relative jumps have three advantages. The first is that they are "position independent"; that is, a block of code that contains only relative jumps may be moved to a different place in storage and still work, whereas if an 8080 jump is moved, the address in it has to be modified. The programs in this book don't move around in storage, so position independence doesn't mean much to us.
The second advantage is that a relative jump is one byte shorter than an 8080 jump. That can be important in some rare applications, but if every jump in this book were relative, the programs wouldn't shrink by as much as ten percent.
The final advantage is an esoteric one. As the Z80 does it, an 8080-style jump always takes the same amount of time (ten clock cycles) whether or not the jump condition is satisfied. A relative jump, however, takes less time (seven cycles) if it is not taken, and more time (twelve cycles) if it is taken. So, in code that is fine-tuned for speed, we might write a relative jump whenever we expect the branch to be taken rarely, and an 8080-style jump when we expect it to be taken more often than not.
One relative jump, the djnz (decrement and jump if not zero), is especially useful. This instruction decrements the contents of register B and performs a jump if the result is nonzero. It is just the ticket for controlling small loops, and we'll use it a lot.
After designing a CPU that was so closely compatible with Intel's, the engineers at Zilog went on to specify an assembly syntax that was utterly different. It may have been that the engineers came from different backgrounds, with the Intel people following a DEC tradition while the Zilog folks worked to an IBM model. Whatever the reason, Zilog's official assembly syntax for the Z80 bears no resemblance to Intel's, even where the machine instructions are identical in binary value and operational effect.
Good things may be said of the Zilog assembly syntax. It is consistent; that is, similar operations have similar syntax. The Intel engineers, for example, seemed to think that there was something fundamentally different between loading register A from the byte addressed by HL, which they coded as
mov a,m
and loading it from the byte addressed by BC, represented as
ldax b
At Zilog, they saw these as the same fundamental operation and encoded them as
ld a,(hl)
ld a,(bc)
respectively. Either scheme works, since in any case we programmers soon learn the instructions by heart and think of them by their effects, not their encodings. But two incompatible traditions were established.
That created a problem for the companies that built computers and software based on the Z80. Those that already had an investment in 8080-style software often chose to ignore the Zilog syntax. Instead, they extended the Intel assembly format to cover the additional registers and operations of the Z80. One such company, now defunct, was Technical Design Labs; you will still sometimes see references to "TDL syntax" or to their "TDL assembler," an assembler that was distributed by several companies.
Companies that started out with the Z80 adopted the Zilog style from the start. Software for Tandy Corporation's TRS-80 line, for example, has always used Zilog syntax.
Digital Research Inc., the publisher of CP/M, chose neither course. It didn't supply a Z80 assembler in any form. Even today, the three 8-bit assemblers from Digital Research will accept only 8080 instructions. However, two of these assemblers, mac and rmac, are macro assemblers. We'll consider macro assembly in the next chapter; for now it is enough to say that one advantage of a macro assembler is that you may design your own instruction set. That's what Digital Research did; they supply a library of Z80 instruction macros as a standard part of the assembler package. You include that library in an assembly; then you may write Z80 instructions in extended-Intel syntax.
This is the form of Z80 instructions that you will find in this book: the form established by the Digital Research macro library. Except for the relative jumps, such instructions are rare in the programs of Part I. The 8080 instructions were adequate for almost everything done there. In the toolkit presented in Part II, however, the Z80 facilities are used a great deal.
If you are not as familiar with the Z80's instructions as you'd like to be, join me in an exercise. When I am confronted with a new CPU, I get a handle on it by cross-tabulating its instructions in different ways, looking for relationships between them. If you'll do that for the Z80 instructions I guarantee you'll uncover a few surprises.
In the first table, document all the possible ways of copying a single byte from a source to a destination. The possible sources and destinations include
Table 1-1 is a start at such a tabulation. Its columns represent sources and its rows, destinations. The single instructions that copy a byte have been filled it. Omitting the entries on the diagonal, how many of the missing squares can you fill in with sequences of instructions, and how short can you make the sequences?
If your patience has held up through that exercise, make a similar table for the instructions that will copy a 16-bit word between
Table 1-2 is a start at this 25-entry table. Note how few one-instruction entries there are, and how many are unique to the Z80. Can you find short sequences to fill in the empty entries? Spending a few hours constructing such tables is one of the best ways I know of to feel at home with the resources of a CPU.
There is one one other resource on which our programs may draw. The CP/M Basic Disk Operating System, or BDOS, is present in the machine along with our program. It can perform a number of services, and will if we invoke it correctly. The beep program of Figure 1-1 calls on the BDOS.
The BDOS is located at some address in high storage; that is, it begins at an address higher than the end of our program. We don't know what that address is. It varies from system to system, and it can vary from one command to the next in a single system, although it normally doesn't. However, there is always a jump instruction at location 5 (address 0005h) which is aimed at the lowest instruction in the BDOS. To call upon the BDOS, we need only place the correct arguments in registers and call location 5.
One BDOS argument is a service number that specifies what we want done. It is always passed in register C. The other argument depends on the service being requested, but if it's a byte, it is passed in register E, and if a word, in DE. In beep, the service is to type a byte at the system console. The second argument is the byte to be typed; it's passed in register E.
In Part I of this book, the programs interact with the BDOS only at second hand, through the subroutines of the toolkit. In Part II we will employ many BDOS services in designing the toolkit itself
We turn now to the tools of the craft of programming. The first is a mental tool: the process of abstraction, a supremely important ability in a programmer. First we create abstractions; then we implement them by exploiting the features of the assembler and by creating subroutines and macros.
At the level of machine language, there is only one kind of data, the binary byte. A byte or a set of bytes can be made to represent anything whatever. If we choose, a byte may stand for eight one-bit flags, or a small integer, or a character. A group of bytes can represent a sentence, or a program, or a floating-point number, or a screen image, or a table of addresses.
Such representations are abstractions. We abstract the concept of a number, a table, a screen image; then we impose that concept on the homogeneous bytes of machine storage. "This block of storage contains a message," we decide, "and this one contains a table of numbers." The hardware takes no notice of such decisions. We implement them by writing instructions that treat the first block as a message and the second as a table -- but not, we hope, vice versa.
We use abstract types in any program. Look at the beep program again (Figure 2-1). Even in this trivial exercise I can identify three abstractions. There is "the set of valid BDOS service request numbers." One of those is 2, the request to display one character on the screen. There is "the set of ASCII control characters." One of those is 7, the BEL character. Finally, there is the BDOS itself, the abstraction of a program that will perform a function given certain parameters. This last is not an abstract data type but rather a functional abstraction, the concept of a particular action.
; BEEP -- toot the console
ProgramBase equ 0100h ; start of any program
BdosJump equ 0005h ; entry to the BDOS
BdosType equ 2 ; request to type 1 byte
AsciiBEL equ 7 ; the BEL byte
org ProgramBase
mvi c,BdosType
mvi e,AsciiBEL
call BdosJump
ret
end
Figure 2-1. A simple program written for an absolute assembler like asm
Abstractions are purely human constructions. We may decide that a set of bytes is an English sentence, but that decision is in no way part of a machine-language program. The CPU will not object if we tell it to multiply two sentences, look for a verb in a floating-point number. The assembler will not complain if we give it a program like this.
msg: db 'Hello, there'
call msg
High-level languages help us avoid mistakes like that. They do it with a variety of mechanisms for isolating one data type from another. Assembly language doesn't; it permits us to mix data types in any way we like, including nonsensical ones. However, it also gives us the means to construct our own type-handling mechanisms. The first of these is the symbolic name. We use symbolic names to make clear the distinction between one kind of data and another.
We don't do it for the computer's benefit. Look again at Figure 2-1. When it is translated to machine language, it is compressed by a factor of 40, from more than 360 bytes to just eight. This compression is the result of stripping out every bit of symbolic information. Names of operations translate to one byte; symbolic constants translate to one or two; and all comments are deleted.
Ninety percent of the beep source file is redundant -- to the CPU. But these things are not in the source file to serve the CPU; they are there to serve human purposes. In Figure 2-2 you can see a version of beep that contains the absolute minimum of symbolic information. In translation it compresses by a factor of only five. Since it is eight times less redundant, it is in some sense a more efficient representation of a computer program. However, it is a total failure as a message between humans.
org 256
mvi c,2
mvi e,7
call 5
ret
Figure 2-2. The beep program stripped of symbols.
Every program source file is a message with three destinations. One destination is the processor, which has no ability to process symbolic information. The second is yourself; you record your decisions about the abstractions being used in the program as comments and symbolic names, for quick reference as you work. The third is a future person, either the programmer that will follow you or yourself at a later time.
Since two of the three recipients of a program are human, and since the other is mindlessly unaware of the program's symbolic content, it follows that the symbolic components of the source text deserve as much attention as the purely mechanical elements.
It also follows that the best assembler is the one with the best support for symbolic information, and that we should exploit that support as thoroughly as we exploit the machine. The CP/M assemblers all allow symbolic names to be as much as 16 characters long and can handle hundreds of names in a single assembly. I've made good use of those features in these programs.
Some things and locations are such constant features of CP/M programs that we might as well have standard names for them, and we might as well find a way to avoid having to type them into every program. The assembler's maclib command gives a way to include a file of equated names.
All the programs in this book use a single macro library, environ.lib. It contains, among other things, about 50 names for common things, notably the standard CP/M storage locations and the ASCII control characters. A separate macro library, services.lib, contains names for the BDOS service requests and a service macro that encapsulates the calling mechanism. If we like, we can rewrite Figure 2-1 using these two libraries and standard names (Figure 2-3).
; BEEP -- toot the console
maclib environ
maclib services
prolog
service BdosType,AsciiBEL
ret
end
Figure 2-3. Program beep written using the toolkit macro libraries.
Neither the CPU nor the assembler have any support for abstract data types, but we programmers use them constantly. Four types are so common and so useful that they crop up in every program. This book features a toolkit of subroutines that deal with these four data types: the character, the integer, the string, and the file.
We use use the ASCII code to relate numbers (which is all that a byte can contain) to letters. Once we've decided that a certain byte will contain a character, we tend to talk as if we really could store a letter in it. We can't, of course; even when we write a sequence like this
mvi a,'x'
sta LetterByte
what we have accomplished is to store the number 120 in the byte -- a quantity that has no necessary relationship to the letter x whatsoever. That's the virtue of abstractions. Having decided on the treatment of LetterByte and having accepted the ASCII code, we can write a program in terms of these abstractions. It relieves our mental burdens considerably, as anyone will attest who has entered a program, in binary, to a primitive development system through its toggle switches.
Sometimes we have to switch between one abstraction and another on the fly. For instance, if we want to make a letter uppercase, we have to alternate between thinking of it as a letter, as a number, and as a bit-pattern. In Figure 2-4 you see a subroutine that returns the letter addressed by register HL as uppercase. There are two point-of-view switches in it.
uppit: ; returns A = m(hl) as uppercase
mov a,m
cpi 'a' ; lowercase?
rc ; (no, less than 'a')
cpi 'z'+1
rnc ; (no, >= 'z')
ani 1101$1111b ; yes, make uppercase
ret
Figure 2-4. A subroutine to make an ASCII letter uppercase.
The first five instructions do a range-check on the letter and exit if it isn't a lowercase letter. The second and third compare the letter to the constant a and return if it's less. The alphabet, as we usually think of it, doesn't recognize the concept of "less"; even so, up to this point most people would agree that the program is dealing with alphabetic letters.
In the fourth instruction we shift to another view of the letter. Here we want to test the letter against z but, in order to set the Carry flag for all cases when the letter is less than or equal to z, we has to test against a value greater than z. The expression 'z'+1 only makes sense if we think of z as a number, not a letter.
The subroutine finally makes the letter uppercase by setting its bit 5 to zero. That operation only makes sense if we think of the letter as a pattern of bits. After long experience with assembly language, I find such shifts in point of view very natural, but they do give newcomers a lot of trouble.
It is a mental strain to work with materials whose shape depends on our angle of view, and every increment of mental stress adds to the time-cost of making a program. But the strain is only present while we are designing and coding the operation. If we code it once in a subroutine like Figure 2-4, we may then forget all its internal details. The symbolic name of the subroutine becomes the abstract function "make an uppercase letter." Thereafter we need only write
lxi h,LetterByte ; point to letter
call uppit ; get it as uppercase
without regard to the details of the process. Naive writers on programming will tell you to use subroutines because they make the program smaller (the instructions don't have to be repeated at each place they are used). That's true. However, the true economy of a subroutine is that it reduces the mental load on the programmer. From that point of view, it can be economical to create a subroutine that is used only once.
The toolkit used in this book contains a number of functions that, like Figure 2-4, modify or classify single characters.
A lone character has limited uses. Often we need strings of them. A string can be a message, or part of one; it can represent one line of a file; and tables of strings are helpful for decoding complicated user input. Most high-level languages recognize the string as a fundamental data type. Assembly language does not; it supports only independent bytes. However, it gives us the tools we need to define our own string data type. We only have to decide how a string should be represented in storage.
There are two common ways of representing strings. In both, a string is a sequence of letters in adjacent bytes. In one method, the string is preceded by a count of the bytes in the string. For instance, a 6-byte string that could be as long as 10 bytes would be defined this way.
str: db 6 ; current length
db 'abcdef' ; contents
ds 4 ; unused space
This representation of a string is used by several Pascal compilers, but hardly ever in assembly language. You can spot the languages that use it; they restrict strings to a maximum length of 255 bytes because they have to fit the count into the leading byte. This string form has the advantages that it is easy to discover the string's length (just pick up the count) and it's easy to find the end of the string (add the string's length to its address). But nothing else you might do with a string is easy because you are forever patching up the length-bytes.
The other method leaves the length of the string implicit, marking its end with a special delimiter that can't otherwise appear in a string. A variety of delimiters have been used. The CP/M BDOS marks the end of a string with the ASCII currency symbol in some of its functions. Some programmers, when space is at a premium, will mark the end of a string by setting on the high bit of the last character. But the most common delimiter is the null byte, a byte with a numeric value of zero.
The same constant string (six bytes in a 10-byte string space) would be defined this way, using a null delimiter.
str: db 'abcdef'; contents
db 0 ; delimiter
ds 4 ; unused space
With this convention, it takes time to find the end of a string or to learn its length (you have to inspect each byte in turn until you find the null byte). But it is easy to copy a string (just copy bytes until you have copied the null) and to append one string to another (find the null in the first, then copy the second through the null that ends it).
It is particularly easy to compare two strings in this format. A subroutine that does it appears in Figure 2-5. One nice feature of this string format is that when one string is a leading substring of the other, the shorter one will automatically appear as "less."
; STRCMP: compare the strings addressed by DE and HL.
; Return the CPU flags set as for first minus second, and
; return the pointers updated to the first inequality.
strcmp: ldax d ; first string's byte
cmp m ; ..versus second string
rnz ; (unequal)
ora a ; equal ending nulls?
rz ; (yes, return Z true)
inx d
inx h ; try next bytes
jmp strcmp
Figure 2-5. A subroutine to compare two strings
Null-terminated strings have the nice property that every trailing substring of a string is also a string. The string abcd0 (using 0 to stand for the terminating null) is a string, but so are bcd0, cd0, and d0. So indeed is the terminal null byte; it's the null string. This property means that, for example, if we are pointing to a string that has leading blanks, we can increment the pointer past the blanks and still be pointing to a string. It might now be the null string, but otherwise it needs no special handling.
This string type is a very useful abstraction. The subroutines in this book include a comprehensive set of tools for creating and manipulating strings in assembly language.
Only two numeric data types are native to the Z80 CPU: the unsigned 8-bit integer and the unsigned 16-bit integer -- in other words, the binary byte and the binary word. The only arithmetic it can do on them is to to add or subtract them, or increment and decrement them by one. A lot can be done with only these abilities, but sometimes we need more.
Sometimes we need other kinds of numeric data. One useful type is the signed integer, a number that can record negative as well as positive values. Occasionally we need the operations of multiplication and division. Multiplication and division of unsigned values can be done with subroutines, and all four arithmetic operations on signed values require subroutines. Subroutines to multiply and divide unsigned integers, and to add, subtract, compare, multiply, and divide signed integers, are part of the toolkit developed in this book.
When two 16-bit integers are multiplied together, the result may be as much as 32 bits long. An integer of this size is an awkward thing for the Z80 to handle. It takes more than half of the CPU's registers just to hold it! Nevertheless, the data type of the 32-bit (4-byte) integer turns out to be useful, especially in file operations.
Under CP/M 2.2, a disk file may be as long as eight megabytes: 8,388,608 bytes, to be exact. Under CP/M Plus, it may be four times as large, or 33 million bytes. If we want to note our position in a file exactly to the byte -- and we do -- we must be able to note a number that may occupy 25 bits. If we want to convert a byte-address within a file to a record count, we have to be able to divide such a number by an integer.
Accordingly, our toolkit must contain at least some support for working with 32-bit unsigned integers, or "longwords" as we will call them. The toolkit routines for 16-bit multiplication return longwords; there is a routine to divide a longword by a word; and there are routines to add, subtract, and compare longwords.
These numeric types -- bytes, signed and unsigned words, and longwords -- are all binary numbers. We must have a means to convert between the binary representation of a number and the ASCII digits that we can display, print, or type on a keyboard. This is where the numeric data types and the string data type come together. The toolkit contains a set of functions to convert strings of ASCII digits into binary values, and vice versa. If we have a string of digits (either decimal or hexadecimal), we can convert those characters into the binary number they represent. If we have developed a binary number, we can convert it to digit characters and append them to a string.
The file is another abstract data type. The bulk CP/M itself is concerned with supporting this abstraction. To a CP/M program, a file is a sequence of bytes that it can create, write, read, rename or erase by calling on the BDOS with appropriate arguments.
This a great convenience. The operating system's file services shield us from a world of messy details -- we needn't worry about disk space allocation, or sector and track numbers, or sector sizes, or I/O interfaces. All we have to do is point to a CP/M file control block and say, "do it, please," and it will be done. Furthermore, the same "do it" request will work correctly in another system with different disk hardware, and under other versions of the operating system such as MP/M.
Useful though it is, the CP/M file system has some shortcomings. Although it claims to present a file as a sequence of bytes, it really stores it as a sequence of 128-byte records. There are too many places where we have shift points of view, thinking of a file at one time as a sequence of bytes and at another as a sequence of 128-byte blocks.
Another problem is the lack of device independence. Under CP/M, there is one set of service requests for dealing with files and a completely different set for dealing with the console, printer, and auxiliary devices. That's too bad, because with few exceptions these character devices could be treated just like files, and there are many advantages to doing so.
Another failing is that there is no connection between the file abstraction and the other abstract data types, especially integers and strings. We'd like to be able to read or write data in units that are strings, or words, or longwords, but the only data unit that CP/M can transfer is the 128-byte record.
There is also the problem of filespecs, the command tokens that the user enters to name a file. The user names a file as "d:filename.typ," but the program must parse that string into the file control block before CP/M can use it. Not only is this a tedious bit of processing, but the program must also check the string for validity (CP/M won't), and must check to see if it is ambiguous.
A related problem is the sticky one of file passwords. CP/M Plus supports them while CP/M 2.2 does not. Under CP/M Plus, a complete filespec is "d:filename.typ;password." The program must recognize the password and take special steps to present it to CP/M when the file is opened, or to assign it when a file is created. Furthermore, a good program should be able to tell when a file password is needed and prompt the user to enter it -- but only if it was omitted. All these filespec problems make it a major operation to get a file opened for processing.
All of these problems can be solved, and their solution is a major feature of the toolkit presented in this book. It contains a set of functional abstractions for dealing with files, abstractions that make of a CP/M file a true abstract data type that interacts smoothly with the other abstract types. The design details are complicated, and we'll defer them to the second part of the book. In the first part we will concentrate on using files.
In order to use an abstract file, you have to use assembler macros. But macros and relocation are separate topics. Let's turn to them now. We will return to files in the the next chapter.
Every assembler gives us two tools for abstraction, symbolic names and subroutines. A macro assembler gives us a third: the macro. In essence, a macro is a packet of assembler statements that we can invoke with a single line. We define the macro just once. Wherever we want that packet of lines inserted in a program, we write only the name of the macro. The assembler replaces it with the lines we defined for it.
Let's demonstrate this with an example. Recall Figure 2-4, the subroutine named uppit. Suppose that, for some reason, we expected to have to make the byte Letter uppercase at several places in a program. Furthermore, uppit doesn't affect the byte in storage; it returns the altered byte in register A. Therefore at several places in the program we are going to have to write this sequence of lines
lxi h,Letter
call uppit
mov m,a
Besides, at some of those places, we won't want the previous contents of registers A and HL destroyed when this is done.
Very well, we will write a macro and name it letterup (Figure 2-6). That done, we can write the single line letterup wherever we intend to make the value of Letter uppercase. The assembler will replace the one line with the seven lines defined for the macro. This is called "macro expansion"; the assembler "expands" our one-line macro call by replacing it with the body of the macro definition.
letterup macro ; open macro definition
push psw ; save A
push h ; save HL
lxi h,Letter; point at byte
call uppit ; get as upcase
mov m,a ; put back
pop h ; restore HL
pop psw ; restore A
endm ; close macro defn.
Figure 2-6. A macro to make the byte Letter uppercase.
There are several ways to think about what we have accomplished with Figure 2-6. The simplest is to say that we have used the assembler to save ourselves time at the keyboard, and we have.
Another way is to say that we have used the assembler to create a new machine instruction, the letterup instruction. It's a special-purpose instruction which happens to be composite, comprising seven ordinary instructions.
The most general way to think about it is to say that we have used the macro feature to create a new abstract function. As a result of our coding the macro, the name, letterup, has come to stand for the function, make-the-byte-Letter-be-uppercase. Wherever in a program we need that function, we need only code the name.
Notice that the letterup abstraction has been built upon another abstraction, the one implemented by the subroutine uppit. The macro provides the function of the subroutine plus saving and restoring registers. We will often build one abstraction on another until we have produced a whole heirarchy of them.
If that were all there was to macros, they would still be useful, but there is more. A macro can be written to take parameters (or "arguments" or "operands" -- the words should have different meanings, but they've been so abused that they mean almost the same thing).
A macro parameter is a portion of the macro that is to be supplied at the time the macro is processed. When we define the macro, we refer to the parameter by a symbolic name. When we use the macro, we supply data to be substituted for the parameter-name wherever it appears in the macro expansion.
Parameters let us make a macro general rather than specific. We can demonstrate this by rewriting Figure 2-6. A macro that operates only on a byte name Letter is specific to that label. We should define instead the macro upany (Figure 2-7). This macro takes as its only parameter the address of the byte to be made uppercase.
upany macro which ; parameter-name is "which"
push psw ; save A
push h ; save HL
lxi h,which ; point at byte "which"
call uppit ; get as upcase
mov m,a ; put back
pop h ; restore HL
pop psw ; restore A
endm ; close macro defn.
Figure 2-7. A parameterized macro to make any byte uppercase.
Compare Figure 2-6 and Figure 2-7. They differ in only two lines. In Figure 2-7, the first line notifies the assembler that this macro takes a single parameter whose name is "which." In the fourth line there is a reference to which; when the assembler expands the macro it will replace the characters "which" with whatever characters the programmer wrote following the name of the macro. At one point in the program we might write
upany Letter
with the result that the assembler will produce the line
lxi h,Letter
At another point we might code
upany String+17
and the assembler will dutifully produce
lxi h,String+17
as one of the lines of the macro expansion. In this way a macro can become a general functional abstraction.
The Digital Research assemblers support conditional assembly, a means of controlling the assembler so that different code is produced depending on the contents of the source program. This finds its greatest use within macros. One common use is in checking the parameters of macros. As shown in Figure 2-7, the upany macro doesn't check its parameter in any way. If we thoughtlessly omit the parameter,
upany
the assembler will replace the parameter name "which" with the null string, producing the line
lxi h,
Then it will discover that it can't assemble such an instruction and flag that line as an error. But the cause of the error won't be obvious. We can trap the error and issue a diagnostic message if we rewrite the macro as shown in Figure 2-8.
upany macro which ; parameter-name is "which"
if not nul which
push psw ; save A
push h ; save HL
lxi h,which ; point at byte "which"
call uppit ; get as upcase
mov m,a ; put back
pop h ; restore HL
pop psw ; restore A
else ; "which" was null
+++ Address of byte is required
endif
endm ; close macro defn.
Figure 2-8. A parameterized macro with a check for an omitted parameter.
The assembler will expand all of the lines of the macro, replacing every occurrence of which with the given parameter, just as before. After expanding all eleven lines, it will process them just as if they had been written into the program at that point.
Now, however, the lines comprise a conditional assembly -- one bounded by if, else, and endif lines. The assembler will process the if line, which instructs it to test a condition. The condition in this case is "not nul" followed by whatever parameter was given. That condition is satisfied if any nonblank characters follow the word nul. If a parameter was given, the condition is true, and the assembler continues working up to the point at which it finds the else line; then it skips lines until it finds endif. The effect of the macro expansion will be exactly the same as if we had used the macro of Figure 2-7.
If we omit the parameter, however, something different will happen. The assembler will still expand all eleven lines of the macro body and begin to process them. But the condition of the if line will not be satisfied. After expansion, it will consist of only
if not nul
because no parameter was given and so which was replaced with the null string.
Since the condition is not satisfied, the assembler will begin skipping; it will not assemble anything until it has seen the else line. When it begins assembling again, it will find the line
+++ Address of byte is required
That is not a valid assembly statement. It's a deliberate error. The assembler will display it with an error flag. The line doesn't say anything to the assembler or the CPU, but it gives the programmer a better handle on the source of the problem.
The conditional assembly feature can be used within macros to make them more useful or more flexible. To see how, let's rewrite the upany macro once more.
As written in Figure 2-8, the macro abstracts the idea of "make a named byte in storage uppercase." That might be handy, but there are times when we want to make a byte uppercase when we can't refer to it by a symbolic expression. Perhaps we have computed its address by adding together a base address and some other factor. Now its address is in register HL, but we can't give a symbolic name for it, and therefore can't use the macro. We could just write the subroutine call instead:
push psw ; save A
call uppit
mov m,a
pop psw
Besides being tedious, that might confuse a later reader who would waste time figuring out why we didn't use the macro here.
We'd like the macro to handle this case. We need a way to tell it that the address has already been loaded into HL and therefore it needn't generate the instructions to save and load HL. The only way to do that (with the Digital Research assemblers; others have better methods) is to define a special symbolic name, and to test for that name in the macro. Suppose that, early in the program, we had defined the name +H to the assembler:
+H equ 0FFFFh
If we can assume that's been done, we can rewrite the macro as shown in Figure 2-9.
upany macro which ; parameter-name is "which"
if not nul which
push psw ; save A
if which ne +H
push h ; save HL
lxi h,which ; point at byte "which"
endif
call uppit ; get as upcase
mov m,a ; put back
if which ne +H
pop h ; restore HL
endif
pop psw ; restore A
else ; "which" was null
+++ Address or +H required
endif
endm ; close macro defn.
Figure 2-9. A macro that uses conditional assembly.
If we give this macro a parameter that is any expression other than +H, it will produce exactly the same lines as the one in Figure 2-8. But if we invoke it with the line
upany +H
the assembler will find the conditions of the two inner if statements to be false. As a result, it will skip assembling the lines that save, load, and restore register HL. The special parameter +H serves to tell the macro, "don't bother saving and loading the address, I've done it for you."
(This technique works with the assembler named mac, but it does not work as shown with rmac. A more involved method, described in Part II, is really required.)
All of these macro techniques, and some that haven't been mentioned, have been put to use in building the tools in this book. To begin with, every function in the toolkit is accessed by way of a macro. These macros validate their parameters as fully as they can, and produce specific messages when necessary parameters are omitted. Most of them use the technique of special names for registers.
The contents of the macros are explained at length in Part II of the book. However, you don't have to know their contents in order to use them as we will be doing here in Part I; you only need to know how they are employed.
The toolkit macros are defined in a single macro library named environ.lib. It is made part of an assembly with the single statement
maclib environ
The assembler primes itself with the toolkit macros before continuing with the assembly. The environ maclib contains
The macros, their functions, and their parameters are listed in an appendix and are summarized for quick reference on the end-papers of the volume.
Simple assemblers like asm provide symbolic names and conditional assembly. Macro assemblers like mac add the ability to define and use macros. There is a third level of capability and it, too, enhances our ability to create abstractions. This is the ability to construct independent modules, and to create a final program by linking an assortment of modules together. An assembler that supports this is commonly called a relocating assembler -- although relocation is the least important part of it.
To a simple assembler, a program is a single source file and it is assembled in a single run of the assembler. There is no relation between the code produced in one assembly and that produced in another. As a result, the output of an assembly has to be a complete, self-contained program. Every function required by that program has to be part of its source text, because there is no way (or at least, no easy way) to combine the output of two different assemblies into a single program.
A relocating assembler does not force this assumption on us. The input to a relocating assembler does not have to define a self-contained program. It may be the source of a module: a portion of a program that is logically separable from other parts, but not complete in itself. The assembler provides three features that, together, make it possible to link together the output of many assembly runs into a single program.
The first two features have to do with symbolic names. We may tell the assembler that a particular name is external, that is, not defined by any statement in the current source file. The assembler takes it on faith that the given name will be defined somewhere, sometime, in another assembly. It includes in its output a note to the effect that name so-and-so is required to complete this module. It also writes notes to designate all the places in the object code where the address of name so-and-so is used in an instruction.
The complement to an external name is a public name. A name that is defined within the current source file may be be designated as public. This tells the assembler that access to the name will be required by other modules. The assembler does nothing special with the name except to place in its output a note to the effect that name such-and-such is defined at a certain offset in this module.
These special name-handling features are almost enough to allow modularity. Already you can imagine a program that would read the object code of two or more modules and splice together their name-references. It could see what names were defined as public, and what names were required as external references; then it could supply to the external references the addresses that correspond to their definitions.
Let's illustrate this with a simple example. We will begin by converting our uppercase subroutine, Figure 2-4, into a complete assembly source file (Figure 2-10). This requires only the addition of a public statement to make the entry-point label of the subroutine available to other modules.
Two other, optional, lines have been added in Figure 2-10: a name statement causes the module's name to be part of its object file, and an end statement tells the assembler the source is complete. The assembler doesn't require the end line; the physical end of the file would serve. The name statement names the module within an object library.
name uppit ; module name
public uppit ; entry-label is public
uppit:
mov a,m
cpi 'a' ; lowercase?
rc ; (no, less than 'a')
cpi 'z'+1
rnc ; (no, >= 'z')
ani 0ffh-20h; yes, make upper
ret
end
Figure 2-10. The uppit subroutine as a complete module.
If it were placed in a file uppit.asm, the source text shown in Figure 2-10 could be assembled by rmac. The output would be another file, uppit.rel, which defines the object code of the subroutine. It isn't a complete program; it doesn't do anything that would be useful as a CP/M command. It is, however, a logically-separable part of a program, one that realizes the functional abstraction of converting a letter to uppercase.
Now we need a way to combine this module with another program. Suppose we were writing a program in which we had need of uppit. Here is part of it:
extrn uppit
lxi h,LetterByte
call uppit
The extern statement tells the assembler that the name uppit is not defined anywhere in the current source file. Instead we promise, cross our hearts and hope to die, that the name uppit will be defined as public in some other source file. The assembler believes us. When it assembles the call uppit statement, it doesn't try to put an address in the call instruction. It puts only zeros there, and inserts a note in its output saying "this call instruction won't work until it has been patched to point to something called uppit."
The program that weaves together these interlocking name-references is called link; it is part of the rmac software package. It processes the output of one or more assemblies to produce a runnable program. We could finish our program with the command
A>link program,uppit
The link program would read program.rel and uppit.rel and combine them. It would note the public name uppit in one and the external reference to the same name in the other, and it would patch the call instruction so that it pointed to the code of the uppit subroutine. Its output would be the file program.com, ready to execute.
Notice what this gives us. The subroutine uppit only needs to be written once; in it, we put our idea of how a certain abstract function is to be implemented. It needs to be assembled only once, also. After all, once we have defined how to do this task, how often will we need to change it? The tiny file uppit.rel is all we need. In any program where we need the function, we can write an extrn statement for uppit, and include uppit when we link the program. Even that can be simplified, as we'll see.
But we have left a loose end. We actually use uppit by way of the macro upany (Figure 2-9). It's the macro name that represents the function to us, not the subroutine name. It's all too likely that we'll employ the macro without remembering to declare the subroutine as external. If we do, the call statement in the macro expansion will produce an assembly error type "U" because the name uppit will be undefined.
This is easily fixed. All we have to do is to add the extrn statement to the macro body (Figure 2-11). When the macro expands, the statement will be processed. The assembler will note the need for uppit in the object file, the linker will add it to the finished program, and all will be well. If we use the macro several times, several extrn statements will be generated. That causes no problems with the Digital Research assembler and linker, although other products might prohibit it.
upany macro which ; parameter-name is "which"
if not nul which
push psw ; save A
if which ne +H
push h ; save HL
lxi h,which ; point at byte "which"
endif
EXTRN UPPIT
call uppit ; get as upcase
mov m,a ; put back
if which ne +H
pop h ; restore HL
endif
pop psw ; restore A
else ; "which" was null
+++ Address of byte is required
endif
endm ; close macro defn.
Figure 2-11. A macro that calls an external subroutine.
I have glossed over the linker's other task, relocation. Consider: at the time it is processing a source file, the assembler cannot possibly know where the object code is going to be located in storage. Nor can we know it. Oh, if the source file represents the main part of a CP/M command, we know that it will have to be located at 0100h, the base of the CP/M transient program area. But when we are assembling a subroutine like the one in Figure 2-10, neither we nor the assembler can tell where the code will finally reside. It depends on the size of the program to which the subroutine will be appended. By the same token, the assembler can't predict where an external name will be when the program is finished.
Many Z80 instructions, especially jumps and calls, contain operands that are 16-bit address values. These addresses depend on the final location of the code that they refer to. Yet the assembler cannot know where the code will be! How can it finish these instructions?
The answer, of course, is that it doesn't finish them. It leaves room in the object code for the addresses, but it doesn't try to put values in them. It does include notes in the object file that say, in effect, "this word refers to an offset of x bytes within this module." Everything else is up to the linker.
The linker is the program that knows the final location of each piece of code. It puts the first .rel file at address 0100h; all the rest follow it. As it prepares each module, link updates all the addresses so they refer to the location of their final targets.
The rmac product is composed of three programs. We've already discussed the assembler, rmac, and the linker, link. The third program is a library manager, lib.
Its purpose is to build and maintain libraries of object modules like uppit.rel. It is easy to accumulate a collection of dozens, even hundreds, of useful little modules. It is awkward and inefficient to keep each one as a separate .rel file and to name it in the link command. Instead we collect them in related groups as object libraries ("relocatable libraries" in the Digital Research documentation). The lib command is used to build an object library, to list its contents, or to replace a module within a library.
The lib program will build either of two types of library files. Both have the same contents, a collection of modules. The simplest is just a concatenation of the modules that go into it. Such a library has the filetype .rel.
The second type is called an "indexed relocatable library" and has the filetype .irl. A file of this type commences with a table of module-names and the file offsets at which they commence. Both the lib and the link program can use this tabular index to locate a module quickly.
Suppose that we already had an object library named misc.irl. We could add the file uppit.rel to the library with this command.
A>lib misc.irl[i]=misc.irl,uppit
The lib program's peculiar syntax becomes more understandable if you keep in mind that it always builds a new file from one or more old files. The new file is named on the left of the equals sign. The old files that go into it are named in a list to the right of the equals sign. The command above can be read as "Lib: create misc.irl (which is to be an indexed relocatable library) from the contents of misc.irl plus uppit.rel."
Notice that giving a filetype of irl to the new file is not sufficient. You have to include the option [i], or lib will build an ordinary library.
Should we alter uppit and reassemble it, we could update it in the library with this command.
A>lib misc.irl[i]=misc.irl<uppit>
Read that as "Lib: create misc.irl (which is to be an indexed relocatable library) from the contents of misc.irl, replacing the module whose name is uppit with the file named uppit.rel." (We put name statements in module source files, as in Figure 2-10, so we can refer to them in such commands.)
When we have uppit in an object library, we can link a program that uses it with this command.
A>link program,misc.irl[s]
The option [s] after the library name means "selective search"; it tells link to include only the modules from this library that are specifically required. Lacking the option, link will include everything in the library whether it is referenced or not.
The toolkit used in this book is kept in one object library, environ.irl.
We have achieved the acme of abstraction allowed by the Digital Research assembly products. We have defined an abstract function, that of making a byte uppercase. We implemented the simplest, most general case of the abstraction as assembly source, then stored its object code in an object library.
We defined a macro as an interface to the abstract function. The macro builds on the simple subroutine by saving, loading, and restoring registers. The macro also declares the subroutine as external so that link will include it.
When these steps have been done, all we need to do in order to use the abstract function is to include the macro library that defines it in our programs. Well, we do have to remember the name of the macro and what it wants in the way of parameters. However, all that's needed to invoke the function is to write of the macro name and its parameter. The macro will take care of setting up the registers that the subroutine needs. The assembler will note that the subroutine is needed. The linker will search for it and append it to the linked program.
In the next chapter we will experiment with these tools by writing some simple file-copy programs, and we will study some of the features of the file abstract data type
We have one more element of the programming craft to discuss. A craftsperson draws a plan before starting work. That step is crucially important in programming. Here we will write write a small program, using it as an example of planning and of using the toolkit macros.
For a first exercise, I propose a program that is very simple, a mere finger-exercise, yet one that is quite hard to do well in any but assembly language. Furthermore, I have seen programs like it advertised for sale for $25, so right here we are going to justify the cover price of this book.
The purpose of the program is to accept lines of input from the keyboard and duplicate them on the printer -- in other words, to turn your expensive CP/M system into a mere typewriter. There are good uses for such a program. You can use it to address an envelope, for instance, or to put a note on a listing.
It is possible to drive the printer from the keyboard using standard CP/M commands. The Control-P keyboard signal makes the BDOS echo each command and its output on the printer. That has its uses, but it won't let you address an envelope; at least, not unless you want each line of the address to commence with "A>."
You can drive the printer from the keyboard with pip by giving the command
A>pip lst:=con:
Unfortunately, pip reads keyboard input one byte at a time. When a program does so, none of the normal input editing keys work. If you make a typo, the typo is printed at once. If you backspace to correct the typo, the backspace is sent to the printer, followed by the overstruck correction. (Many printers ignore backspaces, so both letters appear, making things even worse.) Furthermore, pip echoes only the keys it receives. In particular, when you end a line with the Return key, only the Return code is sent. The Linefeed code that CP/M normally adds isn't sent. So you have to press both Return and Linefeed at the end of each line.
What we want, then, is a program that will read complete lines from the keyboard, permitting the full range of line editing that the BDOS supports. Support for line editing is especially important with CP/M Plus, which allows you to make corrections at any point in the line. It's still useful with CP/M 2.2, which at least permits you to backspace to an error. When the line is complete, the program is to copy it to the printer. This process is to be repeated until we are done.
The preceding paragraph is a plan of sorts, but it has to be formalized. In Figure 3-1 you will see a first pass at a formal plan for the typist program.
typist
Keyboard is a file that represents the console.
Printer is a file that represents the printer.
Line is a space for a string of characters.
repeat
read a line from Keyboard into Line
write Line to Printer
until done
end.
Figure 3-1. First-draft pseudo-code of typist.
That plan is rendered in pseudo-code, a notation for planning programs. A pseudo-code is any notation that mixes the few, rigid, control structures allowed by good programming practice with free-form words whenever we want to defer thinking about irrelevant details.
A pseudo-code plan is for use by people, not by programs, so it may use any notational conventions you like. My personal pseudo-code style mixes English with forms taken from real programming languages. You are free to develop your own pseudo-code style, one that suits you taste and the way you think. The style should force you to state the shape of the problem in the formal, explicit manner of a programming language while not impeding your thinking with excess detail.
There are four reasons to write a plan in pseudo-code. The first is that it forces discipline on a verbal specification, giving it structure. That structure reveals much more precisely what the program will entail. Often a problem that sounds simple in English turns out to be very difficult to do. It's better to find that out while planning than while coding.
The second reason is that we make discoveries as we labor to translate fuzzy words into the strict forms of a program. We discover which things in the program will be hard to do and which easy. We discover that down here we will need to use something that we could have stored back up there. We discover that we will have to do the same procedure at three different places, and therefore it should be a subroutine. Or we discover that we have to do in this program something that we already worked out while planning an earlier one.
The third reason is that we can experiment with a pseudo-code plan. It's close enough to a program that we can make initial judgements about the algorithm we will use. We can write two versions of a procedure and decide quite accurately which version will run faster or use more working storage. We can erase, cross out, revise in every way; and we can do it with much faster "turnaround time" than if we were doing the same experiments in a real programming language. The flexibility and power of the pseudo-code "editor" and "compiler" are really amazing when you consider that they consist of nothing more than a yellow pad and a felt-tip pen.
The last reason is that the actual program is much easier to write when we can work from a good pseudo-code plan. One reason assembly language is hard to use is the number of niggling details that we have to keep track of: the contents of the registers, the correct jump condition to use, and so on. But these matters are local problems that can be worked out while looking at a span of code no larger than one screenful. They aren't difficult to solve, provided we are not at the same time trying to solve global, algorithmic problems. It's just not possible to work out the correct use of the stack and the shape of the main loop at the same time. But if you have made all the big decisions and recorded them as pseudo-code, the coding details are easy to cope with.
Let's return to the design of the typist program. The first draft of a plan appears in Figure 3-1, and it is nearly enough to code from. (I can say that because I know there are toolkit macros that correspond to each of the major lines in Figure 3-1.) There's only one change that should be made in it. The loop condition, "until done," is vague. When is "done"? The answer requires a digression on the nature of the file abstract type.
One of my objectives in designing the file-handling tools was that all files were to be handled alike, whether they were disk files or CP/M character devices. As much as possible, an input file was to be an input file regardless of whether its contents came from a disk, or the keyboard, or a modem. And it worked out that that could be done (the details are in Part II).
Another principle was there were two types of files, ASCII and binary. An ASCII file contains ASCII characters grouped in lines, and its end is marked by the Control-Z byte or by physical end of file, whichever comes first. A binary file contains any sort of bytes; has no internal structure except as the program imposes one; and it ends only at physical end of file. The difference between these two types of file lies entirely in how the program treats them. If it reads a file with ASCII-type macros, the file will be given ASCII-type treatment; if not, not.
Now, it is my plan in typist to treat both the console and the printer as ASCII files. That means that the end of the input file will be marked by receipt of a Control-Z byte. (It can't be marked by physical end of file, because there is no such thing as the "end" of a device.) The functions that read ASCII data return a signal when they find a Control-Z byte.
That is what "until done" amounts to, then: the appearance of logical end of file on the input, as signaled by the function that reads a line. We can express this in the plan by rewriting it as shown in Figure 3-2. In it, the pseudo-keyword break means "exit the loop right now."
typist
Keyboard is a file that represents the console.
Printer is a file that represents the printer.
Line is a space for a string of characters.
loop
read a line from Keyboard into Line
if end-of-file, break
write Line to Printer
repeat
end.
Figure 3-1. Final draft pseudo-code plan of typist.
Since it doesn't do any processing of the data, the typist program consists almost entirely of calls on toolkit functions. As a result, its assembly code (Figure 3-3) is almost a line-for-line translation of the plan. Read it now, then let's examine it together.
; TYPIST -- echo keyboard lines to printer
maclib environ
dseg
linesize equ 128 ; max line we will read
keyboard:
confile
printer:
lstfile
line: strspace linesize
cseg
prolog
loop: fgetstr keyboard,line,linesize
rz
fputline printer,line
jmp loop
end
Figure 3-3. Source code of the typist program.
Many of the lines of the program are calls on toolkit macros. In a minute we will talk about these in the order they are used. Remember, however, that all of these macros are documented in the Appendix to this book.
Figure 3-3 is, of course, an assembly source file. It is written for assembly by rmac, a relocating assembler. That explains the two statements dseg and cseg, which you may not have seen before. Relocating assemblers distinguish between a "data segment" and a "code segment." These portionss of the program are kept separate. At any point in the program the assembler is producing object code for one segment or the other, and these statements switch between them.
The program begins in the data segment by defining two files with the statements
keyboard:
confile
printer:
lstfile
The words confile and lstfile are the names of macros. They are declarative macros; that is, macros that expand to lists of static data. Declarative macros are normally placed in the data segment, although they don't have to be.
Each of these declarations expands into a "file control record," an assemblage of bytes and words that will represent the file to the toolkit functions. There is a general-purpose macro for declaring a file; it is named filedef and we will use it later. The macros used here are special cases of filedef that make it easy to define files that specifically represent the console and the printer.
The line
line: strspace linesize
calls on another declarative macro. The strspace macro declares space for a string of some length -- in this case a length of linesize, or 128 bytes. The macro assembles to a single null byte plus the requested amount of undefined space. In other words, it reserves room for a string of that size, and initializes the space to the null string.
Declarations done, the program switches to the code segment, where executable instructions are always assembled. It invokes the prolog macro because a call on prolog must be the first executable statement in any program that uses the toolkit. This macro expands into a few instructions that
and then call the instructions that follow prolog as a subroutine. Everything that follows prolog is a subroutine of it; therefore the main program may end with a simple return instruction. When it does, the remaining instructions in the prolog expansion return to the operating system. Under CP/M Plus, they also set the Program Return Code to a value of "success."
The formalities complete, Figure 3-3 gets down to the business of the program, which takes exactly four lines to conduct. Here they are:
loop: fgetstr keyboard,line,linesize
rz
fputline printer,line
jmp loop
Two of these are macro calls. The fgetstr macro gets a string from a file. It requires three parameters: the address of the file, the address of a space to receive the string, and the maximum length of the space. In this macro the keyboard file is passed as the file, the line string space will receive the data, and the constant linesize is used to specify its maximum length. (In Figure 3-3, find the three places where linesize is named. Do you see its purpose?)
Reading a string is an ASCII-type operation. The fgetstr function takes bytes from a file and stores them in a string until it sees a Return byte, or a Control-Z byte, or until the string space fills up. If it stops on a Control-Z byte, it returns the Zero flag true; otherwise it returns it false. As a result, our pseudo-code statement "if end of file, break," can be implemented as the instruction rz, meaning "if fgetstr saw a control-Z byte, quit."
As you can probably guess, the fputline macro writes a string to a file. It also writes a terminating Return and Linefeed pair. (There is a function fputstr that writes the string but not the Return and Linefeed. These macros are related in the same way as the write and writeln procedures of Pascal, or like BASIC's PRINT statement with and without a terminating semicolon.)
The source file of Figure 3-3 can be assembled with a command such as
A>rmac typist $lb px sz -m
You may not be used to assembler options. Their meanings are
The last option simplifies the listing; without it the tedious and uninformative macro expansions obscure the listing. (I'm not trying to hide anything; feel free to display the macro expansions if you want to. You'll soon find that they clutter your neatly-typed logic without adding any information.)
You can see the result of that assembly command in Figure 3-4. It doesn't add a great deal to the source file; so little, in fact, that I almost never keep an assembly listing. A listing of the source file is sufficient as a record of the program.
A>rmac typist $lb px sz -m
CP/M RMAC ASSEM 1.1
; TYPIST -- echo keyboard lines to printer
maclib environ
dseg
0080 = linesize equ 128 ; max line we will read
keyboard:
0000 confile
printer:
00C0 lstfile
0100 line strspace linesize
cseg
0000 prolog
loop:
0037 fgetstr keyboard,line,linesize
0047 C8 rz
0048 fputline printer,line
005C C33700 jmp loop
005F end
005F
076H USE FACTOR
END OF ASSEMBLY
Figure 3-4. Console output during the assembly of Figure 3-3.
As soon as the assembly is complete, the program can be linked. The resulting console display appears in Figure 3-5, and it deserves comment.
A>link typist,b:environ.irl[s]
LINK 1.31
+RAMAA 05D4
+FSGAC 01FD
+FRFIL 03CB
+FBINP 048C
+FBAIM 04EC /FSWORK/ 0653
+STAPP 05A5
+RAMCK 05E4
+RAMLK 062E
ABSOLUTE 0000
CODE SIZE 0553 (0100-0652)
DATA SIZE 03AC (06D3-0A7E)
COMMON SIZE 0080 (0653-06D2)
USE FACTOR 0A
Figure 3-5. The display produced while linking typist.
The bulk of Figure 3-5 consists of a display of all the public labels that link handled while linking the program. You might wonder what all these names signify. The answer is, very little. Most of them are the names of toolkit functions. The toolkit modules call one another with abandon; for example, FSPST, which implements the put-string function, calls FSPAC (put an ASCII character), which calls FSPBY (put a byte), which would call FBOUT if it needed to write a buffer-load to disk, and so forth.
All this has next to nothing to do with the logic of typist, the program we are interested in. There are two things worth noting. First, all the public names used in the toolkit code begin with the at-sign character. That's a device to isolate these public names, avoiding conflicts with public names you might devise.
The second thing to note is the aggregate size of this, a very simple program. According to the messages at the end of Figure 3-5, the final code segment contains 553h bytes (1,363 decimal), and the data segment contains 3ACh (940 decimal). There is a common segment (a separate, named, data segment) of 128 bytes, so the total size of the program is 2,431 bytes.
That seems like a lot for a trivial program, and it is. The typist program could be written in a tenth the space if we were willing to hand-code its file operations. Because of the way the toolkit functions cross-link with each other, there is a minimum size of about 2,500 bytes for any program that uses only device files and about 4,100 bytes in the more typical programs that write to disk. Two things make that acceptable. First, it is still small when compared to the minimum size of a program in a high-level language (compile the comparable program in Pascal or C and check its final size). Second, after this first lump, programs grow very slowly as they become more complex. The increase in size after 4,100 bytes is all in the processing code, not in the support.
Now that it exists as typist.com, we can try out the typist command. There isn't much to it (see Figure 3-6). Each time the Return key is pressed, that line is written to the printer. When the user enters a Control-Z signal, the program quits. An impatient user could also kill this program by entering Control-C; CP/M would then cancel it. We shouldn't encourage our users to do that, however. For one thing, it doesn't work with all programs. For another, Control-C cancellation takes place instantly, without giving the program a chance to clean up after itself.
A>typist
A line for the printer
another one.
^Z
A>
Figure 3-6. Execution of the typist program.
It's an important feature of typist that it permits the operator to use CP/M line editing. It only does so as a result of a special feature of the toolkit input functions. In most cases, the support for fgetstr simply copies one byte at a time from the file to the string space, stopping at the first Return character. That's what it does for a file and for the AUX character device (called the RDR device in CP/M 2.2).
The toolkit functions make a special case of reading a string from the keyboard. In this one case, they call on the BDOS for its service of reading a whole line. It is that BDOS service that supports line editing. Since the system handles it, our programs don't have to. On the other hand, the length of such a line is limited. The BDOS won't read a line longer than 255 bytes, while the toolkit function won't ask it to read a line longer than the buffer associated with the file. In the case of the confile macro, that buffer is only 128 bytes long.
Longer lines, indeed lines of any length at all, can be read from other kinds of files. Longer lines can be read from the keyboard as well, but only by requesting them one byte at a time with a different macro, fgetchar. The disadvantage is that when the keyboard is read one byte at a time, CP/M doesn't supply any line-editing features.
The typist program is a file-copy program written for the special case of copying from keyboard to printer. It has its uses, but the same abilities could be had from a more general program, one that copies from the keyboard to any destination: the printer, the AUX (or PUN) device, or to a disk file. Let's make such a program, and call it keyfile.
The purpose of keyfile is to take lines from the keyboard and write them to some destination. The destination will be named as an operand of the command; it will either be a file or one of the keywords AUX:, PUN:, or LST:.
The keyfile program will serve the same purposes as typist, but may also be used to construct a short disk file or to send a line or two to whatever is connected to the AUX device. Like typist, it will allow line-editing of the input lines. However, it should also display a prompt; that is, some signal that it is ready for a line to be entered.
Once more we prepare a plan in pseudo-code. It resembles the plan for typist but there is more to be said (Figure 3-7).
Keyfile(Destination)
Input is a file that represents the keyboard
Screen is a file that represents the screen
Output is a file
Line is space for a string
Prompt is the string "==>"
verify the command operand
prepare the Input file
prepare the Output file
loop
display Prompt on Screen
read Line from Input
if end of file, break
write Line to Output
end loop.
close the Output file
end.
Figure 3-7. Draft plan for the Keyfile program.
The main loop of Figure 3-7 is much the same as the main loop of Figure 3-3, except for the addition of displaying the prompt. The differences occur outside the main loop, in preparing the files beforehand and closing the output file after the loop ends.
One of the most convenient, and at the same time most awkward, features of the CP/M programming environment is the way that command-line operands are presented to a command program. It is convenient, in that whatever operands the operator may have typed are placed in a known location in storage. The program may parse them and use them in any way desired.
It is awkward because the characters of the command line are simply left, exactly as they were typed, and the program has to parse them into tokens before they can be used. That is not a simple task; for a program the size of keyfile, the code to isolate an operand and assign it as the name of a file can be larger than the code of the main loop. The problem becomes harder as the number of operands increases.
CP/M will have formatted the first two operands into CP/M File Control Blocks (provided they were delimited by spaces, not by tabs), but CP/M doesn't recognize the names of devices for this use; and it doesn't handle operands after the second; and anyway the first two may not have been meant for file names.
The toolkit addresses these problems through two functions. One parses the operand string into tokens, each token a separate string, and reports the number of tokens it found. The other returns the address of a token-string given its number.
With these services in mind, we can expand on the plan line, "verify the operand." What must be verified is, first, that exactly one operand was given. With no operands, the program wouldn't know where to put its output. If there are two or more, the operator has confused this program with another one.
When one operand was given, its format must be validated; that is, we have to make sure that it is a valid file specification, or filespec. That can be done by calling on the toolkit function that assigns a filespec (as a string) to a file. It reports back if the string was not valid, or if it was ambiguous. We mustn't try to use an ambiguous filespec (one like "*.doc" or "abc???.sub") for output.
If we assume the presence of these services, we can expand the plan as follows.
to verify the command operand:
parse and save command operands
if not just 1 operand, abort with a message
assign operand 1 to Output
if invalid, abort with message
if ambiguous, abort with message
The input and output files will be specified as abstract files using the general macro filedef. Such files must be opened before they can be used. Anywhere in data processing, to open a file is to do whatever is necessary to make it ready for use. In the specific context of this book's toolkit, opening a file entails several steps:
In the typist program, we used the confile and lstfile macros. Since these are specific to the console and printer devices, they are "opened" statically at the time the macros are expanded.
The Input file in Figure 3-7 will be prepared by application of the freset macro, which prepares a file for input. The file will be dedicated to the console device, so we know beforehand that freset will discover that it represents a device and that it can support its intended use, which (freset assumes) is that of sequential input.
The Output file will be prepared using the frewrite macro, which prepares a file for output. We won't know what the real destination of the file will be; it will depend on what the the operator gave as a command operand. The frewrite support might find it to be a device like LST: or a disk file. It might find that the destination can't support the implied use of sequential output. That would be the case if the command operand was a read-only device like RDR, or (under CP/M Plus) if it specified a read-only disk file. In such cases, the open function will abort the program for us.
With an expanded plan in hand we can code the program (Figure 3-8). Read it now to see how much of it you can understand or guess at. In a moment we will study each line, but try to get the big picture first.
; KEYFILE destination
; write keyboard lines into file specified by "destination"
maclib environ
dseg
Linelen equ 256
Input: filedef Linelen,,CON:
Screen: msgfile
Output: filedef Linelen
Line: strspace Linelen
Prompt: strconst '==>'
Ughhh: strconst 'I have a problem.$'
cseg
prolog
;verify the command operand Destination
; parse and save command operands
savetail ; save operands, set A to count
; if not just 1, abort w/ message
cpi 1 ; exactly one?
abort nz,Ughhh
; assign operand 1 to Output
tailtokn 1 ; set DE->string of token #1
xchg ; make that HL->token
fassign Output,+H ; assign string to file
; if invalid, abort w/ message
abort z,Ughhh ; Z true if not valid filespec
; if ambiguous, abort w/ message
cpi '?' ; A="?" if ambiguous
abort z,Ughhh
;prepare the Input file
freset Input
;prepare the Output file
frewrite Output
loop:
; display Prompt on Screen
fputstr Screen,Prompt
; read Line from Input
fgetstr Input,Line,Linelen
; if end of file, break
jz done
; write Line to Output
fputline Output,Line
;end loop.
jmp loop
; close the Output file
done: fclose Output
ret
end
Figure 3-8. Source code of keyfile.
Once more the source file follows the pseudo-code closely, since again there are toolkit macros for almost everything that has to be done. The lines
Input: filedef Linelen,,CON:
Output: filedef Linelen
are the first appearances of filedef. This declarative macro expands to a block of 64 bytes which represents a file. Half of that contains a CP/M file control block (FCB), the normal input to the BDOS for file-oriented service requests. The remainder is used by the toolkit functions that support files; it allows them to extend the CP/M idea of a file into a more general, flexible abstract data type.
The filedef macro allows five parameters. The first one is required; it specifies the size this file's buffer is to have. The buffer is a block of storage where file data can be held on its way to or from the file. The buffer space is allocated dynamically when the file is opened; it does not take up space in the program as stored on disk.
This buffer-size parameter is required, and it must be a multiple of 128 bytes. In both cases here, the buffer size is given as Linelen, that is, 256, bytes. For the Input file, that permits receiving a line of up to 254 bytes from the operator. The buffer size for the Output file didn't have to be the same size; it could have been specified larger or smaller. With the single exception of reading whole lines from the keyboard, all toolkit file functions work with any size of buffer. Generally they go faster with larger buffers, but speed isn't a concern in this program, which is limited by the operator's typing speed.
As many as four parameters may follow the buffer-size. When given, these parameters represent the file specification for this file. In full, the parameters of filedef are
filedef buffersize,drive,name,type,password
In the declaration of the Input file, only the name parameter is specified. When a file is given a filespec with the only the filename CON:, having no drive-letter, no filetype, and no password, the toolkit functions will recognize the file as referring to the console. This is how we dedicate the Input file's definition to the console device. (We might better have coded the name KBD:, which the toolkit recognizes as meaning the console device for input only.)
No filespec parameters are given for the Output file. That is because the filespec will be assigned to it later, when the program executes, from the first operand of the command.
The two lines
Prompt strconst '==>'
Ughhh strconst 'I have a problem.$'
declare constant strings. The strconst macro assembles the given constant in the form of a string, that is, terminated by a null byte so that the string functions will handle it correctly.
The code of Figure 3-8 follows the pseudo-code of Figure 3-7 very closely. Indeed, the assembly code was made from the pseudo-code: I edited the pseudo-code file, converting its lines to assembly comments, then wrote the assembly statements between them.
Before we follow the flow of logic in the code, let's consider the abort macro that appears several times. It frequently happens that, in the initialization sections of a program, we want to terminate it with a message. We don't expect the program to abort very often, and aborting is not a detail on which we want to spend a lot of time, but still we have to think about it. The abort macro makes it easy to code these cases.
The macro takes two parameters; its syntax is
abort jump-condition,message-label
The jump-condition is a one- or two-letter condition that you might code as part of a jump instruction in the case where an abort is desired. The message-label is the address of a message that is to be displayed as the program quits.
Unlike the rest of the toolkit macros -- in which I tried hard to avoid optional macro parameters -- both parameters of abort are optional. If the jump condition is omitted, the abort is unconditional; it will always take place if control reaches it. And if the message label is omitted, the macro assumes that register DE addresses the message.
The message issued by an abort is written with a BDOS service request that expects the data to be terminated with a dollar sign, $. (Notice that that was true of the string constant, Ughhh.)
When an abort takes place, its effect is to jump directly to a short piece of code that is produced in the expansion of the prolog macro. This code calls on the BDOS to display the message and then terminates the program. (Under CP/M Plus, it also sets the Program Return Code to a "failure" value.)
All of the aborts in keyfile use the same message, a very unhelpful statement that "I have a problem." In later chapters we will improve on this behavior.
With that background, we can follow the logic of keyfile. The savetail function scans the command tail that CP/M left, and breaks it into tokens wherever it is delimited by spaces or tabs. Each token becomes a string, and all the strings are put away for safekeeping in a block of storage that is allocated dynamically. The count of tokens found is returned in register A. Here, the program tests that count and aborts if it isn't equal to 1.
The tailtokn macro returns a token given its number (counting from 1). It returns the address of the token in register DE, which is the usual way of addressing strings for the string functions. However, the file functions, when taking a string as input, take its address in register HL (they reserve DE to address the file block). Accordingly, the code here puts the token address in HL and invokes the fassign macro. This function accepts a file (here Output) and a string, and assigns the string as the filespec of that file. At this point we have the address of the string in a register, and have no other way of naming it. The macro call specifies that the address of the string is already in register HL.
The fassign function reports two conditions. If the string it receives is not a valid CP/M filespec, it returns the Zero flag true. If the name was valid but ambiguous, it returns a question-mark in register A. The code here checks these two cases and aborts if either is true. The remainder of the program is a straightforward translation of the pseudo-code, and quite similar to typist.
We have built two versions of a simple, but useful, program; we have practiced using pseudo-code; and we have gone over the use of some common toolkit macros in detail. These three chapters have been a lengthy (and perhaps tedious) introduction to the fundamental tools of assembly language programming. We can list them now. The chief one is the mental tool of abstraction in all its forms. The physical tools are used to implement heirarchies of abstractions. We define some common data types and the operations on them; we implement those operations as subroutines; we hide the subroutine interfaces in macros. We use the assembler's naming and macro abilities to do this, and we use the linker and library manager to store the subroutines conveniently and efficiently.
In the rest of Part I we will write ever more complicated programs and create ever-higher levels of abstraction. In the text, I will pay less attention to the details of the tools because they are documented in the appendix. It's not the tools we are concerned with here, but what we can build with them
The program developed in this chapter, although simple, is one of the most consistently useful ones in the book. Its design gives us an excuse to use a table of strings, and to try out the conversion of strings to numbers.
Peripherals just keep getting smarter, don't they? When I first got my printer, it seemed to be the acme of sophistication because it could set its margins and tabs, and boldface and underscore, all under software control. My terminal can do all sorts of clever things provided the computer sends it the right sequence of control characters. And now there are smart print spoolers, voice synthesizers, and modems, each with its own set of sophisticated functions.
All these smart devices are controlled alike. They do their minimal, generic functions if we send them a stream of ordinary data to process, but their fancy features can only be triggered by sending them a sequence of special codes; a control sequence of ASCII control characters.
Normally, sending control sequences is the business of a special piece of software, a word processing or communications program that has been configured for the particular device. But often we would like to control the device directly from the CP/M command line without having to load an interactive program.
That is the purpose of the emit program; it will let us issue a control sequence to a device from the command line. Its command syntax will be
emit device bytes...
which may be read as "emit to device this sequence of bytes." The device will be one of the CP/M logical devices that can accept output: CON: or LST: or AUX: (also known as PUN:). We have to work out some sensible format for the bytes. Let's consider what kind of bytes go into a control sequence.
I've worked mostly with printers and terminals. These generally take three kinds of bytes in their control sequences: ASCII control characters, single ASCII letters, and bytes that are treated as numeric values. To set the left margin of a Diablo printer to column 10, for example, you send it
An intuitive syntax for bytes would let us send that Diablo sequence with a command like
A>emit lst: esc ht 10 esc 9
But there's a problem with that command. It would be difficult for a program to deduce that the operand "9" was meant as an ASCII digit character, the byte 39h, while the operand "10" was meant as a byte with the decimal value of 10, the byte 0Ah.
Letters present the same problem. An Epson MX-80 printer can be set for condensed, emphasized printing with the sequence of characters SI, ESC, and the letter "E". A natural command format for that might be
A>emit lst: si, esc, e
But it would complicate the program's logic if it had to deduce that "e" was a fundamentally different kind of thing from "esc." It could be done; the program's rule could be that if an operand starts with an alphabetic, it is a control character if it appears in a table of control-character names, otherwise it is a literal character. There are two things wrong with that, however. It doesn't solve the problem of numeric 9 versus digit character "9." And it makes a mis-spelled control character into a literal, so that a typing error like "ecs" for "esc" couldn't be diagnosed and reported.
The usual solution to this kind of encoding problem is to require some kind of quote character. Suppose we say that, to emit a literal character, the character must be prefixed with a quote. Then the two sample commands come out like this.
A>emit lst: esc, ht, 10, esc, '9
A>emit lst: si, esc, 'e
That solves the immediate problem. For neatness' sake, let's allow a quote to be closed. For the sake of flexibility and friendliness, let's not require a closing quote, and let's permit either kind of ASCII quote, thus:
A>emit lst: esc, ht, 10, '9'
A>emit lst: si, esc, "E
We can even accomodate multi-character literals, within limits. Suppose that a smart modem will dial a number if it receives "###D" followed by the number, followed by a Return character. We could drive it with a command like this.
A>emit aux: '###D415-555-1212' cr
We cannot, however, support literal spaces, tabs, and commas. Those characters are preempted by the conventions of CP/M; they delimit command operands. The toolkit functions (and any other CP/M command program) will use them as delimiters and discard them. Nor can we support lowercase letters, since CP/M will convert the command line to uppercase before our program sees it.
One last feature. Sometimes the documentation of a device will specify its control sequences in terms of hexadecimal values. We shouldn't require a user to convert a hexadecimal code in the manual to a decimal code or an ASCII value for use with emit. How shall we encode a hexadecimal number?
There are several conventions for representing a hexadecimal byte such as the value of ESCape, 1B. There is the old IBM convention, X'1B', but we can discard that out of hand. There is the convention of the increasingly popular C programming language, 0x1b. There is the convention used with assemblers for the 8080 and Z80, 1Bh, and the convention used with assemblers for the 6502 and 6800 CPUs, $1B.
It really doesn't matter which we pick. We can assume that a programmer will feel comfortable with any of them, and that a nonprogrammer will find them equally distasteful. We might as well pick the one that we find most comfortable - the one from the assembler we are using.
With these decisions made, we can write a concise page of user documentation for the program.
The emit program is used to send a control sequence to a peripheral device from the CP/M command line. Its syntax is
emit device bytes...
which means "Emit these bytes to that device."
The device must be one of the CP/M logical character devices LST:, CON:, or AUX:. The name PUN: may be used for AUX:.
The bytes to be emitted are specified in one of four ways. A numeric byte must begin with a decimal digit. It may be given as a decimal number between 0 and 255; or it may be coded as a hexadecimal number between 0h and 0ffh, with the appended "h" signifying hexadecimal notation.
An ASCII control character may be specified by giving its name. The names of control characters are:
nul soh stx etx eot enq ack bel
bs ht lf vt ff cr so si
dle dc1 dc2 dc3 dc4 nak syn etb
can em sub esc fs gs rs us
The name "xoff" may be substituted for "dc3," and "xon" may be used for "dc1." The name "space" may be used for the ASCII space character and the name "comma" may be used for the comma character.
A literal character, or a sequence of literal characters without any embedded spaces or commas, may be specified by preceding it with either an apostrophe or a double-quote character. An ending quote is optional. Lowercase letters will be converted to uppercase.
For example, this command
A>emit lst: esc, '9, 1bh, ht, 20, "'ello" comma space 'sailor
would emit the following sequence to the CP/M printer:
Long sequences may require multiple command lines. After testing a complicated sequence, you may put the necessary emit commands in a batch command file and execute it with the submit command. Use the stat command (in CP/M 2.2) or the device command (in CP/M Plus) to assign physical devices to the CP/M logical device-names.
That's a very pretty specification; now we have to implement it. We begin, of course, with a draft pseudo-code plan (Figure 4-1).
There are two basic strategies we could use here: we could write each byte to the device as soon as we decode it, or we could decode them all, then write them all at once. The second strategy is shown in Figure 4-1. The first strategy is simpler, but it has the defect that, should the program find a byte it can't decipher, it may have already sent some bytes to the device. Under the second strategy, either all bytes will be sent or none of them will.
emit(device-name,codes)
"dest" is a file
validate the number of command-tokens
validate the device-name, assign to dest, and open
for each code-token c
decide what c's format is
if it's indecipherable, abort with message
translate c to a single byte
save it in an array and count it
end for.
write the saved bytes to dest
end
Figure 4-1. First draft of a plan for emit.
Before we go further with the design of emit, let's turn aside to investigate a general problem that is raised by the first line of Figure 4-1, "validate the number of command-tokens." It describes a step that will be part of nearly every program we write. Every program expects a certain number of command operands, perhaps zero, or exactly two, or sometimes the count of operands must fall in a certain range. Their count is the first thing the program can learn about its operands. What should it do when it gets the wrong number of operands?
The typist program of chapter 3 expected no command operands. The keyfile program expected exactly one, and aborted with an unhelpful message if it was given more or less than one operand. Now we have emit: it wants a device name and some number of bytes to emit. The minimum number of operands it can accept is 1 (when no byte operands are given), while the maximum is the maximum that the user can squeeze onto the line.
What should a program do when the number of command operands doesn't meet its expectations? Some CP/M commands take the approach that if they are given no operands, they report on the system; if they have operands then they change the state of the system. The user command is an example of this policy.
Another policy is to take the absence of operands as a cue to prompt the user to enter the missing operands. In CP/M Plus, the rename and date commands work this way, and the pip command has always followed that policy. We might visualize emit carrying out a dialogue like this one.
A>emit
emit to what device? con:
emit what bytes to CON:? esc "p"
There are things to be said for such a policy; it looks "friendly" as all get-out. Unfortunately, it is difficult to do it well. Once a program undertakes to be interactive, it vastly increases its opportunities for looking stupid. To see what I mean, consider this dialogue.
A>emit
emit to what device? frummage
emit what bytes to FRUMMAGE?
Substitute any conceivable user mistake for "frummage"; the point is, a program has to validate every response as it gets it to avoid looking stupid. But then it must also have the logic to report an error in that response and re-prompt. That goes for every prompted input, and it adds up to a significant amount of programming - often more programming than is involved in the function the program is meant to do in the first place.
Another problem arises from the fact that command operands are positional in nature; that is, the only thing that distinguishes one operand from another is its position in the command line. That makes it impossible to tell for certain which operands have been omitted unless they all are. In the case of emit, for example, if there are any operands, the program must assume that the first one is meant as a device-name. If it gets just one operand, emit can't tell the difference between these two cases:
A>emit lst:
A>emit si
In the first case, the user names a device but omits to say what bytes should be sent to it; in the second, the user has named a byte to send (the byte that puts an Epson MX-80 into condensed mode) but not the device. If the user has been deluded into expecting the program to prompt for a sequence of bytes in the first case and for a device-name in the second, he or she is going to be disappointed; the program doesn't have the information it needs to be that clever.
Finally, we should ask if the effort of prompting for missing operands is really worth all the programming it takes. Its only use is to help the user who doesn't know the usage of the command. The user who knows it wouldn't bother with prompting; it's a lot quicker just to type the operands and be done with it.
If we design our commands to take only a few operands, and if we make those operands flow in a natural sequence, then the only problem we have is how to help the user who has not learned them, or who has temporarily forgotten them. That can be done with a brief usage message - a few lines that summarize the proper use of the program.
Let's establish the rule that, if a program is given no operands, or the wrong number of operands, or if its very first operand is a single question-mark, it will respond by displaying a usage message. Here's how that might look with emit.
A>emit ?
EMIT sends bytes to a device. Syntax is
EMIT device bytes...
Device must be CON: or LST: or AUX: or PUN:
A byte is either
a decimal number from 0 to 255
a hex number from 0H to 0FFH
name of a control character like ESC or CR
quoted literal characters like 'ABC or "9
A>
A display like that is enough to jog the memory of someone who has used the command before but who has forgotten, perhaps, how the program wants hex numbers written. It also summarizes the command for someone who has never used it, but who simply wondered what it was good for. It omits some details, but that's why we write documentation, isn't it?
We could, of course, write the complete program specification into the usage message. I know people who would argue that we should, or rather, who would argue that all systems should have complete documentation of all commands on-line at all times. Those peoples' machines have larger disks and faster processors than mine. Documentation is bulky; and the documentation for a command is used many, many times fewer than the command itself is used.
In every program we do from here on, we will want to save the command operands, check their count, and check the first operand for a question mark. The function is stereotyped and easy to make into a parameterized subroutine. Let's do that, creating a module chkops that we can include in any program. Its pseudo-code appears in Figure 4-2.
chkops(min, max, usage): returns count
min and max are bytes giving the range of operands
usage is the address of a usage message
count is the count of operands
count := savetail()
if (count < min) or
(count > max) or
(first token is "?") then
abort with usage
else
return count
endif
end chkops
Figure 4-2. The plan for the chkops module.
The plan outlines a subroutine that takes three parameters: the minimum and maximum counts of tokens that the program will accept, and the address of a usage message. Since chkops will use the message in an abort macro if it uses it at all, we must be sure that the message ends in a dollar sign.
The plan in Figure 4-2 includes the first use of my personal pseudo-code notation for a subroutine that returns a value. In this case, the returned value is the count of command operand tokens.
The plan is a simple one and not difficult to convert to assembly language. The result is in Figure 4-3. There are a few things worth noting in that listing.
name 'CHKOPS'
; CHKOPS: save command tail, check count of operands and
; check for "?" in first operand. Parameters are:
; reg B = min tokens allowed
; reg C = max tokens allowed
; DE-> usage message ending in $
; returns count of command tokens in reg. A.
maclib environ
dseg
usage dw 0 ; save ->message
cseg
public CHKOPS
entersub
CHKOPS:
push h ; save caller's HL
xchg
shld usage ; save ->message
savetail ; A = count of tokens
push psw ; ..save for exit
cmp b ; count :: min
jc quit ; (less than min)
ora a ; were there zero operands?
jz exit ; (yes, must be right number)
dcr a ; reduce count to force carry
cmp c ; ..on comparison to max
jnc quit ; (count > max)
mvi a,1 ; get DE->first token
tailtokn +A
xchg ; make that HL->token
mov a,m
cpi '?' ; does it start with "?"
jnz exit ; (nope)
inx h
mov a,m ; is it maybe "?xxx" or
ora a ; ..is it exactly ?,null
jnz exit ; (was "?xx...")
quit: lhld usage
xchg ; DE->abort-message
abort ,+D
exit: pop psw ; A = count of tokens
lhld usage ; restore
xchg ; ..caller's DE
pop h ; ..and HL
ret
Figure 4-3. The source text of module Chkops.
The first is the name statement with which it begins. Its only effect is to make the the assembler include that name as one of its notes in the object file. The linker will make no use of the name. Only the lib program notices the name of a module; it keeps a name for each module in an object library. The lib command is easier to use if every module has an explicit name that is the same as its filename.
The code in Figure 4-3 defines only a module, not a complete program. We code the prolog macro as the first statement of a complete program, but that would not be appropriate in a module. That macro generates the code to set up a stack and initialize storage. A module should depend for such matters on the program with which it is linked. However, the prolog macro defines two public labels that a module may need: +BDOS, the gateway to the operating system.
The entersub macro is used to get access to those two names. All it contains is a pair of extern statements to define them as external, but it has a nice, official look to it.
As you read Figure 4-3, you might have noted how the code goes to some trouble to return all registers to its caller just as the caller passed them. The only exception is register A, in which the module returns its result, the count of tokens.
This is a general rule that we will apply to all subroutines: a subroutine will preserve all of its caller's registers, except for the registers in which it returns a result. In chkops we might reasonably suppose that the caller doesn't care if registers B, C, and DE are preserved or not; nevertheless we still preserve them.
It costs us something to apply that rule. It takes time to push and pop registers, and the stack-size requirement goes up. Neither cost is very large. The registers are pushed and popped only once for each call on a module. If the module contains any kind of loop, its real processing time will completely overshadow the time taken to save them. The prolog macro reserves a generous, 256-byte stack when the program starts up. That allows for pushing 128 registers, or for 32 nested subroutine calls each of which saved four registers.
The benefit of applying the rule is that abstract functions keep their abstract nature. When we know that the rule will be applied consistently, then at the moment we code a call to a subroutine we need think only about the subroutine's defined result. We don't have to clutter our minds with exceptions, dangers, special cases. All we have to remember is which registers the subroutine takes as input and which it returns as output. That reduces the number of things we have to keep in mind, and that speeds programming and reduces bugs.
The code in Figure 4-3 illustrates one peculiarity of the Z80 instruction set. The Z80 (and the 8080) have processor flags that are set during a comparison. A comparison is essentially an unsigned subtract; the flags are set as if the instruction operand had been subtracted from the contents of register A.
The processor flags are so defined that, after a comparison, we can detect equality with a jz jump, and we can detect that A was less than the operand with a jc jump. Furthermore, we can detect that A was greater than or equal to the operand with a jnc jump. But there is no single jump that will be taken if A was greater than but not equal to the operand.
That is the condition that must be detected in Figure 4-3 when comparing the count of operands to the contents of register C, the maximum number allowed. There are three ways to handle the situation. The simplest would be to code two jumps in sequence,
cmp c
jz exit ; count = max
jnc quit ; count > max
so that the first jump eliminates the equal-to condition from consideration. Besides being confusing to read, that solution offends my sensibilities; it uses six whole bytes (gad!) to detect a simple condition.
A second solution is to reverse the order of the operands. Instead of comparing to see if count is greater than max, we could arrange things so we could compare to see if max was less than count. It's the same test but its result is revealed unambiguously by the processor flags.
mov b,a ; save count
mov a,c ; pick up max
cmp b ; compare max :: count
jc quit ; max < count, so count > max
That's not easy to read, and it destroys the contents of register B.
A third solution is to reduce the first comparand by one or to increase the second comparand by one. Either strategem merges the case of equality (of the original comparands) with the case of less-than. Thus if we want to test a letter to see if it is less than or equal to "z" we can code the test
cpi 'z'+1
If register A is less than or equal to "z," it will be simply less than a value one more than "z."
In Figure 4-3 we dare not increment the second comparand, since the caller might have passed 255 in register C (meaning, essentially, "I don't care how many"). Incrementing C in that case would cause it to overflow to zero, resulting in a false detection of an error. The method actually used is to reduce the first comparand; if the count less one is less than register C, then the original count must have been less than or equal to C. That trick, also, is subject to error. If the original count was zero, decrementing it would make it underflow to 255. But at that point in Figure 4-3, the case of a zero count has been eliminated.
Now we have taken care of chkops, we can turn to the rest of the plan for emit.
The second item in Figure 4-1 is "validate device name and assign to dest." I first thought to do this with the fassign macro. That macro lets the program know if the token represented a valid, unambiguous filespec. Unfortunately, it does not let the program know if the filespec named a device (that's not usually a consideration when setting up a file).
There is a toolkit macro that inquires whether a file is a disk file or a device, and another that tests to see if a file is read-only or writable. The two in combination would tell the program whether or not it had been given the name of a writable device. Unfortunately, neither of those macros will work until the file has been opened, and we don't want to open the file unless the operand is valid.
There is another way. Part of the toolkit's support for strings is support for searching a table of strings. A table of strings is a collection of string constants. There is a macro, strlook, which accepts the address of a table of strings and the address of single string, and searches for a match to the string in the table. We will build a table of strings, each an acceptable device name, and search it for a match to the first-operand token. If there is a match, the operand is valid.
The rest of Figure 4-1 is concerned with decoding the operands that represent bytes to be emitted, and it is written at very high level (in other words, it's vague). This part is repeated in Figure 4-4.
for each code-token c
decide what c's format is
if it's indecipherable, abort w/ message
translate c to a single byte
save it in an array and count it
end for.
open dest for output
write the saved bytes to dest
Figure 4-4. Plan of the central loop of emit
The way we defined the byte-operands, we can tell the type of each one from its initial character. If it is an alphabetic, the operand must be a name like ESC or COMMA. If a quote, the operand is a literal; if a decimal digit, it's a number - although whether decimal or hexadecimal we can't tell. These realizations, plus some details concerning how the decoded bytes might be stored, are expressed in Figure 4-5.
stuff is an array of bytes
j is a count of the bytes in stuff
j := 0
for each code-token c with initial byte x
if (x is alphabetic) then
j := handle-name(c,j)
else if (x is decimal) then
j := handle-number(c,j)
else if (x is a quote) then
j := handle-literal(c,j)
else badbyte(c)
end for.
open dest for output
write j bytes from stuff to output
Figure 4-5. Expanded plan for the body of emit.
The effect of Figure 4-5 is to organize what we know about initial letters and to defer the decision on what to do about them. Procrastination is an important tool in program design. Here we have decided that there ought to be a separate subroutine for each kind of token, decided what parameters each routine will take, and finally we've put off any decisions on how those routines will do their work. Now each can be considered in isolation.
One other decision is visible in Figure 4-5: there will be a subroutine badbyte to handle the case of an indecipherable operand. It will be given the bad token; it will presumably issue an enlightening error message and abort the program.
Ok, let's tackle those deferred decisions, starting with the case of a token that is initially alphabetic. Such operands ought to name ASCII control characters. They can be decoded with a table of strings. We will set up a table of valid control character names and search in it for the token we got. If it appears, it's a valid operand. If the operand doesn't appear in the table, we will call on badbyte to issue a diagnostic message.
A table of strings can also translate a string. To see how, you must understand how a table is laid out in storage. The heart of a table of strings is an array of addresses. Each address-word points to a constant string. Space for this array is reserved by the strtable macro. Each constant string is assembled by the strentry macro, which also sends the assembler back to fill in the string's address in the array of addresses.
When we apply strlook to search the table, we pass it the address of the array of addresses. The function compares the input string to each table entry in turn, getting their addresses from the array.
Although we will usually define the table-entry strings together, they don't have to be adjacent in storage. Other data can be sandwiched between the strings; it will not affect the way the table is searched. The strlook function gets the strings' addresses from the array; it has no way of telling whether or not they are adjacent, nor does it care.
Used in its simplest form, strlook merely returns the processor's Zero flag true if the input string appears in the table. However, it can be used in such a way that it also returns register HL pointing to the null byte at the end of the table entry that matched the string. That's the key; if we leave the translation of each name following the table-entry that describes it, we will be able to validate a name and translate it in a single step. The plan for names comes out looking like Figure 4-6.
handle-name(c,j) : count
"names" is a table of valid character-names,
each followed by its translation
if strlook(c,names) then
j := j + 1
stuff[j] := translation
return j
else
badbyte(c)
endif
end.
Figure 4-6. A plan for handling names of characters.
The numeric operands are easier to handle. There are toolkit macros that, given the address of a numeric string, will convert it to binary and return the binary result. The only problem is to decide whether the operand was written in decimal or hexadecimal so that the right toolkit function can be applied. That is indicated by its last character, which should be either a digit or the letter "H." If it is neither, or if the conversion routine returns a binary value greater than 255, we will abort through badbyte. The resulting plan is shown in Figure 4-7.
handle-number(c,j): count
"h" is a binary word
if (last byte of c is "H") then
straxbw(c,h)
else
if (last byte of c is a digit) then
stradbw(c,h)
else
badbyte(c)
endif
endif
if (h < 255) then
j := j + 1
stuff[j] := h
return j
else
badbyte(c)
endif
end.
Figure 4-7. A plan for handling numeric operands.
Operands that represent literal characters commence with a quote, either an ASCII apostrophe or a double-quote character. This may be discarded. If the user is a nitpicker and closed the operand with the same character, the closing quote should be eliminated as well. The characters that remain in the string should be counted and copied to the holding array. The only error that I can think of is the case where, after dropping the leading and trailing quote, nothing remains. That should be diagnosed through badbyte. The plan falls out as Figure 4-8.
handle-literal(c,j) : count
"x" is a character
x := initial byte of c
if (x = the last byte of c) then
truncate c to eliminate the closing quote
if (the second byte of c is now a null)
badbyte(c)
endif
endif
for each letter x from the 2nd to the last of c
j := j + 1
stuff[j] := x
end for
return j
end.
Figure 4-8. The plan for handling quoted literals.
In decoding both numeric and literal operands, we need to get at the ending byte of a string. There is a toolkit macro, strend, that will advance a register from the front of a string to the null at its end. From the null, backing up one byte gives the address of the end character. That might, of course, be the first character as well; we'll have to watch out for such one-letter strings.
The emit program comes out quite a bit larger than the ones we've dealt with thus far, so let's examine it in sections, starting with its prologue.
The opening sections of the source of emit appear in Figure 4-9. Like all the programs in this book, the source lines are limited to 64 characters. That's because the assembler adds sixteen bytes of information to the head of each line as it lists it. The longest lines in the listing are limited to 80 characters, and will fit on the screen of the terminal.
title 'EMIT command'
;===============================================================
; EMIT device bytes...
; Emit a control sequence specified by "bytes..." to a logical
; device CON:, LST:, or AUX: as given by "device." Nothing is
; emitted until all operands have been verified. For operand
; formats, see "usage:".
; Abort messages:
; FRUMMAGE is not a device I can emit to.
; FRUMMAGE is not a byte-code I can convert.
; External modules: CHKOPS
; History:
; initial code 18 June 84
;===============================================================
maclib environ
dseg
usage: ; usage message for aborts
cr equ AsciiCR
lf equ AsciiLF
tab equ AsciiTAB
db 'EMIT sends bytes to a device. Syntax is',cr,lf
db tab,'EMIT device bytes...',cr,lf
db 'Device must be CON: or LST: or AUX: or PUN:',cr,lf
db 'A byte is either',cr,lf
db tab,'a decimal number from 0 to 255',cr,lf
db tab,'a hex number from 0H to 0FFH',cr,lf
db tab,'name of a control character like ESC or CR',cr,lf
db tab,'quoted literal characters like ''ABC or "9',cr,lf
db '$' ; must end abort with a dollarsign
abdev: strconst ' is not a device I can emit to.$'
abopr: strconst ' is not a byte-code I can convert.$'
; **keep the next two bytes adjacent and in order**
ntoken db 0 ; number of operands
ctoken db 0 ; token being worked on now
cbyte dw 0 ; ->next byte of "stuff"
stuff: ds 128 ; space for output bytes (and msgs)
dest: filedef 128
cseg
Figure 4-9. The prologue and global data of emit.
The first section is a descriptive prologue. Its purpose is to summarize the main features of the program for another programmer (or for myself at a later time). Professional software shops apply strict, elaborate standards to the layout of such a prologue. We can be more casual, but some things really should be present: a synopsis of the program's function and command syntax, a list of the abort messages it may display, notes on the external modules it requires, and a modification history.
The modification history is especially important. One of the most vexing problems you can face is to find two versions of a program's source, and to be unable to tell which one contains the fix for a certain bug. If you record all fixes and enhancements under the "History" heading in the prologue, you can tell one version of the source from another.
It's my habit to begin the code of a program in the data segment, with the definition of all the constants, files, work areas, and messages. The usage message, if it is first among these, is handy for reference from the prologue.
In Figure 4-9, the usage message is labelled usage; it runs for several lines. Every screen-line of the message must end with a return-linefeed pair, and the message as a whole must end with dollar-sign character. This is because the usage message (and any other message used in an abort) is displayed using the BDOS's type-a-message function, and it always types up to a dollar sign. If the dollar sign is missing, it will type, and type, and type, throwing any sort of garbage to the screen, until finally, somewhere in storage, it finds a random dollar sign.
The variables used in the main body of the program are defined in this section as well. There are three of these in Figure 4-9 - ntoken, ctoken, and cbyte. They are used in the main section of the program.
Every program has a main loop, a top level of the program that determines what things will be done, in what order, and when the program is finished. The source of the main loop of emit appears in Figure 4-10. In a simple program, the main loop might be the only loop, but in emit, much of the processing has been pushed out into subroutines that are called from the main loop.
cseg
prolog
; validate the number of command-tokens
extrn CHKOPS
lxi b,(1*256)+255 ; B=1, C=255
lxi d,usage ; DE->usage message
call CHKOPS
sta ntoken ; save count of operands
; validate the device-name and assign to dest
call checkdev ; do it in a subroutine
; set up for the loop:
mvi a,2 ; first code-token will be
sta ctoken ; ..operand #2
lxi h,stuff ; and will go into
shld cbyte ; ..byte 0 of stuff
mvi b,0 ; count bytes in B (i.e. "j")
; for each code-token c with initial byte x...
for:
lxi h,ntoken
mov a,m ; A = total operands
inx h ; HL->ctoken
cmp m ; total < current?
jc donefor ; (yes, done)
mov a,m ; A = current token
inr m ; ..and ctoken = next
tailtokn +A ; DE->current token
ldax d ; A = initial byte
; if (x is alphabetic) then
; j := handle-name(c,j)
alpha? +A ; is A alphabetic?
jnz notalph ; (no)
call handlename ; yes, handle it
jmp for ; ..and interate
; else if (x is decimal) then
; j := handle-number(c,j)
notalph:
digit? +A ; is it a digit?
jnz notdig ; (no)
call handlenum
jmp for
; else if (x is a quote) then
; j := handle-literal(c,j)
notdig:
cpi '''' ; single quote?
jz isquote
cpi '"' ; ..or double?
jnz notquote
isquote:
call handlelit
jmp for
; else badbyte(c)
notquote:
call badbyte
; end for.
donefor:
mov a,b
ora a ; any bytes decoded?
rz ; (no, quit)
; write the saved bytes to dest
lxi h,stuff
lxi d,dest
outloop:
mov a,m ; A = this byte
inx h ; HL->next one
fputbyte +A ; write it
djnz outloop
ret
Figure 4-10. The code of the body of emit.
The code in Figure 4-10 follows the pseudo-code of Figure 4-5 closely. In fact, I used the lines of Figure 4-5 as a skeleton for it. I concatenated those lines to the first draft of Figure 4-9 and inserted the assembly language code between them, paging back to the global definitions to add variables as needed.
There are some assembly language tricks worth noting in Figure 4-10. The statement
lxi b,(1*256)+255
could have been written just as well as two statements,
mvi b,1
mvi c,255
and might be better so. The effect of the two sequences is identical, but the first is one byte shorter and microscopically faster. One byte is a trivial space and, since this statement is executed precisely once in a run of the program, the time saved is meaningless. The same trick could be justified if it occurred in the heart of a loop that was executed thousands of times.
The bytes ntoken and ctoken are used to regulate the main loop. The first holds the count of command operands, while the second holds the number of the operand that will be processed on the next pass. When the second exceeds the first, processing is complete.
The bytes are compared following the label for. Follow the way that register HL is used to address the pair of bytes. The code sequence
lxi h,ntoken
mov a,m
inx h
cmp m
could as well have been written
lda ntoken
lxi h,ctoken
cmp m
and perhaps ought to have been. Once more we are saving one byte of code and a few microseconds of time. This section of code is executed as many times as there are command operands, so in a typical run it will save less than a hundred microseconds. That is an insignificant optimization, and it is obtained at a steep price. If the ntoken and ctoken variables were not defined adjacently and in that order, the code wouldn't work! That is, incrementing HL from ntoken would not bring it to point at ctoken. Again this is code that can only be justified in a section of a program that will be executed many thousands of times per run. I have a bad habit of making these useless optimizations at inappropriate points; I'll try to do better as we go on.
The program might discover that the first byte operand, operand number two, doesn't exist. In that case, the main loop will end as soon as it starts, and the program will arrive at label donefor with its count of decoded bytes equal to zero. That's fine; every program should "do nothing gracefully"; if this one has nothing to emit, it emits nothing, and ends.
Normally it will have decoded some bytes. The count of them will be in register B - which plays the role of the pseudo-code variable "j" - and their values will be in the array stuff. The body of emit ends with a short loop that picks up each byte and writes it to the file dest.
The line that does the writing,
fputbyte +A
deserves a look. All of the file and string macros in the toolkit allow register notation in this form. The first parameter of a file macro is always the designation of a file definition. In this case, it's the file dest, so the line could have been written
fputbyte dest,+A
However, if it had been, the macro would have generated the code to save the contents of register DE, load it with the address of dest, and restore it after the operation. In Figure 4-10, register DE is loaded with the file's address outside the loop and the +D parameter tells the macro it needn't bother.
The parameter +A is essential, not optional. If we wanted to write a specific byte to the file - the ASCII tab code, for example - we could do it with the line
fputbyte dest,AsciiTAB
specifying a constant value. But in Figure 4-10, the byte value to be written is unknown; it is whatever happens to have been decoded and stored in stuff. That value has been loaded into register A, and the parameter +A tells the macro where to find it.
There are two toolkit macros that will write a single byte to a file: fputchar and fputbyte. As their names suggest, one is specifically for writing ASCII character values, while the other is for writing nondescript bytes of any sort. They make different assumptions about the use of the file that is being written. The fputchar macro assumes a CP/M text file is being created; if we give it a return character, it obligingly writes a linefeed character as well. That way, a program can end a text line with a single operation.
The macro being used here, fputbyte, makes no such assumptions. That is just what emit wants. It is supposed to write exactly and only the bytes that are requested by its command operands.
The skeleton of emit is visible in Figure 4-10, but the program's flesh is in the subroutines it calls. The first of these subroutines, checkdev, is called only once. It is a subroutine only to get it out of sight so as to clarify the flow of the body. Its text appears in Figure 4-11. It contains our first uses of table lookup and of string copying.
; checkdev: subroutine to validate "device" operand and
; abort if it isn't appropriate.
dseg
devtab: strtable 4 ; initiate table of 4 strings
strentry 'CON:' ; fill with valid devices
strentry 'LST:'
strentry 'AUX:'
strentry 'PUN:'
cseg
checkdev:
push h
push d
push psw
tailtokn 1 ; DE->first operand string
strlook +D,devtab ; lookup DE->string in table
jnz baddev ; (didn't find it)
xchg ; make it HL->operand
lxi d,dest ; and DE->file
fassign +H ; assign name to filedef
frewrite +D ; ..and open it
pop psw
pop d
pop h
ret
baddev: ; oops, not a device we know -- build an abort message
xchg ; HL->bad device operand
lxi d,stuff ; place to build message
strcopy +H ; copy "frummage" to stuff
strappnd +D,abdev ; append rest of msg
abort ,+D ; ..and abort with it
Figure 4-11. The checkdev subroutine of emit.
As we decided earlier, checkdev verifies the first command operand by looking it up in a table of valid operands. The table is defined in a short data segment at the head of the subroutine. A string table is defined in two steps. The strtable macro defines space for the array of entry-addresses. Its operand is the number of entries the table will have.
Each entry is defined with the strentry macro. Its parameter, like that of strconst, is a string constant which it defines in storage. But strentry has an additional job: it moves the assembler back to the next slot of the array defined by strtable and assembles there the address of the string constant. Thus a table is defined by a call of strtable followed by a series of calls on strentry.
A table is searched by the executable macro strlook. In Figure 4-11, the program gets the address of the first command operand as a string, and uses strlook to look for that string in the table. If it is not found, the Zero flag is false afterward. Here, if the operand string matches an entry of the table, it specifies a writable CP/M device. The code assigns the string as the name of a file and opens the file for output.
If the operand isn't valid, checkdev must abort the program with an informative message. It does that following label baddev. The informative message will be
FRUMMAGE is not a device I can emit to.
where FRUMMAGE is whatever the operand consisted of. It takes a bit more trouble to echo a bad input within a message, but it makes the message a great deal more helpful, since it is immediately apparent how the program interpreted the operand.
The abort message is constructed from two parts - the incorrect operand and a constant string - and both are strings. The code at baddev builds the message in the stuff array's space, since stuff won't be of any use now. The strcopy function copies a string to a space. Here it is used to copy the operand string to the stuff space.
The constant part of the message is appended to the operand string using strappnd. That macro takes two strings and appends the second to the first, making a single, longer, string. In this case, the second string is the string constant abdev, defined in Figure 4-9. That constant ended in a dollar sign, as is required of any message used in an abort.
It's especially important to repeat the incorrect operand when we report an invalid byte-token (Figure 4-12). Imagine the frustration of a user who types emit with twenty operands, only to be told "Invalid operand." "Which operand, dummy?" he or she would shriek. This is how programmers accumulate bad karma. A programmer who doesn't want to be reincarnated as a cockroach will take care to echo the offending operand as part of the message. It would be even better if emit checked every operand and issued a message for each bad one. It doesn't; it aborts on the first one it can't handle, so the user will have to discover his or her mistakes one at a time.
; badbyte: DE->an operand we can't handle, abort
badbyte:
xchg ; HL->operand
lxi d,stuff ; DE->space to build msg
strcopy +H
strappnd +D,abopr
abort ,+D
end
{QFigure 4-12. The code to abort on any indecipherable
byte operand.Q}
The badbyte code in Figure 4-12 is called as a subroutine, but that's a sham. It always aborts, ending the program, so it can never return to its caller. However, when it aborts, the address of its caller is on the stack. If we were debugging emit with a program like sid, we could set a trap at the entry to badbyte (or at the public label +ERROR where all aborts go to happen). Then we could examine the stack to see where the abort was initiated.
There are three types of operands, and the processing of each has been pushed into a subroutine. The code for handling numeric operands is shown in Figure 4-13.
; handlenum: DE->token commencing in a digit, convert it
; from either decimal or hex.
handlenum:
push psw
push h
push d ; save ->start of string
strend +Dupdate ; DE->null at end of string
dcx d ; DE->last byte of string
ldax d ; A = terminal h?
pop d ; recover ->string
cpi 'H' ; hex number?
jnz nothex
straxbw +D ; convert hex to binary in HL
jmp dechex ; ..and check value
nothex: digit? +A ; not hex, is it decimal?
cnz badbyte
stradbw +D ; convert decimal to binary
dechex: mov a,h ; value > 255?
ora a ; ..H is nonzero if so
cnz badbyte ; (yes, give up)
mov a,l ; no, save value in A
lhld cbyte
mov m,a ; and put in next stuff slot
inx h
shld cbyte ; update pointer,
inr b ; ..and count byte
pop h
pop psw
ret
Figure 4-13. The code for handling numeric operands.
The operand that begins with a digit should end in another digit if it is decimal, or in the letter "H" if it is written in hexadecimal. The code in Figure 4-13 checks this first. It uses the strend macro to advance the string address in register DE until it is pointing at the null byte that ends any string. Decrementing DE yields the address of the byte preceding the null, the last byte of the string.
If that byte is "H," the code invokes function straxbw. This one of a number of toolkit functions for converting between binary values and numeric characters. The names of these macros encode their functions according to this scheme:
The source of the conversion comes first, the destination second, in the macro's name. Thus straxbw converts ASCII hex digits to an unsigned binary word; stradbw converts decimal digits to an unsigned word; strswad converts a signed word into ASCII digits; and so forth. Not all combinations are implemented, since not all are meaningful.
The code in Figure 4-13 uses one of two of these macros to convert the numeric operand to binary in register HL (the destination by default). The result must be tested to see if it can be accomodated in a byte. After all, there's nothing to prevent the user from entering
A>emit lst: 17484
The test is to check the most significant byte of the result; if it is zero, the value fits in a byte.
When it does, the decoded byte must be saved in array stuff and counted. In the pseudo-code, we indicated that with lines like
j := j + 1
stuff[j] := x
That's how we would do it in a high-level language like Pascal. Subscripting an array is more difficult in assembly language. It could be done by loading the address of stuff and adding the count of bytes to it. That comes to only a handful of instructions, which could have been put into a subroutine for use from several places.
What I chose to do (almost without thinking) was to carry the address of the next slot in stuff in a separate variable, cbyte. That address has to be incremented each time a byte is stored, when the count is incremented. You can see it being done at the end of Figure 4-13.
The second type of operand is the quoted literal. The code to handle that type is shown in Figure 4-14. It begins much like the numeric code, finding the last byte of the operand, but it has a different purpose. We decided that the user could, but didn't have to, close a literal with a quote. Here the code is checking to see if there is a closing quote, and obliterating it if so. That shortens the operand string by one byte, and reduces the two cases to one case, that of the unclosed quote.
; handlelit: DE->string starting with one of two quotes,
; copy it (less quotes) to stuff.
handlelit:
push psw
push h
push d
ldax d ; A = opening quote
inx d ; DE->byte after it
push d ; (save that)
strend +Dupdate; DE->terminal null
dcx d ; DE->closing byte of string
xchg ; (make that HL)
cmp m ; did they close the quote?
jnz notclosed
mvi m,0 ; yes, truncate string
notclosed:
pop d ; DE->first literal byte again
ldax d ; is there anything left now,
ora a ; ..or was it just only a quote?
jnz havesome
pop d ; recover ->whole string
call badbyte ; ..and give up
havesome:
lhld cbyte
litloop:
mov m,a ; copy literal byte to stuff
inr b ; ..and count it
inx h ; ..and point to next slot
inx d ; ..and point to next byte
ldax d ; is that byte
ora a ; ..the null at the end?
jnz litloop ; (no, continue)
shld cbyte ; record final ->next slot
pop d
pop h
pop psw
ret
Figure 4-14. The code to handle quoted literals.
Having done this, the code in Figure 4-14 checks to see if anything is left. If there is, all of the one or more bytes must be copied to the stuff array. The process is much like that of storing a numeric byte, but is repeated in a loop.
The final operand type is the named character. These, we planned, were to be decoded using a lookup table. The code that does it appears in Figure 4-15. It is dominated by a large data segment, in which a 36-entry table of names is defined.
; handlename: DE->operand beginning with alphabetic,
; decode it with a table look-up.
dseg
names: strtable 36 ; set up table of names
strentry 'NUL' ; after each name,
db 0 ; put byte value.
strentry 'SOH'
db 1
...etc, etc, until we reach...
strentry 'DC1' ; DC1 = XON = ctrl-Q
db 17
strentry 'XON'
db 17
strentry 'DC2'
db 18
strentry 'DC3' ; DC3 = XOFF = ctrl-S
db 19
strentry 'XOFF'
db 19
...then so on and so forth until...
strentry 'RS'
db 30
strentry 'US'
db 31
strentry 'SPACE'
db 32
strentry 'COMMA'
db 44
cseg
handlename:
push h
push psw
lxi h,names
strlook +Hupdate ; find DE->string in HL->table
jnz badbyte ; give up if not in table
inx h ; HL->byte after matching entry
mov a,m ; ..which is requested value
lhld cbyte
mov m,a ; put in next "stuff" slot
inx h
shld cbyte ; update pointer
inr b ; ..and count byte
pop psw
pop h
ret
Figure 4-15. The code to handle operands that are character-names.
Each table entry is followed by a single byte, the value of that name. The code takes advantage of these bytes when it invokes the strlook with the lines
lxi h,names
strlook +Hupdate
The second operand of strlook is the address of the table to be searched. If it is given as a label, or merely as +H meaning "the address is in HL, use it," the only result of the lookup is to set the Zero flag true or false.
Giving the operand as +Hupdate tells the macro, "the table's address is in HL, use it, but don't save HL for me - give it back the way the lookup code leaves it."
The lookup support module leaves HL pointing to the null at the end of the last table entry it examined in its search. If the search was successful, that entry is the one that matches the search string. And, because of the way the table entries are defined, that address is just one less than the byte that contains the matching value of the name. It can be picked up and saved in stuff.
Building the emit program has exercised our design methods and many of the more interesting toolbox functions. If you are still new to assembly language, emit is a good program on which to practice your code-reading skills. Work through it line by line, referring to a manual or book that explains the use of each instruction, until you feel confident that you understand what the program is doing. In succeeding chapters we will discuss the program code in less detail
In this chapter we will return to the purpose of our first programs: moving data from one place to another. The two programs we'll develop read a disk file and display it on the screen. Although the programs are simple in concept, planning them will lead us into many interesting byways.
The first program is a simple one, almost a finger exercise for programmers, but it has its uses. We want a program that will display the contents of a text file, not as simple text the way the type program would do, but in a way that reveals its exact layout as lines and disk records.
Once in a while we find ourselves with a file of unknown contents, or one produced by a program we don't trust -- maybe a new one we haven't finished debugging. Experience teaches that it's a mistake to just type the file, or pip it to the printer, to see what's in it. It's all too likely to contain strange control characters that will obscure its contents or make the terminal or printer misbehave. Before editing the file, or displaying it as text, we'd like to take a first suspicious peep at it under controlled circumstances.
The purpose of cdump is to provide just those controlled circumstances. It will display a file, but will filter out all control characters so that only printable characters reach the screen. Since we don't know for sure that the file is really a text file, cdump won't assume that it has the text file's structure, lines of moderate length divided by (CR, LF) pairs. Instead, it will display the file in regular units that fit on a screen line. If the file has delimited lines, they will be revealed by a special display of the CR and LF control characters.
In short, cdump displays a file that probably, but not certainly, contains text. It displays all nonprintable characters other than CR and LF as the dot or period character. It displays the CR and LF characters as backslashes (+) as cdump displays it.
The syntax of the command is
cdump filespec
where filespec is the file to be displayed. A typical display looks like this:
.In short, cdump displays a file that probably, but not certai
nly,+contains text. It displays all ASCII control characters
as the dot or period+except for the CR and LF characters, wh
et cetera...
Each line displays exactly 64 characters from the file. This length may not match the length of text as it would be displayed by, for instance, the type command, since cdump displays a TAB character as a dot while type will display it as from one to eight spaces. The format is, however, an aid to programmers, since each pair of records corresponds to a CP/M file record of 128 bytes.
The program displays all the file up to physical end of file, so some of the characters in the last two display lines may be garbage that follows the logical end of file.
That functional specification tells us several things. First, since the entire file is to be displayed right through physical end of file, and since the CR and LF characters are to be treated individually, we know that we are not going to treat the file as a text file; we will read it with toolkit macros for binary files.
That simplifies the program design a bit. All CP/M files are stored in multiples of 128 bytes. Text files, however, can contain a logical end-of-file character (it's the SUB control character, also known as 1Ah, 26 decimal, and Control-Z) which might turn up end of file at any point. In a binary file all bytes are data, so end of file can only happen after all bytes are used, which will happen on a byte that is a multiple of 128.
These considerations lead us to the plan shown in Figure 5-1. It expresses the idea that we can make two lines -- twice 64, or 128 bytes -- before we have to check for end of file. But it could use some elaboration. Displaying a line is no problem; fputline user,line will do it nicely. But preparing a line for display is the heart of the program, and the problem of discovering end of file needs consideration.
program cdump(filespec)
input is a file
user is a file representing the screen
line is space for a 64-byte string
check operand count of 1, etc. (CHKOPS)
validate filespec, assign it to input, and open it
repeat
make first 64-byte line and display it
make second line and display it
until end-of-file(input)
end cdump.
Figure 5-1. First cut at a plan for cdump.
A plan for displaying a line is shown in Figure 5-2. It expresses the idea that a line is formed by reading and translating exactly 64 bytes from the file, and appending the printable characters to the display line.
translate(x) : character
if (x > 127) then x := x - 128
if (x >= space) and (x < DEL) then return x
if (x = CR) or (x = LF) then return backslash
return dot
end translate.
makeline()
x is a character
make line a null string
do 64 times
x := fgetbyte(input)
x := translate(x)
append x to line
end for
end makeline.
Figure 5-2. Plan for preparing a line for display by cdump.
The only characters that need translation are the control characters. They are easily identified; their byte values are less than that of the space character. Well, perhaps it isn't quite that easy! The DEL character, byte value 127, is also a control character. It has no printable representation, so it, too, should be translated.
Furthermore, certain word processors have the unfortunate habit of sprinkling text files with what should be ordinary ASCII characters, but which have their high bits set. What should cdump do with these? It could treat them as control characters, displaying them as dots. That's reasonable, since a byte with a value greater than DEL's 127 has no printable representation. (No standard representation, anyway. Lots of devices will print or display different symbols when sent bytes greater than 127, but no two agree on what symbols to use for what bytes.) On the other hand, the user might get more information about the file if such characters were reduced to ordinary ASCII and then translated. That would reveal more meaning in some files, at the cost, in others, of displaying characters where no character was intended. The plan in Figure 5-2 adopts this latter course.
One line of Figure 5-1 needs attention. It says, "validate filespec, assign it to input, and open it." There are several steps that have to be taken to do this. And from here on, most of our programs will have to read from a file named by a command operand, so this is going to be a problem we will face again and again. It's a good application for a separate module that we can use over and over.
What does it take to prepare an input file for use? The first step is to assign the command operand string to a file definition with the fassign macro. Its return tells us whether or not the operand is a valid filespec. If the operand was invalid the program should abort, but the ending message should echo the invalid operand.
The operand might be valid by the generous rules of CP/M, but it might still be ambiguous; that is, it might contain a question mark or asterisk so that it refers to more than one file. Such a filespec is of no use for input. Under CP/M Plus, an attempt to open such a file is illegal and will terminate the program with a CP/M error message. Under CP/M 2.2, we can open an ambiguously-named file, but we can't predict what file we will end up reading; it will be the first file in the disk directory that happened to match the name.
The fassign macro reports whether the filespec was ambiguous. If it does the program should abort with an informative message -- again, a message that echos the operand the way the user typed it.
When neither of these conditions interferes, the file may be opened for input with the freset macro. The code that supports this macro reports back whether or not there is any data to be had from the file. There is data to be had if the file is a disk file that has data in it, or if it is a device that is capable of input. The file can produce no data if it doesn't exist at all; or if it is a device that can't do input, such as PUN:; or if it is a disk file with no data in it.
All of these last three conditions are lumped into the single flag returned by freset. In most cases, they all mean the same thing: that there is nothing for the program to do. The usual response to such an empty-file report is to terminate, once more with an message. However in this case the message has to be worded more vaguely.
It doesn't take a great deal of code to perform these steps, but it it's better to do it once for all and put the results in a separate module, one we might call openin. The code for the module appears in Figure 5-3.
name 'OPENIN'
;
; OPENIN(operand-number,filedef) -- assign the specified command
; operand to the filedef and open it. Abort with one of three
; messages if problems arise:
;
; FRUMMAGE is not a valid filespec.
; FRUMMAGE is ambiguous; an explicit name is needed.
; FRUMMAGE is empty or does not exist.
;
; A = operand number to assign
; DE->filedef to use
;
maclib environ
dseg
is: strconst ' is '
inval: strconst 'not a valid filespec'
ambig: strconst 'ambiguous; an explicit name is needed'
empty: strconst 'empty or does not exist'
dotdol: strconst '.$'
msg: strspace 64
cseg
entersub
public OPENIN
OPENIN:
push psw
push b
push d
push h
xchg ; save ->file in HL
tailtokn +A ; DE->operand
xchg ; ok, HL->operand, DE->file
fassign +H
lxi b,inval ; (set up for invalid)
jz error ; oops, not a valid filespec
cpi '?' ; was it ambiguous?
lxi b,ambig ; (prepare in case it was)
jz error ; (yes)
freset +D ; try to open it
lxi b,empty ; (but assume we can't)
jz error ; (we couldn't)
pop h ; could. all done.
pop d
pop b
pop psw
ret
; Something went wrong, and BC->the details of what.
; HL still points to command token. Build an abort
; message and quit.
error:
; copy the operand to the message field first
lxi d,msg
strcopy +Hupdate
; add the word " is "
lxi h,is
strappnd +Hupdate
; then add the specific explanation
mov h,b ! mov l,c
strappnd +Hupdate
; finish up with a period and a dollar sign
lxi h,dotdol
strappnd +Hupdate
; that does it -- byebye
lxi d,msg
abort ,+D
end
Figure 5-3. The source code of module openin.
The code in Figure 5-3 demonstrates two new things. The first is a common trick, that of anticipating a possible outcome in order to avoid writing extra jump instructions. Consider the lines that go
fassign +H
lxi b,inval
jnz error
The point of them is that, if fassign reports an error, we are to transfer to error with the address of message inval in register BC. The lines could have been written this way,
fassign +H
jz ok1
lxi b,inval
jmp error
ok1:
with the business of loading the address of the error message being deferred until we know that it is needed. That is just how most compilers would code the equivalent "if" statement. But the second version requires us to invent a label to name the good case, and to write two jumps. We avoid that by loading BC in anticipation of having to jump, then jumping only if necessary. The trick is used in two other places.
The second thing is the construction of a string from pieces. The abort message is built up from four parts -- the operand string, a constant, whatever string is addressed by register BC, and another constant. This requires four macro calls. The register operand +Dupdate operand says, "DE has the address, and don't save it -- let the function update it for me."
The string functions usually update the destination pointer so that it points to the null byte at the end of the string. The strappnd operation has to advance to the end of the destination string before it can begin appending to it. By allowing the string address in DE to be updated each time, we keep it pointing at the current end-byte of the string, reducing the amount of work the support functions have to do. This gains a meaningless savings of time -- meaningless because the speed with which a program goes to abnormal termination doesn't matter a bit!
Thus far we have planned cdump as if the input file would go on forever. That's the easy way to think about it. Things proceed in a nice, regular way as we go along through the file, and the plans reflect that regularity.
End of file is a discontinuity, an abrupt break. The program must stop what it has been doing and do something else (in this case, terminate). We simplified things by having the openin module abort if the file was empty. That eliminated the case in which end-of-file turns up immediately; since CP/M stores files in units of 128 bytes, we can be confident that there will be at least enough data for the first pair of lines. However, once that pair has been processed, we have to find out if there is data to make the next pair.
Programming languages vary in the way they present end of file. Some treat it as a surprise, an error condition that might crop up during an attempt at input, and supply a mechanism for jumping elsewhere in the program when it arises. PL/I and COBOL take this approach. In those languages, you write code that says, "I don't believe end of file will happen, but if it does, go there."
Other languages treat end of file as an expected condition or state of a file. These languages provide a means of checking for the end-of-file condition before a read is attempted. Pascal is one such language; in it you are required to write the equivalent of "Is end of file true? If not, read."
The toolkit functions that read files do not anticipate end of file. If there is another byte in the file, fgetbyte will return it. Nothing special will happen even if that is the very last byte in the file. Only when it finds that no more data is to be had will an input function report end of file by returning the Zero flag true. This approach made the toolkit easier to write and more efficient in execution (and in fact no other approach is possible with files that are really devices), but it causes problems for a plan like the one in Figure 5-1 and Figure 5-2.
In Figure 5-1, we are assuming that we can test for end of file after reading the 128th byte and before trying to read the 129th byte. This is Pascal-style programming; it assumes that there is a way to look ahead and see the end of file looming without actually attempting a read. Fortunately, there is; but imagine the consequences if there wasn't. If the only way to detect end of file was to attempt a read, then our whole plan would have to be turned inside out. The makeline routine (Figure 5-2) would detect end of file when it tried to read a byte; it would have to end early and return a signal; then the main loop (Figure 5-1) would have to notice the signal and break off its loop early. As an exercise, work out a plan that would work under these conditions. There are a number of dodges you can work, but the result will always be more convoluted than what we have now.
The feof? macro (the Digital Research assemblers permit question-marks in macro names) will test for impending end of file. It reports back with the Zero flag true if the next input request will fail because of physical end of file; that is, if there are no more bytes to be had at all. This function gives us just what we need to implement the "until" test in Figure 5-1.
The feof? function can be used with text files as well as binary ones. When the file is not at its physical end, it returns a copy of the next byte in register A so that the program can detect an impending logical end of file -- the control-Z character.
This function can only work correctly only on disk files. Think about it: what meaning could "end of file" have when applied to a device like CON:? On one hand, a device is always at end of file, since there is no next character ready until the device produces one, and it might not. On the other hand, it is never at end of file because it is capable of producing another byte. This is one area in which disk files and devices can't be treated alike. The feof? macro always reports end of file on device files, while input functions never do (they just wait for a byte to arrive).
There is yet another factor that our cdump plan ought to take into account (gee, it looked like such a simple program!). As the plan stands, cdump is going to finish the display of any file it starts on. Suppose the user sets it going on a large file, and then decides that the display is useless. Maybe the first few lines of the display answer the user's question, or maybe the wrong file was named. Whatever the reason, the program has started and now the user wants to cancel it and get on to something else.
The usual way to cancel a CP/M program is to press control-C, but that is only effective when the system is paying attention to the keyboard. The BDOS only monitors the keyboard for control-C during an input request (cdump makes none) or while the display is frozen by control-S. Our user could cancel cdump by pressing control-S and then control-C. But the user can cancel system commands like type and dir by pressing control-C alone, and a display program like cdump should be just as accomodating, if only for consistency.
We can incorporate this need in the plan of Figure 5-1 by adding another "until" condition:
repeat
make first 64-byte line and display it
make second line and display it
until end-of-file(input) or keyboard-pending
There is a toolkit macro, testcon, which tests for pending keyboard input, much as the BASIC function INKEY$ does. It will allow us to implement the additional test.
Once all the planning has been done and the openin module has been coded, the rest of cdump is easy to implement. Its code appears in Figure 5-4.
;===============================================================
; CDUMP filespec
; Displays file "filespec" in ascii, 64 bytes to the line, for
; safe inspection when the contents of the file are in doubt.
; Abort messages:
; usage message
; input-open messages
; Modules:
; CHKOPS
; OPENIN
; History
; initial code 6/21/84
;===============================================================
maclib environ
dseg
usage: db 'CDUMP filespec'
db AsciiCR,AsciiLF
db 'Displays contents of file 64 bytes/line, with'
db AsciiCR,AsciiLF
db 'control characters translated to "." and ends'
db AsciiCR,AsciiLF
db 'of lines shown as "+".'
db AsciiCR,AsciiLF
db '$'
user: msgfile
input: filedef 1024
line: strspace 64
cseg
prolog
; check operand count of 1, etc (CHKOPS)
mvi b,1 ; minimum operands: 1
mov c,b ; maximum ditto
lxi d,usage
extrn CHKOPS
call CHKOPS
; validate filespec, assign it to input, and open it
mvi a,1 ; operand 1 is filespec
lxi d,input ; filedef to assign it to
extrn OPENIN
call OPENIN
; repeat
loop:
; make first 64-byte line and display it
call makeline
fputline user,line
; make second line and display it
call makeline
fputline user,line
; until end-of-file(input) or keyboard pending
feof? input
jz done
testcon
jz loop
; end cdump.
done: ret
; makeline()
makeline:
push psw
push b
push d
push h
; make line a null string
lxi d,line
strnull +D
xchg ; carry HL->string position
lxi d,input ; ..and DE->file
; for t := 0 to 63
mvi b,64 ; set loop count
mloop:
; c := fgetbyte(input)
fgetbyte +D
; c := translate(c)
call translate
; append c to line
xchg
strput +A
xchg
; end for
djnz mloop
;end makeline.
pop h
pop d
pop b
pop psw
ret
;translate(x) : character
translate:
; if (x > 127) then x := x - 128
cpi AsciiDEL+1
jc lt128
ani AsciiDEL
lt128:
; if (x >= space) and (x < DEL) then return x
cpi AsciiBlank ; if less than space
jc iscontrol ; ..it's a control char
cpi AsciiDEL ; not less than space,
rc ; if < DEL, is ascii
iscontrol:
; if (x = CR) or (x = LF) then return backslash
cpi AsciiCR
jz slish
cpi AsciiLF
jnz dot
slish: mvi a,'+'
ret
; else return a dot
dot: mvi a,'.'
ret
;end translate.
end
Figure 5-4. Source code of the cdump program.
As will often be the case, the assembly source follows the pseudo-code plan very closely; so closely, in fact, that it was created by editing the pseudo-code file and filling in the necessary assembly statements between each line. (I don't mean to say that they were filled in quickly or thoughtlessly! I worked back and forth over the file many times, reading and revising. But the pseudo-code lines supplied the skeleton.)
Observe the use of registers HL and DE in the subroutine makeline. This routine has two objects to keep track of: the file input and the developing display string in line. It takes bytes from the file with fgetbyte, which returns the next byte in register A, and it appends translated bytes to the string with strput.
Both of these macros could have been given the names of their objects as parameters, as in
fgetbyte input
strput line,+A
But the code of makeline goes to the trouble of carrying the addresses of file and string in registers. Having set up the registers, it could have appended it to the string with
xchg
strput +A
xchg
That would have saved the macro's generation of code to load the string's address in register DE. But what the code uses is the operand +Dupdate operand causes the macro to not preserve the starting value of DE, leaving it instead as the support function returned it. Thus the register traces the end of the line as it develops, saving 64 scans from the front of the line to its end in the course of the loop. This time the extra complexity really does save some time.
The cdump command is useful for checking the contents of files which we expect to contain only text. But there are times when we want to look into files that aren't supposed to contain text, files that we expect will consist of binary data. Cdump doesn't tell us enough about such files; they are full of binary values that it renders only as dots.
We need a binary-dump program, bdump, which will show us the precise contents of a file in all their hexadecimal glory. Binary files don't have any internal markers to divide them into convenient sections, as text files are divided into lines, so bdump may as well divide them into the 128-byte chunks that CP/M calls "records." These don't usually correspond to the records of the file as they are defined by the programs that create or use such a file, but they are the only divisions that are common to all binary files.
The bdump program, then, will display a file in 128-byte groups, each group identified by its relative record number -- the number of the record within the file, counting from zero. The contents of the file will be shown in hexadecimal and in ASCII.
There is more than one way to display data in hexadecimal. The most common way is to spread it out on a line, with a space between each byte and with the ASCII values following:
30 31 32 33 34 35 36 37 38 39 3A 3B 3C 3D 3E 3F 0123456789:;<=>?
40 41 42... +AB...
That format uses one line to display just 16 bytes of data. Another way is to invert the format, showing the hexadecimal digits in columns below their ASCII translation:
0123456789:;<=>?+AB...
3333333333333333444...
0123456789ABCDEF012...
This vertical format allows us to put 64 bytes across the screen. However, it takes three lines to show those bytes, and requires a blank line between each 64-byte display to avoid confusion. The final result is the same; both formats use up eight screen lines in displaying 128 bytes of data. The horizontal format is slightly easier to create using the toolkit macros, so we'll use it.
Bdump is much like cdump in its outline. It must open a file, read it, and display it. A draft plan expressing this appears in Figure 5-5.
program bdump(filespec)
input is a file
user is a file representing the screen
check operand count of 1, etc. (CHKOPS)
validate filespec, assign and open (OPENIN)
repeat
get 128 bytes and display it
until end-of-file(input) or keyboard-pending
end bdump.
Figure 5-5. A broad-brush plan for bdump.
That plan merely repeats the obvious, but there is virtue in writing it down anyway. I have often made the mistake of wading into the details of a program I thought would be just like some other, only to discover that it wasn't; that something in the specification mandated a different plan. Now that we have examined Figure 5-5 and decided that, yes, it is just like cdump's plan and so should present no problems, we can set it aside. What we have accomplished is to eliminate all of the problem except the line "get 128 bytes and display it," and now we can focus on that.
It's no problem to get 128 (or any other number) of binary bytes from a file; there is a toolkit macro, fgetblok, for just that purpose. Having gotten the data, we must display it in eight lines with a record number at the end of the first one. That leads to the plan in Figure 5-6.
show128(recnum)
block is a space for 128 bytes
line is space for a display line
fgetblok(input,block)
process 1st 16 bytes into line
append record number recnum to line
fputline(user,line)
do 7 more times
process next 16 bytes into line
fputline(user,line)
end do.
end show128.
Figure 5-6. A plan for displaying one 128-byte block.
The first line has to be treated differently because only it will contain the record number. The remaining lines can be handled in a loop. However, the parallel construction of "process 1st 16 bytes" and "process next 16 bytes" is no accident. Most of the first line will be created by the same actions that create the whole of the other lines, and those actions can be a subroutine. Thus we reduce the problem "get 128 bytes and display it" to one of "process 16 bytes into line."
Each display line has two parts, a display of hex numbers and a display of ASCII text. The hex numbers will reflect the exact values of the bytes from the file, while the text display will show them in the way that cdump does -- with characters for the printable bytes and dots for the ones that aren't.
I can think of two ways of building such a display. The first way is to build a single display line by going over the file data twice. This method is outlined in Figure 5-7.
show16(bytes)
bytes is 16 bytes of file data in storage
make line the null string
for each byte x in bytes
append hex display of x to line
append a blank to line
end for
append another blank to line
for each byte x in bytes
append translate(x) to line
end for
end show16.
Figure 5-7. One of two ways of building a display line.
The second way is to process each file byte once, putting it into each of two strings, and then to concatenate the strings. This method is outlined in Figure 5-8. In both figures, the notation "translate(x)" refers to the same subroutine that we used in cdump.
show16(bytes) 2
bytes are 16 bytes of file data in storage
ascline is space for a 16-byte string
for each byte x in bytes
append hex display of x to line
append translate(x) to ascline
end for.
append a blank to line
append ascline to line
end show16.
Figure 5-8. An alternate way to build a display line.
In this program, it doesn't much matter which of the methods we use. In a higher language like C or Pascal, we'd probably favor the second plan because it has one less for-loop. When I look ahead to the assembly language encoding of each plan, however, I can see that in the first plan there is one less thing to keep track of at any one time. That is, in the first plan the program will only have to keep track of its position in the file bytes and in one string, while in the second it has two string-addresses to juggle.
The assembly code of bdump appears in Figure 5-9. As usual, it follows the pseudo-code plan. However, I made a change as I wrote it. The structure of bdump is nested deeply enough to be confusing. The structure could be summarized this way.
bdump calls on
chkops and
openin and
show128 which calls on
show16 which calls on
translate
In such a structure, it ought to be possible to understand any one level independent of the others. That's the only way to keep the program understandable and maintainable. It is always necessary to understand the abstract function of the lower routines that are called, but that is the only interlevel information that should be required. It's an important principle of software design that if you can't read a routine at one level without referring to the code in levels above or below it, the structure of the program is faulty.
title 'BDUMP -- binary file display'
;===============================================================
; BDUMP filespec
; Displays file "filespec" in hex and ascii, 16 bytes to the
; line, with CP/M record numbers.
; Abort messages:
; usage message
; input-open messages
; Modules:
; CHKOPS
; OPENIN
; History
; initial code 6/26/84
;===============================================================
maclib environ
dseg
usage: db 'BDUMP filespec'
db AsciiCR,AsciiLF
db 'Displays contents of file 16 bytes/line, with'
db AsciiCR,AsciiLF
db 'data shown in both hex and ascii, with CP/M'
db AsciiCR,AsciiLF
db 'file record numbers.'
db AsciiCR,AsciiLF
db '$'
input: filedef 1024
cseg
prolog
; check operand count of 1, etc (CHKOPS)
mvi b,1 ; minimum operands: 1
mov c,b ; maximum ditto
lxi d,usage
extrn CHKOPS
call CHKOPS
; validate filespec, assign and open (OPENIN)
mvi a,1 ; operand #1 is filespec
lxi d,input ; DE->filedef for it
extrn OPENIN
call OPENIN
; HL will carry record number
lxi h,0
; DE will address input file
lxi d,input
; repeat
; get 128 bytes and display it
loop128:
call show128 ; with(file,recnum)
inx h ; next record number
; until end-of-file(input) or keyboard-pending
testcon ; keyboard pending?
jnz done ; (yes)
feof? input ; no, end of file?
jnz loop128 ; (no, continue)
;end bdump.
done: ret
;show128(DE->file,HL=recnum)
; user is a file representing the screen
; line is space for a display line
; block is space for 128 bytes of data
dseg
user: msgfile ; moved to this level
line: strspace 80
block: ds 128
cseg
show128:
push psw
push b
push d
push h ; save recnum on top of stack
; fgetblok(given file,block)
fgetblok +D,block,128
; process 1st 16 bytes into line
lxi h,block
lxi d,line
call show16 ; with(line,bytes)
; append record number recnum to line
strput +Dupdate,AsciiBlank
xthl ; save ->bytes, HL=recnum
strbwax +H
xthl ; get back HL->bytes
; fputline(user,line)
fputline user,line
; do 7 more times
mvi b,7 ; loop count for djnz
loop7:
; process next 16 bytes into line
lxi d,16
dad d ; advance HL to next 16
lxi d,line
call show16 ; with(line,bytes)
; fputline(user,line)
fputline user,line
; end do.
djnz loop7
;end show128.
pop h
pop d
pop b
pop psw
ret
;show16(DE->line,HL->bytes)
show16:
push psw
push b
push d
push h ; HL->bytes to display
; make line the null string
strnull +D
; for each byte x in bytes
mvi b,16
loophex:
; append hex display of x to line
mov a,m ; get byte "x"
inx h ; ..and advance pointer
strbbax +A
; append a blank to line
mvi a,AsciiBlank
strput +A
; end for
djnz loophex
; append another blank to line
strput +A ; A = blank at end of loop
; for each byte x in bytes
pop h ; recover ->bytes
push h ; ..and save again
mvi b,16
loopasc:
; append translate(x) to line
mov a,m
inx h
call translate
strput +A
; end for
djnz loopasc
;end show16.
pop h
pop d
pop b
pop psw
ret
;translate(x) : character (from cdump)
translate:
; if (x > 127) then x := x - 128
cpi AsciiDEL+1
jc lt128
ani AsciiDEL
lt128:
; if (x >= space) and (x < DEL) then return x
cpi AsciiBlank ; if less than space
jc iscontrol ; ..it's a control char
cpi AsciiDEL ; not less than space,
rc ; if < DEL, is ascii
iscontrol:
; if (x = CR) or (x = LF) then return backslash
cpi AsciiCR
jz slish
cpi AsciiLF
jnz dot
slish: mvi a,'+'
ret
; return a dot
dot: mvi a,'.'
ret
;end translate.
end
Figure 5-9. The assembly source code of bdump.
The levels of a program are most independent when the only flow of data between levels is through subroutine arguments downward and subroutine results upward. Any other method of exchanging data between levels confuses the relationship between levels, and can cause a change in the code at one level to propogate up or down to another level. There are several kinds of inter-level relationship that can confuse a program's structure, and some of them are very subtle. But the worst is the sharing of named variables.
Until now we have been casual about this principle, but the structure of bdump is elaborate enough that we should pay attention to it. There are two key tests for level independence. The first is, "Could this subroutine be completely rewritten without causing a change in any program that calls it?" The second is the reciprocal query, "Could the program that calls this subroutine be completely rewritten without causing a change in the subroutine?" The chkops and openin modules satisfy both; they depend only on the arguments passed to them in registers. So does the translate subroutine from cdump.
The show128 routine planned in Figure 5-6 and the show16 routines in Figure 5-7 and Figure 5-8 do not. Each depends on a variable that is defined at a higher level. Show128 assumes the existence of a file named input; show16 relies on a string-space named line. In both cases, the second test fails -- the calling program couldn't be completely rewritten without changing at least the names used in those subroutines.
Is this merely a philosophical quibble? In a program as small as bdump, perhaps so. But no; the show128 and show16 routines are potentially useful in other programs. Someday we might want to extract them, make modules of them, and use them with some other program. We would not be able to because of those cross-level name references. They would have to become external names in a module; if the code were copied bodily into another program, that program would have to define a file and string-space with the identical names and use them in the identical way. Or suppose you worked in a group of programmers and wanted to make these routines available to the others: imagine what the documentation for these little modules would look like. (In fact, over-complicated technical documentation is as often the fault of poor structure in the thing documented as it is the fault of the writer.)
It's usually easy to fix a modularity problem at the design stages. I fixed the problems in show128 and show16 as I wrote the assembly code. I made sure that all the resources they needed were either private to them, or handed to them in registers. It didn't cost anything in program size or speed.
We've designed and coded two simple file-display programs, but they turned out not to be quite as simple as expected. Designing them led us to consider how to: open an input file named as a command operand, detect end of file, and cancel a program when the user tires of it. And even a small program proved to have a structure complex enough to motivate some attention to proper modular design. In the next chapter we'll apply these principles to a more complicated display task
In this chapter we develop a pair of utilities; that is, programs that read an input file and write an output file containing the input data, modified. Along the way we will discuss the design of utilities in general, and develop another useful module.
These particular utilities tackle the problem of inserting and removing tabs from a file of ASCII text. The problem is interesting and easy to state. Because of that, it has become a standard exercise for systems programmers.
CP/M has a convention for the use of tab characters. Every serial I/O device is assumed to have tab stops set at every eighth column. If columns were numbered from zero, the stops would be at columns 8, 16, 24, and so on. It is conventional to number columns from one, so the usual way of stating the tab convention is to say, "tab stops are assumed in columns 9, 17, 25, etc."
Because of that assumption every tab has a consistent interpretation, no matter where in a file it appears: it always stands for the number of spaces needed to move to the next eighth column.
The CP/M tab convention has the useful effect of providing automatic data compression. Some operating systems do not have a tab convention. In those systems, a tab has no consistent meaning. As a result, tabs almost never appear in text files -- long strings of blanks appear instead. Multiple blanks almost never appear in files created under CP/M; they are replaced by short strings of tab characters.
Of course, not all programs put tabs into their output files. Some should not! If the data in a record occupies a different column than it will in its eventual output, tabs should not appear in it. Let's look at an example. Imagine a BASIC program like this,
3000 FOR I=1 TO J
3010 WRITE#1,DESC$(I),PRICE(I)
3020 NEXT I
which prepares an output file like this:
" Midget Widget",0.45
" Widget",0.85
" Jumbo Widget",1.49
In other words, some records contain leading blanks. The programmer has put them there for some good reason, and they should not be replaced with tabs. The fields of these records bear no necessary relation to the columns in which they begin. They might, for example, become input to a program like this,
7200 FOR I=1 TO J
7210 READ#1,WHAT$,COST
7220 PRINT "Description: ";WHAT$,COST
7230 NEXT I
which will not produce the expected output if there are tabs in the input. The tab that made sense in column 1 of an input record will not be correct in column 14 of a print line. If the data file was edited, and if the editor program replaced blanks in its output with tabs, the second program would produce the wrong output.
On the other hand, some programs produce files that don't contain tabs when tabs would be all right. Files brought to CP/M from some other operating system often don't contain tabs. Worse, files from some other operating system might contain tabs that are based on some other tab increment than eight.
If we had a utility that compressed a file by replacing blanks with tabs wherever possible, and another one that replaced tabs with the spaces they stood for, then we could solve any of these problems. We would to be able to take a file without tabs and tabbit, or take a file containing tabs based on any regular increment and untab it.
Before going further with the design of these programs, let's turn aside to the general problem of how a command like "take that file and tabbit" ought to be phrased.
How shall we phrase a command like "untab that file"? Utilities are common programs, and each of them implements a similar command: "modify this file"; or more often, "modify this file and put the result in that one." It would be a good idea to have a consistent style for such commands.
One syntax that seems very natural to me is this one:
A>utility infile outfile
where infile is the file that utility is to read, and outfile is the file it is to write. Sometimes we shall find need for a third operand, options:
A>utility infile outfile options
Such a command seems to me to say, "perform utility on infile, put the result in outfile, and by the way, do it according to options."
Our work would be easier if we could require the user to specify complete filespecs for both infile and outfile. But good utility programs are used often, and the commands are much easier to type if we allow a reasonable set of defaults for the file references.
In CP/M 2.2, a file reference consists of three parts -- a drivecode, a filename, and a filetype. We can represent them so:
x:filename.typ
In CP/M Plus, as in all the newer Digital Research operating systems, a filespec has a fourth part, its password:
x:filename.typ;password
All three (or four) parts are set up in a file definition by the fassign toolkit function, and its input is usually a command operand string typed by the user. The user, however, ought not to be made to give all the parts of a filespec operand when the program can provide a reasonable default. The user will appreciate us even more if we use the default rules consistently in every utility.
If the user omits the drivecode, fassign will set up the file for access to the default disk drive, the one whose letter appears in the system prompt. This is standard CP/M practice and we will apply it to the input operand.
CP/M allows a file to have a filename that is completely blank, as in "b:.doc." Some programs won't accept such a filename, and people hardly every create one except by accident, but just the same such filespecs are permissible. If the infile operand omits the filename, it specifies a filename of eight spaces.
A filetype of three blanks is allowed by CP/M, as in "b:letter" or "b:letter;pass." Again, such files are rarely created, but they are permissible and we will permit them. When the filetype is omitted from the infile operand, we will assume a filetype of three spaces.
All of these things are done automatically by fassign when it processes a character string into a file definition.
The outfile operand is a file reference and has the same parts. If a part of the output fileref is omitted, what shall a utility do? The simple answer would be "exactly what it does for the infile operand." However, a utility's output file is closely related to its input file. It would be convenient if its default file reference were related as well. A simple rule is this: if a part of the output filespec is omitted, a utility will use the same part of the input reference. Let's consider the effect of that rule for several variations of a hypothetical utility program, process.
A>process chap01.doc b:
The input file is a:chap01.doc (the default drive will be used). The output drivecode has been specified, but the output filename and filetype have been omitted. Copying these parts of the input fileref gives a complete output file reference of b:chap01.doc. That certainly seems more reasonable than sending the output to a file whose name and type are all-blank.
A>process chap01.doc .dat
The input file is again a:chap01.doc. The output filetype is given but its drivecode and filename are missing. Taking them from the input reference gives an output file of a:chap01.dat. The user has been relieved of making six redundant keystrokes.
A>process input c:output
The input file is a:input (default drive, blank filetype). After copying the (blank) filetype from the input operand, the output file is c:output.
A>process b:replaced.doc
The input file is b:replaced.doc. All three parts of the output reference are missing. Copying them from the input reference gives us an output file of -- b:replaced.doc. This scheme of defaults calls for the output file to replace the input file! Can we permit this? It seems to imply that the program will be writing to the same file it is reading from.
When I realized this, my first thought was to find some way to ban it. On reflection I realized, first, that the situation could arise no matter what rules we use (all the user has to do is type the same filespec in full for both operands) and second, that the facility is a useful one; there are many times when exactly what we want a utility to do is to replace a file with a modified version of it. It turns out to be perfectly feasible to implement.
We have specified what a utility should do with the drivecode, filename, and filetype of its input and output operands. What should it do with their passwords? Under CP/M 2.2, or course, the answer is "nothing." The fassign macro will process a password and store it where CP/M can find it, but the BDOS of CP/M 2.2 will ignore it. Under CP/M Plus, a utility has to do something reasonable when one or both of its file operands include a password.
File passwords are not easy to handle in any of the CP/M systems that support them. There are two ways for the user to specify one: by appending it to a filespec, or by setting a default password before giving the command that uses the file. If the default password is set, the user needn't give it in the infile operand; the program will be able to open the file without it. Therefore, the lack of a password in the infile operand doesn't mean that the file is unprotected; it might still have a password. However, the default password has no effect on newly created files. They don't receive a password automatically.
A new file receives its password when it is created, and the password may be applied at any of three levels: read, write, or delete. A read password is required for any use of the file; a write password must be given when the file is to be extended or updated in place; the delete password is required only to erase or rename the file. There is no convenient syntax for specifying which level of password an output file is to receive. If the outfile operand includes a password, which level should a utility apply? The answer to that one is easy, if uncomfortable. The purpose of a password is security, and you don't take chances in a secure environment. We dare not assume the user wants anything less than maximum security. The program must apply the password at the read level. (That is what pip does, by the way.) However, a file with a read-level password is an awkward thing. You must specify the password to make any use of it whatever, even to type it.
A utility must use the read level if it applies a password at all; and it cannot always tell when the input file has a password. For these reasons, it seems best not to extend the utility convention to the password field; best not, that is, supply a missing outfile password by copying one from infile. If the user wants a password on the new output file, the user can specify it explicitly as part of the output operand.
All of these considerations went into the design of the toolkit functions that support fassign and other file macros (as is discussed more thoroughly in Part II). The fassign macro will accept four parameters. Ignoring the fourth for the present, the first three are
fassign newfile,string,default
In previous programs we have used only the first two, newfile naming the filedef to receive the filespec and string naming the character string that represents the filespec (usually a command operand).
The optional third operand, default, names a second filedef, one that has already had a filespec assigned to it. After processing string into newfile, fassign checks to see if the drivecode, filename, or filetype were omitted. If a part was omitted, and if the default parameter was specified, the missing part is copied to newfile from default. The utility operand conventions can be implemented this way. Assign the first operand to a file; then present that file as the default while assigning the second operand to another file.
The feature of replacing an input file is implemented by the frewrite function. It opens a file for output from the beginning (I named it after the rewrite procedure of Pascal, which does the same job). We have used it once before, in the keyfile program.
The frewrite function supports file replacement this way. It first checks to see if a file of the same name already exists. If not, it creates a file and all is well. If a previous file does exist, however, it doesn't erase it (as a Pascal, BASIC, or C program would do). Instead, it creates a new file with a filetype of $$$. Recall our hypothetical example
A>process b:replaced.doc
in which we intend the program to read b:replaced.doc while simultaneously writing a new version of it. The program will ask frewrite to open a new file named b:replaced.doc, but frewrite won't do it. It will see the existing file, and will create instead a new file named b:replaced.$$$. This new file will receive the output of the program; the input file won't be disturbed.
When it finishes, the program will use the fclose macro to tidy up the output file. The fclose function will discover the situation, and it will do three things. It will close the new file b:replaced.$$$. That ensures that the file's data are complete and the disk directory updated. Then it will erase the previous file, b:replaced.doc. Finally, it will rename b:replaced.$$$ to b:replaced.doc.
This scheme takes care of the file-replacement problem very nicely and, since it is completely hidden in the toolkit functions, it is simple to use. It does run into some problems with password-protected files under CP/M Plus, but they are not crippling. For example, if b:replaced.doc has a delete-level password, the program will crash when fclose tries to erase the old file. But all such problems take place after the program finishes its work and the output data are secure under their temporary filetype; and the user can avoid them all by specifying the output file in full with its password.
The utility convention is a major part of the external specification of tabbit; now that it has been settled, we can specify the rest.
The tabbit command will read an input file of ASCII text and will write another text file. Its command syntax is
tabbit infile outfile
In the outfile file, multiple blanks will have been replaced by tabs wherever that can be done without changing the appearance of the file as typed. In addition, blank characters at the end of a line will have been deleted. (Such useless, trailing blanks are rare in CP/M files but common in files brought from other operating systems.)
Tabbit may be applied to any text file, but it is not recommended for use on files that will receive other processing before they are printed (or else such files should be untabbed before processing).
Tabbit, like most utilities, is basically a program to copy one file to another. After preparing the input and output files, a file copy proceeds like this:
repeat
read a unit of the input file
process it
write it to the output file
until (end of input file)
The keyfile program we wrote in chapter 3 followed that pattern. Its input file was the keyboard; the unit it handled was the line; and it did no processing. A program like tabbit introduces only three refinements: The input file will not be limited to the keyboard, but may be a file of any sort; the "unit" will usually be a single character; and there will be a processing step between reading and writing. The body of tabbit will have a shape like this.
repeat
read a character x from the input file
if (x is a blank) then
do something about converting it to a tab
write a character to the output file
until (end of input file)
Now all we have to do is figure out how to convert the blanks to tabs. Unfortunately, if we limit our thinking to the "read a byte, write a byte" model, we aren't going to find one.
In many utilities, we can make a decision about what to do with a character based solely on the character's value. If we were writing a program whose only task was to convert all digits to asterisks, for instance, we could use a plan like this.
repeat
read a character x from the input file
if (x is a digit) then x := '*'
write x to the output file
until(end of input file)
The processing step is simple because the decision to convert x is based only on the value of x.
Tabbit presents a tougher problem. The decision of whether to convert a blank to a tab depends on what follows it within the file. If it is followed by nothing but blanks up to the next tab stop, then a single tab character should be written. If not, that is, if something other than a blank occurs before the next tab stop, then the blank should be written.
The distressing thing is that, in order to discover the context, we have to read onward in the file. If we find nothing but blanks, fine; they'll all collapse into a single tab, which we'll write. But if they don't, we'll have read several characters without copying them, and must hasten to set things right. A tidy, elegant solution to this problem is by no means easy to find. It is possible to invent all sorts of over-elaborate schemes to handle it; I know, I've done it.
One of the tidy solutions runs along these lines.
repeat
read a character x from the input
while (x is a blank)
count it
read another x
end while
write as many tabs as the count permits
write any blanks not accounted for
write x
until (end of input)
The idea is to suck up as many contiguous blanks as possible. At the end while point, we have counted some number of blanks -- possible zero -- and x is not a blank. The count of blanks summarizes the fact of how much white space should precede the nonblank x. We'll have achieved the aim of tabbit when we can reproduce that white space with as many tabs and as few blanks as possible.
The opening of the plan, reading and counting blanks, and its close, writing x, will be simple. The vague part of the problem has been reduced to two lines. Given a count of blanks (which may be zero),
write as many tabs as the count permits
write any blanks still unaccounted for
The count of blanks is a count of columns; that is, a count of record, screen, or print positions that are to be skipped over. How shall we decide how many tabs such a count permits? This is my solution.
n := columns to the next tab stop
while (count >= n)
write a tab to output
count := count-n
n := 8
end while
Suppose for the moment that we are working at the first character of a line. Then the first line, n := columns to the next tab stop, amounts to only n := 8; that is, from the first position of a line there are eight columns to the next tab stop in the ninth position. The while-loop is clearly correct under that supposition. If 16 blanks had been counted starting at the first position of a line, the loop would write two tabs to the output and reduce the count to zero.
If ten blanks had been counted, that loop would write one tab and leave the count on 2. Two blanks remain unaccounted for. They can be dealt with in a loop that is very similar to the first one.
while (count > 0)
write a blank to the output
count := count - 1
end while
There is just one loose end, namely, how to calculate the number of columns to the next tab stop when we are not in the first position of a line. Let's defer that and hark back to the specification of tabbit. In it, I rashly promised to delete trailing blanks from any line. Our plan doesn't reflect that yet, but we can add it easily. Recall that, after counting blanks, the current character x must be nonblank. It might be any one of three kinds of nonblanks, however. It might be
The first case, end of file, needn't worry us too much. The ASCII-file input functions of the toolbox take pains to ensure that they return an end of line character immediately before returning end of file, even if the file lacks one. Therefore when we see end of file, count will have to be zero, since the end of file always follows end of line with no intervening characters.
That leaves two cases: x either contains an ASCII CR, indicating end of line, or it does not. If it does not, the blanks summarized in count are necessary white space and must be written. If it does, they are redundant and may be skipped. If we put all these things together, we arrive at the plan shown in Figure 6-1.
repeat
read a character x from the input
while (x is a blank)
count it
read another x
end while
if (x is not a CR) then
n := columns to the next tab stop
while (count >= n)
write a tab to output
count := count-n
n := 8
end while
while (count > 0)
write a blank to the output
count := count - 1
end while
end if
write x to the output
until (end of input)
Figure 6-1. First-draft plan for the body of tabbit.
Just one problem remains: how can we know how many columns remain to the next tab stop, regardless of the current position in the line? Well, suppose that we know what the current position is, as a count of columns beginning at 1 in the left margin. Now enumerate all the answers for the first dozen columns:
column: 1 2 3 4 5 6 7 8 9 10 11 12...
to-tab: 8 7 6 5 4 3 2 1 8 7 6 5...
It's like a question from a sophisticated IQ test: "What expression, applied to the numbers of the top line, will yield the numbers on the bottom line?" The answer jumps out at you if you number the column positions, not from one, but from zero:
column: 0 1 2 3 4 5 6 7 8 9 10 11...
to-tab: 8 7 6 5 4 3 2 1 8 7 6 5...
The expression we want is
n := 8 - (column mod 8)
where column is the current column position counting from zero.
The modulo, or mod, function crops up often in programming. Provided that we deal only with positive integers, x modulo y is simply the remainder after dividing x by y, and is always an integer between zero and y-1 inclusive. Provided we number things starting from zero, the expression number mod y has the effect of folding all possible numbers back onto the first y numbers; as here the expression column mod 8 will fold any value of column back onto the first eight column numbers, 0 to 7.
This "folding" effect of modulo works neatly only when things are numbered starting with zero, and that explains why programmers so often use origin-zero numbering schemes. Thanks to modulo, we need consider only the first eight column numbers, and the expression 8-number yields the count of positions up to the next tab stop.
Modulo is particularly easy to implement when working with binary numbers and y is an integral power of two. Eight is such a power of two; as a result, column mod 8 amounts to nothing more than extracting the three least-significant bits of column. In other words,
column mod 8
column AND 0111b
have exactly the same result. No doubt that's why the CP/M tab increment is eight, not ten.
We are squeezing the unknown parts out of the plan. Now we have an expression that will set up our tab-producing loop, but it requires column as input. That variable must contain a running count of the current output column position. We could think of it as an analogue of the physical position of a print-head or cursor as it displays the file. Every character that we write to the output file must have the same effect on column that it would have on the position of a cursor or print-head.
An ordinary character should make column increase by one. A CR should reset it to zero. A tab character should advance it to the next tab stop, and a backspace character should decrease it by one. The first of these are obvious, but backspace is a bit tricky. A real printer won't backspace out of column 1, so when writing a backspace code we mustn't decrement column lower than zero. (Of course, backspace is an unlikely character to find in a disk file, but if we disregard it, some user will apply tabbit to a file that contains one and report a bug. Besides, who says tabbit's input file has to be a disk? It might be CON:.)
Advancing column to the next tab stop amounts to rounding it up to an even multiple of eight. Since eight is a power of two, we can do that with the expression
column := 1 + (column OR 0111b)
When we augment Figure 6-1 with statements to maintain and use column, the result is Figure 6-2, and the plan for the body of tabbit is complete.
count, column, and n are integers
x is a character
column := 0
repeat
x := fgetchar(input)
count := 0
while (x = AsciiBlank)
count := count + 1
x := fgetchar(input)
end while
if (x <> AsciiCR) then
n := 8 - ( column mod 8 )
while (count >= n)
fputchar(output,AsciiTAB)
column := column + n
count := count - n
n := 8
end while
while (count > 0)
fputchar(output,AsciiBlank)
column := column + 1
count := count - 1
end while
end if
if (x < AsciiBlank) then
if (x = AsciiCR) then
column := 0
elif (x = AsciiBS) and (column > 0) then
column := column - 1
elif (x = AsciiTAB) then
column := (column OR 0111b) + 1
endif
else if (x < AsciiDEL) then
column := column + 1
endif
fputchar(output,x)
until (end of input)
Figure 6-2. Final plan for the body of tabbit.
The plan in Figure 6-2 is complete for the body of the program, but it omits the initialization and termination steps. What needs to be done? The first step, as in previous programs, will be to check the number of operands and terminate with a usage message if necessary. The chkops module will handle that. Then the input file must be assigned and opened. That process will be similar to the same step in the cdump and bdump programs. The openin module would suffice for it.
The third step of initialization will be to open the output file. This will be a new process for us. We will want to assign the second command operand to a file, but we will want to include in the assignment a default file -- the assigned, opened input file. After the assignment, the file must be opened with the frewrite macro to prepare it for output.
How shall we handle this step? It should be generalized and isolated in a module for use with other utilities. However, the assignment of an operand string to the output file is subject to the same two errors that can afflict the input file; that is, the operand could turn out to be an invalid filespec, or it could turn out to be ambiguous.
The openin module that we created in chapter 5 already contains apparatus to construct error messages for these situations. With its code, string constants, and working space, this apparatus occupies a couple of hundred bytes. It would be a shame to duplicate all that in another module, causing all utilities to contain two copies of those error messages. Instead, let's create a module that performs both kinds of opens that a utility needs.
The code of this module, openut, appears in Figure 6-3. I created it by editing openin. The openin module is still useful; it contains the minimum function needed by a program that only reads a file. Many such programs can be written.
The openut module in Figure 6-3 is a superset of openin. It contains a public function named openin that does exactly what the simpler module does -- assign an operand to a file and open it for input, aborting if the file is empty or not found. It contains an additional function, openou (public names are limited to six characters, unfortunately). This function assigns an operand to a file with a default, and opens the file for output.
The operand-assignment operation is common to both of these functions; it has been extracted into a small subroutine. The business of building an error message has been disentangled from the rest of the code as well; in fact, the structure of openin has been cleaned up generally to make openut.
name 'OPENUT'
;===============================================================
; OPENUT module
;
; Function OPENIN( A=operand number, DE->filedef)
; Acquire the given operand string and assign it to the filedef,
; then open the file for input. If problems, abort with one of
; three messages:
; FRUMMAGE is not a valid filespec.
; FRUMMAGE is ambiguous; an explicit name is needed.
; FRUMMAGE is empty or does not exist.
;
; Function OPENOU( A=operand, DE->filedef, BC->default filedef)
; As for OPENIN, but allows a default filedef, opens for output
; with frewrite and hence doesn't care if file is empty.
;
maclib environ
dseg
is: strconst ' is '
inval: strconst 'not a valid filespec'
ambig: strconst 'ambiguous; an explicit name is needed'
empty: strconst 'empty or does not exist'
dotdol: strconst '.$'
msg: strspace 64
cseg
entersub
public OPENIN
OPENIN:
push psw
push b
push d
push h
lxi b,0 ; no default filedef for input
call Assign ; assign & check the operand
freset +D ; try to open it
lxi b,empty ; (but assume we can't)
cz Error ; (we couldn't)
pop h
pop d
pop b
pop psw
ret
public OPENOU
OPENOU:
push psw
push b
push d
push h
call Assign ; try the assignment
frewrite +D ; and open for output
pop h
pop d
pop b
pop psw
ret
; Internal subroutine Assign(A=op#, DE->file, BC->dflt) --
; Attempt the assign of operand to file with default and
; abort if necessary.
Assign:
push d ; save ->file
tailtokn +A ; get DE->operand string
xchg ; and move to HL
pop d ; recover DE->file
fassign +B
lxi b,inval ; (set up for invalid)
cz Error ; oops, not a valid filespec
cpi '?' ; was it ambiguous?
lxi b,ambig ; (prepare in case it was)
cz Error ; (yes)
ret ; assigned ok...
; Internal subroutine Error(BC->submessage, HL->operand)
; Not really a subroutine because it always aborts and never
; returns -- construct an abort message including the operand
; string and abort the program.
Error:
; copy the operand to the message field first
lxi d,msg
strcopy +Hupdate
; add the word " is "
lxi h,is
strappnd +Hupdate
; then add the specific explanation
mov h,b ! mov l,c
strappnd +Hupdate
; finish up with a period and a dollar sign
lxi h,dotdol
strappnd +Hupdate
; that does it -- byebye
lxi d,msg
abort ,+D
end
Figure 6-3. Assembly code of the module openut.
The plan for tabbit was so thorough that the assembly-language source fell into place quickly and easily (it appears in Figure 6-4). It opens with calls on chkops, openin, and the new openou, and closes with an fclose of the output file. The code to implement Figure 6-2 falls between these, but I chose to make that a subroutine so as to make the main line of initialization and termination clearer.
;===============================================================
; TABBIT input output
; Reads an ASCII file and converts sequences of blanks to tabs
; wherever possible. Also deletes trailing blanks on a line.
; Abort messages:
; file-open messages
; usage message
; Modules
; CHKOPS
; OPENUT (OPENIN, OPENOU)
; History
; Initial code 6 July 1984
;===============================================================
maclib environ
dseg
usage:
db AsciiTAB,'TABBIT infile outfile'
db AsciiCR,AsciiLF
db 'Tabbit reads the input file and converts sequences of'
db AsciiCR,AsciiLF
db 'blanks to tabs where possible. It also deletes blanks'
db AsciiCR,AsciiLF
db 'at the ends of lines.'
db AsciiCR,AsciiLF
db 'The input file should be all-ASCII, and its data should'
db AsciiCR,AsciiLF
db 'not be intended for further processing before printing.'
db AsciiCR,AsciiLF,'$'
input: filedef 128 ; small input buffer
output: filedef 16384 ; big output buffer for speed
cseg
prolog
extrn CHKOPS,OPENIN,OPENOU
mvi b,1 ; at least one operand
mvi c,2 ; but not more than 2
lxi d,usage
call CHKOPS ; chkops(min,max,usage)
mvi a,1 ; 1st operand is input
lxi d,input
call OPENIN
mvi a,2 ; 2nd is output (may be null)
lxi b,input ; default filespec is "input"
lxi d,output
call OPENOU
call Process ; do the main loop
fclose output ; close the output file
ret ; and end
;======= Body of program (from pseudo-code) ========
Process:
;.column := 0
lxi b,0 ; carry column in BC
lxi d,input ; carry DE->input file
;.repeat
mainloop:
;.....x := fgetchar(input)
fgetchar +D
;.....count := 0
lxi h,0 ; count in HL
;.....while (x = AsciiBlank)
readblank:
cpi AsciiBlank
jnz notblank
;.........count := count + 1
;.........x := fgetchar(input)
inx h
fgetchar +D
;.....end while
jmp readblank
notblank:
;.....if (x <> AsciiCR) then
cpi AsciiCR
jz isCR
push psw ; save the byte "x"
push d ; save ->input, free up DE
;.........n := 8 - ( column mod 8 )
; note: since the expression needs only the low bits of
; the count, we can reorder it to (-(column mod 8)) + 8
; and do it all in the A-register.
mov a,c ; low-order bits of column
ani 0111b ; A = column mod 8
neg a ; A = -(column mod 8)
adi 8 ; A = (-(column mod 8))+8
mov e,a
mvi d,0 ; DE = 8-(column mod 8)
;.........while (count >= n)
tabloop:
cmpbw +D ; flags := count-n
jc tabend ; count < n
;.............fputchar(output,AsciiTAB)
mvi a,AsciiTAB
fputchar output,+A
;.............column := column + n
;.............count := count - n
ora a ; clear carry
dsbc d ; count := count-n
xchg ; (DE=count, HL=n)
dad b ; HL = column+n
mov b,h !mov c,l; move it back to BC
xchg ; (restore HL=count, DE=junk)
;.............n := 8
lxi d,8
;.........end while
jmp tabloop
tabend:
;.........while (count > 0)
blankloop:
mov a,h ! ora l ; test HL (count) for zero
jz blankend
;.............fputchar(output,AsciiBlank)
mvi a,AsciiBlank
fputchar output,+A
;.............column := column + 1
;.............count := count - 1
inx b
dcx h
;.........end while
jmp blankloop
blankend:
;.....end if
pop d
pop psw
isCR:
;.....if (x < AsciiBlank) then
cpi AsciiBlank
jnc notCC
;.........if (x = AsciiCR) then
;..................column := 0
cpi AsciiCR
jnz notCR
lxi b,0
jmp writex
notCR:
;.........elif (x = AsciiBS) and (column > 0) then
;..................column := column - 1
cpi AsciiBS
jnz notBS
mov h,a ; save "x"
mov a,b !ora c ; test column for zero
mov a,h ; restore "x"
jz writex ; (column = 0, don't back up)
dcx b
jmp writex
notBS:
;.........elif (x = AsciiTAB) then
;..................column := (column OR 0111b) + 1
cpi AsciiTAB
jnz writex
mov h,a ; save "x"
mov a,c
ori 0111b
mov c,a ; BC = column OR 0111b
inx b ; ..plus one
mov a,h
jmp writex
;.........endif
notCC:
;.....else if (x < AsciiDEL) then
;.........column := column + 1
cpi AsciiDEL
jnc writex
inx b
;.....endif
writex:
;.....fputchar(output,x)
fputchar output,+A
;.until (end of input)
cpi CpmEof
jnz mainloop
ret
end
Figure 6-4. The assembly-language source code of tabbit.
That subroutine, process, is another direct translation from the pseudo-code plan to assembly language, but a bit more complicated than previous efforts. The architecture of the Z80 CPU complicated matters at three points.
A pseudo-code loop or if statement must be implemented with conditional jumps. The program must prepare the CPU's flag registers properly before taking a conditional jump. And almost the only way of setting the flags is to perform some operation in register A. For instance, the pseudo-code
while (count > 0)
might, if "count" is being carried in registers HL, become the assembly statements
mov a,h ! ora l ; test HL for zero
jz outofloop
That's fine, so long as there was nothing of interest in register A beforehand. In tabbit, however, I was carrying the all-important variable x, the current nonblank input byte, in register A. At three points it had to be set aside temporarily while register A was used to set up for conditional jumps. In one case, the variable x was set aside over a long stretch of code by pushing it onto the stack; in two others it was tucked away in another register that was unused at that point. Find these points in Figure 6-4 and then ask yourself what they imply for the maintainability of the code. Imagine someone a year from now wanting to add a new function to tabbit, a function that needs another register. Might these temporary saves of x be missed, or fouled up somehow, so as to cause a bug? What could be done to make things easier for that person?
The main reason for using assembly language is efficiency; that is, getting a smaller, faster program. It might occur to you that Figure 6-2 is so detailed that it is almost ready for compiling in C or Pascal as it stands. What is gained by translating it into assembly language?
In order to find out, I translated Figure 6-2 into the C language and compiled it with a popular 8-bit implementation of C. The translation was straightforward, although not as simple as I thought it would be. You can read it in Figure 6-5. Here are the results.
/* "tabbit" in C (both filespecs must be given in full) */
#include "stdio.h"
#define CR '+n'
#define BS 0x08
#define TAB 0x09
#define BLANK 0x20
#define DEL 0x7f
#define ABORT(X) fputs(X,stdout);exit();
int count, column, n;
int x; /* has to be "int" to test for EOF */
FILE *infile, *outfile;
main(argc,argv)
int argc; /* count of operands, includes 1 for program-name */
char *argv[];
{ /* "chkops" */
if ((argc != 3) || ('?' == *argv[1]))
/* "openin" */
if (NULL == (infile = fopen(argv[1],"r")) )
/* "openou" */
if (NULL == (outfile = fopen(argv[2],"w")) )
process();
}
process()
{
column = 0;
do
{
x = agetc(infile);
count = 0;
while (x == BLANK)
{
count++;
x = agetc(infile);
}
if (x != CR)
{
n = 8 - ( column & 0x0007 );
while (count >= n)
{
aputc(TAB,outfile);
column += n;
count -= n;
n = 8;
}
while (count > 0)
{
aputc(BLANK,outfile);
column++;
count--;
}
}
if (x < BLANK)
{
if (x == CR) column = 0;
else if ((x == BS) && (column > 0)) column--;
else if (x == TAB) column = (column | 0x07)+1;
}
else if (x < DEL) column++;
aputc(x,outfile);
} while(x != EOF);
}
Figure 6-5. The tabbit program written in C.
The C source file is considerably shorter at 1.4 kilobytes (Kb) versus 4.25 Kb. The difference would be less if the C file had a proper prologue and more comments (as it should); even so, the assembly language will always be at least twice as large (and will presumably take twice as long to compose, all else being equal).
The programs took about the same length of time to compile (assemble) and link -- the assembly version was ready to run after 60 seconds, the C version after 73 seconds. This relationship would vary with the C compiler used; some are faster and some slower than the one I used. In any case, the cycle of edit, compile, and test takes about the same length of time for either language.
The assembly program was smaller, as it should be. Tabbit in assembly language, linked with all the toolkit modules it uses, comes to 4.0 Kb. The C version, linked with this compiler's run-time library, came to 9.8 Kb, more than twice as large. This ratio would have been much larger in favor of assembly language had I not been careful to avoid the printf() function of C which requires elaborate library support.
In execution the assembly program was much the faster. It processed a 5.3 Kb input file (its own source with all tabs converted to blanks) in 5.8 seconds; the C program took 9.8 seconds to process the same file.
We've done tabbit; now let's address the opposite problem. Suppose that we have an ASCII file the contains tabs, and we don't want the tabs. Perhaps we ran tabbit on a file and then realized that its contents would be rearranged at output, making the tabs invalid. Or perhaps we have downloaded this file from a mainframe system that defines a different tab-increment than CP/M's eight. We want the tabs replaced by the blanks that they stand for. Now in fact, the pip program will do exactly that, so it isn't really necessary to write a special program for the purpose. However, it is an interesting problem. In particular, it gives us an excuse to write a utility that takes an option.
The untab utility will processes an ASCII file to remove all tabs and replace them with the blanks that they represent. It will assume that the tabs in the file are based on some regular increment. Unless the increment is specified otherwise, an increment of 8 (the customary CP/M increment) will be used. However, a different increment between 1 and 255 may be specified as an option in the command line.
The syntax of untab is
A>untab infile outfile [increment]
The file references are given as for other utilities. Omitted parts of the output reference are supplied from the input reference. If the output reference is omitted entirely, the input file will be replaced.
The option [increment] may be omitted. If it is, the command will assume a tab increment of 8. A different increment may be specified as a decimal number enclosed in square brackets. For example,
A>untab thisfile thatfile [10]
will produce "thatfile" from "thisfile" using a tab increment of 10.
It is only recently that Digital Research has attempted to standardize the syntax of options in commands. Think of the variety of ways of coding options. The asm assembler takes parameters as single letters in the filetype position. The mac and rmac assemblers take two-letter parameters following a dollar sign. The use of a hyphen is becoming popular in some circles. Other writers have used the slash as a delimiter for parameters. Indeed, almost every ASCII punctuation character has been used to distinguish an option from a filespec by some program or other. Which one ought we to use? After some thought, it seemed best to me to use the square brackets.
If you are using CP/M 2.2, you are used to giving options within square brackets, but only to pip, as for instance when you enter
pip b:=a:*.asm[v]
However, the newer Digital Research operating systems -- MP/M 2, CP/M Plus, and Concurrent CP/M -- use these square brackets in many commands. The link and lib programs that we use with the rmac relocating assembler follow this custom as well.
The toolkit functions were designed with the square-bracket usage in mind. In particular, fassign takes the left and right square-bracket characters to be filespec delimiters. Either one stops its scan over a filespec; the contents of a string preceding the bracket are part of the filespec but the bracket itself is not.
This fits in well with the utility convention for filespec operands. If the outfile operand is omitted, the option will appear as the second command operand. We needn't make a special test for this case; we can pass the operand string (of, say, [10]) to fassign and it, finding nothing to the left of the filespec delimiter "[," will treat the operand as a null string for file-assignment purposes.
As we did with tabbit, let's defer planning the initialization steps and go to work on the processing loop. Unlike tabbit's processing loop, that of untab can follow the simplest utility model:
repeat
read a byte x
do something with it
until (end of input)
In this case, "doing something" with an input byte comes down to two cases: the input byte is a tab, or it isn't. If it is a tab, we want to write one or more blanks in its place. We can formalize the idea this way.
repeat
get a byte x
if (x is a tab) then
write the number of spaces it stands for
else
write x
endif
until (end of input)
The code is simpler than tabbit's because no look-ahead is needed. In tabbit, the appearance of a space marked a point at which the program might be able to substitute a tab. The uncertainty could only be resolved by reading further in the file. In untab, the appearance of a tab signals a point at which spaces will be substituted.
Ah, but how many spaces? Two factors determine the answer -- the tab increment, and the current position within the file. The latter is a column count, just like the one we maintain throughout tabbit. The tab increment will be either eight, or the number given as an option in the command.
If we assumed a fixed tab increment of 8, the answer would be simple to obtain. It would be
8-(column mod 8)
the same expression that we used in tabbit to compute how many positions remained to a tab stop. But that expression is just a special case of
tabincr - (column mod tabincr)
where tabincr is any regular tab increment. In tabbit we used a fixed increment of 8, and that made modulo an easy function to implement. Here we must take column mod tabincr when tabincr may be any number from 1 to 255. Since both are positive integers, "modulo" and "remainder" are identical (remainder and modulo are not the same function when either argument is negative, a point that is often overlooked). We have will have to perform a division of a 16-bit column value by an 8-bit tab increment. The toolkit functions contain such a divide routine.
With these things in mind, we can lay out a fairly detailed plan for untab (Figure 6-6). Two lines are still fuzzy in that plan. One of them is "adjust column for the effect of x." That's just shorthand for the same set of ifs and elses that appear at the end of tabbit; there are no surprises in it.
program untab(in, out, option)
tabincr, column, n are integers
infile, outfile are files
chkops(1,3)
openin(1,infile)
openou(2,outfile,infile)
extract tab-increment from option to tabincr
repeat
x := fgetchar(input)
if (x = AsciiTAB) then
n := tabincr - (column mod tabincr)
do n times: fputchar(output,AsciiBlank)
column := column + n
else
fputchar(output,x)
adjust column for effect of x
endif
until (x = CpmEof)
close outfile
end untab.
Figure 6-6. Plan for the untab program.
The other fuzzy area is expressed by the line "extract tab-increment from option." That problem breaks down immediately into two problems: (1) locate the option operand-string, and (2) if there was one, extract a number from it. At first glance, neither of these steps looks too hard.
Finding the option operand isn't too hard. As we have specified the command's syntax, the option must be the last operand. We wrote the chkops module so that it returns in register A the number of operands that appeared in the command. If there were three operands, the option operand is the third; if two, it's the second. So a call on the toolkit function tailtokn, passing the same number that chkops returned, will yield the address of the last operand-string.
Of course, if the user enters only the two filespecs, the last operand string will be the outfile operand, not an option. We can eliminate that case by looking for a left-bracket character as the first byte of the string.
Once we have the option-operand as a string, it is not difficult to extract a number from it. We must step over the opening bracket character, then use stradbw to convert ASCII digits to a binary word. Then we should check the result to see if it is in the specified range of 1-255.
All this is not hard to do, but it doesn't add up to a sophisticated user interface, either. Consider what the user might try, and how the program would react to it. For instance, the user might omit both file operands.
untab [11]
In this case, the program would ask openin to assign and open a file based on the first operand, [11]. But the bracket is a filespec delimiter to fassign, so the input filedef would be assigned a filename and filetype of all blanks; that file would not be found, and the program's response would be to abort with the message
[11] is empty or does not exist.
That doesn't match the conventional idea of "user friendly," but at least it would alert the user that something is wrong.
Another possibility is that the user would run the option up against the output filespec, as pip requires.
untab thisfile thatfile[16]
In this case, the two files would be opened correctly, but our scheme for locating the option would fail. The toolkit macros split the command "tail" into operand strings only at blanks or commas, so this command has but two operands: thisfile and thatfile[16]. The program would check the second operand for a leading bracket, fail to find it, and continue with the default increment of eight instead of the desired 16.
A third glitch appears if the user inserts any spaces into the option.
untab this that [ 16 ]
Now there are not three, not four, but five operands, and chkops will abort the program with the usage message.
Other erroneous combinations are possible, and it would take a very sophisticated program to analyze for all possible errors. Such analysis might be easier if the toolkit function savetail were designed to treat the square brackets in special ways. It could, for example, force any left- or right-bracket to become an isolated, one-character, operand. Then a program would receive all possible cases of bracketed options as if they had been entered as space, bracket, option, space, bracket. (But consider the effect of such a rule on a program like emit!)
This is the not case, however; and although under the existing scheme it is possible for a utility to look fairly stupid, I don't feel disposed to fix it. Perhaps you would like to put a more intelligent option-analyzer into it.
The assembly code of UNTAB appears in Figure 6-7. Like tabbit, it consists of a main-line routine that performs initialization and termination, and a subroutine process that implements the pseudo-code plan. Another, smaller subroutine locates and extracts the tab-increment option.
;===============================================================
; UNTAB infile outfile [tabinc]
; Read infile, convert tabs to spaces, write as outfile. Assumes
; a regular tab increment of tabinc (default is 8 if [tabinc])
; not given.
; Note: the option [tabinc] must be a separate token and must
; not contain embedded spaces or commas.
; Abort messages:
; file-open messages
; usage message
; "option must be [nn] where "nn" is a decimal
; number between 1 and 255."
; Modules
; CHKOPS
; OPENUT (OPENIN, OPENOU)
; History:
; initial code 10 July 84
;===============================================================
maclib environ
dseg
usage:
db AsciiTAB,'UNTAB infile outfile [nn]'
db AsciiCR,AsciiLF
db 'Reads ascii file "infile," converts tabs to spaces, and'
db AsciiCR,AsciiLF
db 'writes "outfile." Tab-conversion assumes a regular tab'
db AsciiCR,AsciiLF
db 'increment of "nn" with a default of 8 (normal CP/M) when'
db AsciiCR,AsciiLF
db 'the option "[nn]" is omitted.'
db AsciiCR,AsciiLF
db '$'
infile: filedef 128 ; small input buffer
outfile: filedef 16384 ; big buffer for speed
tabincr: ds 1 ; space for tab increment
opcount: ds 1 ; save number of operands
cseg
extrn CHKOPS,OPENIN,OPENOU
prolog
; chkops(1,3)
mvi b,1 ; at least one,
mvi c,3 ; not more than 3, operands
lxi d,usage
call CHKOPS ; check, get count
sta opcount ; ..of operands and save
; openin(1,infile)
mvi a,1
lxi d,infile
call OPENIN
; openou(2,outfile,infile)
mvi a,2
lxi d,outfile
lxi b,infile ; (default file)
call OPENOU
; extract tab-increment from option to tabincr
lda opcount
call getincr ; do it in a subroutine
sta tabincr
call process ; do the work
lxi d,outfile
fclose +D
ret
;===============================================================
; getincr(op#) returns increment -- extract a number from
; the option [incr] if we can find it, return in A.
dseg
badop:
db 'option must be [nn] where "nn" is a decimal number'
db AsciiCR,AsciiLF
db 'between 1 and 255.'
db AsciiCR,AsciiLF
db '$'
cseg
getincr:
push h
push d
push b
tailtokn +A ; DE->given operand string
ldax d
cpi '[' ; start of option?
mvi a,8 ; (assume not)
jnz default
inx d ; yes, step over bracket
stradbw +Dupdate; extract digits to word in HL
; result of stradbw is zero in two cases: if the number
; was actually zero ([000]) or if there were no decimal
; digits ([abc]).
mov a,h ! ora l ; check for zero...
abort z,badop
mov a,h ! ora a ; check for HL > 255...
abort nz,badop
mov a,l ; put increment in A
default:
pop b
pop d
pop h
ret
;===============================================================
; process: the main loop, from the pseudo-code, moved out of
; line for clarity. As part of the main-line, we don't bother
; to save the registers.
process:
lxi d,0 ; carry "column" in DE
; repeat
procloop:
; x := fgetchar(infile)
fgetchar infile
; if (x = AsciiTAB) then
cpi AsciiTAB
jnz notTab
; n := tabincr - (column mod tabincr)
lda tabincr ; A = tabincr = divisor
mov h,d ! mov l,e ; HL = column = dividend
div816 +A ; HL = HL/A, A = remainder
neg a ; A = -(column mod tabincr)
lxi h,tabincr
add m ; A = tabincr-(column mod tabincr)
mov b,a ; put in B as loop-count
; do n times: fputchar(output,AsciiBlank)
; column := column + n
mvi a,AsciiBlank
outblank:
fputchar outfile,+A
inx d ; increment column for each
djnz outblank
; note: at the end of this then-section we know we didn't
; have CpmEof (we had a tab) so we can short-circuit the
; loop test and continue at the top of the loop
jmp procloop
; else
notTab:
; fputchar(output,x)
fputchar outfile,+A
; adjust column for effect of x (from tabbit)
; if (x < AsciiBlank) then
cpi AsciiBlank
jnc notCC
; if (x = AsciiCR) then
; column := 0
cpi AsciiCR
jnz notCR
lxi d,0
jmp endloop
notCR:
; elif (x = AsciiBS) and (column > 0) then
; column := column - 1
cpi AsciiBS
jnz endloop
mov h,a ; save "x"
mov a,d !ora e ; test column for zero
mov a,h ; restore "x"
jz endloop ; (column = 0, don't back up)
dcx d
jmp endloop
notCC:
; else if (x < AsciiDEL) then
; column := column + 1
cpi AsciiDEL
jnc endloop
inx d
endloop:
; until (x = CpmEof)
cpi CpmEof
jnz procloop
ret
Figure 6-7. The assembly source of untab.
For the most part, translating pseudo-code to assembly source is a straightforward business, very easy to do with a good full-screen editor. Begin with a unit, like a repeat-loop, and make assembly comments of it.
; repeat
; (various statements)
; until (x = CpmEof)
Insert a label at the top of the loop, and add the code that will implement the loop condition.
; repeat
procloop:
; (various statements)
; until (x = CpmEof)
cpi CpmEof
jnz procloop
Then pick the next-innermost statement and implement it. Each form of pseudo-code statement has an arrangement of necessary labels and segments of assembly code that you can apply almost mechanically (just as a compiler would do). An if statement, for example, needs a false-label and (if it has an else part) an end-if label. Take this one, for example.
; if (x = Tab) then
; (various statements)
; else
; fputchar(outfile,x)
; endif
Before doing anything else, insert the necessary labels.
; if (x = Tab) then
; (various statements)
notTab:
; else
; fputchar(outfile,x)
; endif
wasTab:
Then implement the condition of the if and the escape at the end of the then part.
; if (x = Tab) then
cpi AsciiTAB
jnz notTab
; (various statements)
jmp wasTab
notTab:
; else
; fputchar(outfile,x)
; endif
wasTab:
The statements within the then- and else-parts may then be implemented.
This almost-mechanical scheme works, but isn't always desirable. Simple compilers for high-level languages do the same sort of mechanical translation, and they produce awful code. One example shows up in the process subroutine of Figure 6-7. Its repeat-loop contains only an if statement. The then-part of that statement is executed only when x is a tab, while the loop condition is x=CpmEof. Only the most intelligent of optimizing compilers would recognize what is obvious to a human programmer: if the then-part of the if is executed, the loop condition cannot possibly be true (and there are no true optimizing compilers available for microcomputers).
A mechanical translation of the if, such as the one outlined above, would have the then-part of the statement end with a branch to the end of the if, and thus to the loop-test which couldn't possibly be satisfied. In Figure 6-7 you will see that this redundant test has been short-circuited by a jump back to the top of the loop.
We have built a matched pair of utilities and in the process have done battle with several issues in program design: handling defaults in command operands, opening files for sequential output, processing a stream of bytes with and without lookahead, and a less-than-perfect method of handling command options.
File-transforming utilities like these ("filters," they are sometimes called) are among the best candidates for assembly-language implementations. They are usually based on simple algorithms that aren't hard to code in assembly language, and when that is done, they usually reward us by being much smaller and faster than they would be in a high-level language. We will build several more in following chapters, but there are an endless number you could construct to the same pattern to suit your own needs
Here we continue to practice the construction of utility programs with pack, a program that will compress most text files to 66% of their original size, and a matching unpack program to restore them to usable form.
Disks are never quite large enough; they always seem to fill up when we need to store just one more file on them. That's especially true of the current generation of inexpensive CP/M machines that use 5-inch diskette drives.
A data-compression utility can help. A compression utility reads a file and writes a version of it that is smaller, yet contains all its original information. Since compressed files take up less disk space, more of them can be put on a disk. A compressed file must be restored to its original form before it can be used, but its compressed form is fine for backup and archival storage.
There are a number of methods for compressing data. They all work by predicting some kind of redundancy in the data and encoding the data so as to eliminate that redundancy. The methods differ in the kinds of redundancy they predict and in the encoding schemes they use to eliminate it. They all have one flaw: if the predicted redundancy doesn't occur, they don't compress -- their output is no smaller than their input and may indeed be larger.
The most effective compression schemes assign codes of different lengths to the units of data, with the shortest codes assigned to the most common units. If a "unit" is a character, such a method might work as follows. First take a census of all the characters in a file. From it, assign each character a rank order; that is, give the most-frequent character the rank 0, the next most common the rank 1, and so on. Initialize the output file by writing the table of characters in rank order. Then, for each input character, write binary 1s corresponding to its rank, followed by a single binary 0. Thus the code for the most common character is a single zero-bit; the code for the next is 10; for the third 110, and so on.
To restore such a file, begin by reading the table of rank-ordered characters and saving it. Then read the rest of the file one bit at a time. Count one-bits until a zero-bit is seen, then write the character from the rank table that corresponds to the count of one-bits.
This is essentially the algorithm used by the public-domain "squeeze" utilities. It can compress any kind of data, even binary data like an object file, provided only that the frequency distribution of byte values is at least moderately skewed. In its pure form, however, it requires reading the input data twice, and the rank-table of characters inflates the size of small output files. Both of those objections can be removed: if we assumed a single, fixed rank order for all files (based, perhaps, on a one-time census of thousands of files) there'd be no need to take a census of the input or to write a rank-table. Even so, the algorithm is a complicated one to implement, and because of all the fiddling with strings of bits of varying lengths, a hard one to make fast.
Another class of compression algorithms are called "adaptive" because, rather than taking a census of the data beforehand or making a statistical prediction about its contents, they formulate the encoding on the fly, as the data is being processed.
An adaptive compressor begins with a large table in which it can store input units. The table is initially empty. In its simplest form, the method proceeds as follows.
read the next unit
look it up in the table
if (it was found) then
write its table-index
else
write the unit itself
enter it to the table
endif
The restoration algorithm begins its work with an empty table of exactly the same size. Its logic is
read the next compressed unit
if (it is a table-index) then
write the data unit from that table entry
else t
write the data unit
enter it to the table
endif
Adaptive methods rely on the prediction that, if a certain data unit occurs once, it will likely occur several times more. On its second and later appearances, a given data unit will be written as a table-index that is shorter than the unit itself.
A "greedy" adaptive compressor doesn't stop when it finds a unit that appears in the table. Instead, it reads the next text unit and appends it to the table-index for the first one, treating the pair as a single unit. If the combined unit also appears in the table, it replaces the pair with that new table-index and continues. Only when it finds a unit (or combination of indexes and units) that isn't in the table does it write anything. In this way it can build up single table-indexes that stand for long sequences of text units. The matching program that restores such a file must be prepared to handle such nested sequences.
Before commencing this chapter I wrote an experimental adaptive compression program for ASCII text (I used a high-level language for this prototype work). I hoped to find a better method than the one that will be used here, but the results were disappointing. The program was much more complicated than ones to be developed here, yet it didn't compress significantly more. The complexity of the program was, I think, inherent in the algorithm, but its lack of effectiveness may have been due to a poor implementation (I have seen better results reported in the literature). One problem may have been that, in my prototype, a "unit" was a byte and a table-index was a 16-bit word. As a result, the algorithm couldn't achieve compression until it had seen enough input to have built up many 3-byte codes in its table. It's quite possible that the results would have been better if the unit of compression had been the English word; however, dealing with units that were variable-length strings would have made the implementation even more complicated.
For some types of data we can predict that a file will contain long runs of identical units. Think of the lines of asterisks or equal-signs that decorate boxed comments in many programs, for one example. Pictorial data, such as a digitally-encoded photograph, is notorious for containing long runs of data units that all stand for the same shade. Many mathematical matrices are "sparse," containing a majority of zeros.
Such a run of identical units can be compressed into a three-unit recipe: this is a run ... of n units ... of this value. The code that says "this is a run" must be reserved; that is, it mustn't appear normally in the data (or it must be "escaped" with yet another reserved unit when it does).
Run-length encoding is unusual among compression methods in that it cannot produce output that is larger than its input. If there aren't any runs, there won't be any run-codes. If there are runs, run-length encoding will shorten the output. I know of one mainframe time-sharing system in which the system command for data compression consists of nothing more than a simple run-length encoder. It's quite effective, too, but only because in that system tabs are not supported and, worse, text files have fixed-length records padded to 80 bytes with spaces.
Unfortunately, run-length encoding is not often effective for CP/M text files. In them, runs of spaces are already compressed into tabs, and trailing blanks are almost never found. (In a sense, the CP/M convention for tab characters is form of run-length encoding. A tab is a single unit that says "this is a run of spaces," with the length of the run left implicit.) Still, runs do occur, especially in well-commented source programs. We will incorporate run-length encoding as a subordinate part of the pack program.
If we confine our attention to files of English text (and to program source files, which contain a fair proportion of almost-English text), we can make a different set of predictions about the data. For centuries, cryptographers and typesetters have known that the distribution of letters in English and the Romance languages is heavily skewed in a predictable way. The most frequent letters of English text, in approximate rank order, are etaoinshrdlu (the exact rank order can vary slightly from document to document). In computer files, the space character must be added at the head of the list; it occurs even more frequently than does e.
I reasoned some time ago that, since these letters are the most frequent, pairs of them must also be among the most frequent letter-pairs ("digraphs") to appear in a text file. It turned out to be quite easy to write a program that looked for letters in the set (space, etaoinshrdlu) and, if one was followed by a letter from the set (space, etaoins), to pack the two letters into a single byte. The program compressed a text file by 25-30%.
I published a version of that program in a magazine article and a reader, Jerry Fowler, wrote back with a thoughtful comment. "Once the first letter has been determined, there is a given probability that the next letter may or may not include one of your fixed second list. If the choice of second letters was predicated on the value of the first letter, a further compression should occur."
Fowler was perfectly correct. When it found a t, the simple algorithm looked only for a next letter from (space, etaoins). While the pairs t-space, te, tt, ta, to, and perhaps ts would occur fairly often, the pairs ti and tn were unlikely. Worse, the pair th was completely neglected. What the method needed was a choice of second letters that was different for each first letter.
I wrote a program (in a high-level language, since it would only be used a few times) that would read a text file and take a census of every digraph that began with one of (space, etaoinshrdlu). I ran it against files amounting to 250,000 bytes (the text of a book), and found the results that are summarized in Table 7-1. In that table, each row lists the eight letters that most often followed the letter that heads the row, in descending order of frequency.
This table is not to be taken as definitive for English text in general. It can't be; it is based on letter frequencies as they appear in one book by one author. Furthermore, only the first few letters in each row had distinct frequencies of occurrence. Once past the fourth follower-letter, frequencies were small and similar. This suggests that, given a different sample, while the first three or four follower-letters would almost certainly appear in roughly the same positions, the rest might be different. In the first row, followers of the space, the true second-place follower was "other"; that is, uppercase letters and nonalphabetics. Despite these shortcomings, the information in u is good enough to be the basis of an effective compression method.
This method searches a file for letters in the common set. It copies ones that are not to its output. When it finds one of the thirteen common characters, it tests the following byte against the appropriate row of u. If the second character is found, the pair of letters can be compressed into a single byte. The byte is formed from the number at the head of the row and the number at the head of the column.
The pack and unpack programs form a complementary pair. The purpose of pack is to compress a file of text, while unpack will restore a compressed file to its original form. A compressed file takes less disk space, so more files can be gotten onto a small diskette. However, a compressed file is useless for anything but storage; it contains many unprintable bytes and must be restored by unpack before being printed or processed by other programs.
The compression method of pack works correctly only for files of text in English (or another European language), expressed as ASCII bytes. While packing and unpacking a non-ASCII file will not harm it (no information will be lost), the result of packing such a file will not be smaller (and might be larger) than the original file.
Both programs are utilities and have no options. That is, their syntax is
pack infile outfile
unpack infile outfile
For pack, infile is the text file to be compressed and outfile receives the packed data. For unpack, infile is a packed file produced by pack, and outfile is the destination of the restored text. Both programs use the "utility convention"; that is, omitted parts of the outfile filespec will be copied from the infile filespec, and if outfile is omitted, infile will be replaced.
The pack program is essentially a file-copy utility, but it cannot decide what to do with every byte based only on the byte's value. When the current byte is one of the common letters, it must look ahead one more byte to see if it has a compressible pair. This is a simpler problem than that presented by tabbit, where, when we found a blank, we had to look ahead as many as eight bytes before we could be sure whether a blank or a tab should be written.
Since pack looks at only two bytes at a time, it may as well carry two current bytes at all times. In other words, pack can look at its input through a window two bytes wide. When compression is not possible, it will deal only with the byte at the left of the window, then shift the window to the right. When it can compress the byte, it will deal with both bytes, then shift the window to the right twice. We can formalize this notion as a simple plan (Figure 7-1).
b, c and x are bytes
b := next byte
c := next byte
repeat
if (b and c are a compressible pair) then
form the pair as x
write x
b := next byte
c := next byte
else
write b
b := c
c := next byte
endif
until (all bytes processed)
Figure 7-1. A first cut at planning pack.
Before going any further, let's establish the encoding scheme for compressible pairs. We are assuming ASCII input, and that implies that all, or anyway most, input bytes will be less than 128 decimal. Therefore we will reserve all output byte values from 128 to 255 for compression codes. That gives us 128 values to play with.
its high bit set on will represent a compression code.
Now we'll perform one of those shifts of view so common in systems programming. We'll stop thinking of these as numbers, and start thinking of them as the binary values stored in bytes, and specifically as patterns of eight bits. The numbers from 0 to 127 are stored as bit patterns from 0000$0000b through 0111$1111b, while the range we are claiming, 128 to 255, is stored as 1000$0000b through 1111$1111b. (The Digital Research assemblers permit us to scatter dollar-signs freely in numeric constants. Here we are using them to make the groups of bits easier to read.) In other words, the reserved values all have their high (most significant) bit set on. In a byte whose high bit is set, we have seven more bits to use for encoded values.
There are thirteen common characters to look for; it takes four bits to represent thirteen values; therefore four of the seven bits will have to be dedicated to encoding the first letter of the pair. The remaining three bits can represent eight numbers (from zero to seven), and will be used to encode one of eight following characters. A compression code can be described as a binary constant of 1$aaaa$bbb.
The four bits aaaa could be used to encode as many as sixteen first letters. However, once the most common thirteen characters are eliminated, the remaining characters found in English text show a distribution that is nearly flat and that varies significantly from document to document. In other words, the farther down the list we go, the less reliable our predictions about character rank become and therefore the less likely we are to achieve useful compression.
Furthermore, when we restrict the values of the bits aaaa to the range of 0-12, we leave some possible compression codes free for other uses. As things stand, a compression code might range from binary 1$0000$000 to 1$1100$111; that is, from 80h to E7h. The byte values E8h through EFh and F0h to FFh are free, and we can make good use of them for other things.
The output of pack is to consist of uncompressed ASCII bytes (with high bits of zero) and compression codes (with high bits of one). But what shall we do if we find an input byte whose high bit is one? Such bytes are frequent in binary files, and they occur in the document files written by some word processors. They can't be compressed, but if we copy them unchanged unpack will take them to be compression codes.
The solution is to "escape" an offending byte; that is, to prefix it with a special code that says "take the following byte literally." Let's set aside the first of our unused codes, E8h, as a flag for non-ASCII data. When we incorporate that idea into Figure 7-1 we get the plan in Figure 7-2.
b, c and x are bytes
Literally is a constant, E8h
b := next byte
c := next byte
repeat
if (b > 127) then
write Literally
write b
b := c
c := next byte
else if (b and c are a compressible pair) then
form the pair as x
write x
b := next byte
c := next byte
else
write b
b := c
c := next byte
endif
until (all bytes processed)
Figure 7-2. Plan for pack, stage 2.
Take a close look at Figure 7-2. It seems quite redundant. Two branches of the if sequence end in identical statements, and all three end in the same action, c := next byte. That line at least can be factored out and moved to the bottom of the loop. And if the middle branch were to set things up so that b:=c was a proper action, that line could be factored out as well. If we do these things we get the tighter plan shown in Figure 7-3.
b, c and x are bytes
Literally is a constant, E8h
b := next byte
c := next byte
repeat
if (b > 127) then
write Literally
write b
else if (b and c are a compressible pair) then
form the pair as x
write x
c := next byte
else
write b
endif
b := c
c := next byte
until (all bytes processed)
Figure 7-3. Plan for pack after factoring redundant actions.
The plan in Figure 7-3 is well advanced; we had better consider how the I/O actions of "write" and "next byte" will be implemented. When we specified these programs, we promised that they would be able to handle binary files without losing any information. That promise may cause problems. It means that "next byte" will have to be implemented with the non-ASCII input function, fgetbyte. There are several implications.
When we deal only with text data, we can use the ASCII function fgetchar and so receive two benefits. That function swallows a linefeed that follows a return, so that end of line is marked by a single byte rather than the return-linefeed pair that actually end a line of text. Pack, however, will be seeing both characters when it reads a text file.
Detection of end of file is more complicated with fgetbyte. The logical end of a text file is marked by a special character, control-Z (equated to CpmEof in the listings). There is no such convenient marker in a binary file; any byte value is possible, so none of them can be reserved to mark end of file. When fgetbyte finds there is no more data in the file, it reports back with the Zero flag true and a byte value of zero, but zero is also possible as data.
Consider Figure 7-3 in the light of these facts. How will we be able to implement the loop test, "until all bytes processed"? End of file could be discovered at any of the places where the program reads the next byte. There are two of these at the moment. If the last two bytes of a file form a compressible pair, end of file will be seen in the middle of the loop and again at the bottom, and all bytes will have been processed. If not, end of file will be seen first at the bottom of the loop, at which time the byte in b will remain to be processed. It would be decidedly awkward to figure out which condition obtains and to clean up the remaining byte in the second case. It could be done (for instance, by making "next byte" into a subroutine and in it, counting the number of times end of file is reported) but the resulting plan is not pretty.
Things would be ever so much simpler if there was a data value that meant end of file, as there is in text files. Then, so long as we made sure that that data value wouldn't participate in any compressions, the loop condition could be stated as until (b = end of file value). In other words, the loop could be allowed to run until that value had worked its way across the two-byte window, at which time all the preceding data bytes would have been dealt with.
It can be done. In the C programming language, it is done by treating byte values as integer values, and by using an integer value greater than 255 to mean end of file. Doing this will complicate the implementation (it will mean devoting a register pair to the variables b and c), but it will simplify our design work a good deal. (I know that because I've already gone through several abortive designs that didn't use this dodge.)
The pack program will find end of file at the physical end of its input file. But it will write less data than it reads, so its output file may not end exactly on a CP/M record boundary. The toolkit functions will fill out the last record with meaningless bytes, and we won't want unpack to process these. So pack will have to flag the end of the meaningful data with something that unpack can recognize. Let's assign the unused compression code EFh for that purpose -- its hex value looks like an acronym for End File -- and make sure that pack writes that as the last byte of compressed data.
The plan so far will compress certain pairs of lowercase letters, but other common pairs occur in CP/M text files. If we can identify them, we have the compression codes E9h to EEh to represent them.
One such pair is the CR-LF combination -- the carriage return and linefeed bytes that end every line of a text file. Pack will be seeing these and it could recognize them and translate them to a single compression code.
I can think of only one other combination that is likely to be generally useful. That's the combination CR-LF-TAB, which begins so many lines of program source files in almost any language. Many other combinations could be cited as common, but only in specific kinds of files: the CR-LF-semicolon that is common in assembly-language files; the zero-zero, comma-zero and space-zero pairs often found in data files; and so on. But all such compressions are specific to one kind of data and would have little effect on any other kind of file.
When we insert these two ad-hoc compressions into the plan, and extend it to account for the fact that bytes will be handled as integers, we get the plan shown in Figure 7-4.
b and c are words
x is a byte
Literally is a constant, E8h
CRLF is a constant, E9h
CLTAB is a constant, EAh
EndFile is a constant, EFh
readone() : returns a word
if (end of file) then return 0100h
else return fgetbyte(infile)
end readone
compare(a,w) : returns true/false
if (w > 255) then return false g
if (a = w) then return true
else return false
end compare
b := readone()
c := readone()
repeat
if (b > 127) then
fputbyte(Literally,outfile)
fputbyte(b,outfile)
else if (b and c are a compressible pair) then
form the pair as x
fputbyte(x,outfile)
c := readone()
else if (compare(CR,b) and (compare(LF,c) then
x := CRLF
c := readone()
if (compare(TAB,c) then
x := CLTAB
c := readone()
endif
fputbyte(x,outfile)
else
fputbyte(b,outfile)
endif
b := c
c := readone()
until (b > 255)
Figure 7-4. Plan for pack with ad-hoc compressions.
Runs of identical characters aren't common in document files, but they do occur; and they are often found in program source files. It won't hurt the effectiveness of pack to attempt run-length encoding and it might help it. We have the sixteen compression codes F0h-FFh; let's use them. We shall specify that a run of identical characters is represented by a two-byte code Fnh, cch, where the hex digit n is the number of times that the byte cch should be repeated. The shortest possible run is two bytes long, so let us say that the compression code Fnh means that the following byte should be repeated n+2 times. F0h means a run of 2, F2h a run of 4, and so on to FFh, signifying a run of 17 bytes.
In order to recognize a run longer than two bytes we will have to look further ahead in the file than our two-byte window allows. We won't even try unless all other compressions have failed and b=c; that is, when we have a run of at least two bytes that are otherwise incompressible.
Once we see that condition, we will enter a loop in which we will suck up as many more identical bytes as possible, just as in tabbit we vacumed up as many blanks as we could find before writing any tabs. Having counted the identical characters we will be able to write as many run codes as the count allows. If the count is odd, we'll have to write a solo byte to make up the final tally. The plan for this is in Figure 7-5. Imagine that code inserted into Figure 7-4 just preceding the final else.
else if (b = c) then
n := 2
loop
c := readone
while (c < 256) and (b = c)
n := n + 1
end loop
while (n >= 17) do
fputbyte(FFh,outfile)
fputbyte(b,outfile)
n := n-17
end while
if (n > 0) then
if (n > 1) then
x := F0h + n-2
fputbyte(x,outfile)
endif
fputbyte(b,outfile)
endif
Figure 7-5. Plan for doing run-length encoding in pack.
There is a new pseudo-code structure in Figure 7-5, the loop structure. No common programming languages support the loop structure, yet it is often useful, especially in assembly language programming. It signifies a middle-exit loop. In general form it is
loop
first act
while (condition)
second act
end loop
Here is the sense of it: do the first act; test the condition; if it is true then do the second act and repeat the loop; otherwise exit the loop. There is an alternative way of writing the same thing:
first act
while (condition)
second act
first act
end while
In Figure 7-5, first act is c := readone() and second act is n := n+1. Write the loop from Figure 7-5 in while form and compare the two. Do you agree that they describe the same sequence of actions? The loop structure rotates the while ninety degrees, so to speak, and thus does away with the redundant statement of first act.
There's still a vague line in Figure 7-5. We have been putting off a decision on how to implement the test and action
if (b and c are a compressible pair) then
form the pair as x
Making the test will involve making separate tests on b and c. Is b one of the thirteen common characters? If so, is c one of its common followers? If so, the numbers that will be combined in the pair-code should be produced as a byproduct of making the tests.
Therefore let's specify a subroutine that will ask the questions, form a compression code if it can, or form something harmless if it can't. Then we can test its output. In other words, we will be able to write
if (x := makepair(b,c) produces a code) then
This trick of having a function serve two purposes -- returning a usable value when a condition is true and returning a harmless signal when it isn't -- is often useful at the pseudo-code level. As we will discover, it sometimes doesn't work out so well at the level of assembly language statements.
How shall makepair do its work? It should look up the first character in a list of common characters, quitting with a non-code if it isn't there or saving the character's rank-number if it is. Then it can select a list of possible followers based on the rank-number, and search for the second character in that list. (These follower-lists are the rows of u.) A plan along these lines is shown in Figure 7-6.
list1 is a string "(space)etaoinshrdlu"
followers is an array of strings -- see u for contents
makepair(b,c) returns a byte x
p and q are bytes
p := lookup(b,list1)
if (p > 12) then return 0
q := lookup(c,followers[p])
if (q > 7) then return 0
return 80h + (p shiftleft 3) + q
end makepair
Figure 7-6. Plan for the subroutine makepair.
As displayed, makepair depends on lookup, a subroutine that will search for a character within a string and return its index counting from zero. Strangely enough, there is no such function in the toolkit. It isn't hard to write such a function; we can defer it until we code the program.
The outer portions of pack.asm are shown in Figure 7-7. Much of this material should be familiar from the utilities we've done before. I thought it all would be, and so prepared no specific plan for for it. However, a new consideration cropped up.
;===============================================================
; PACK infile outfile
; Read infile, compress using digraph and run-length methods,
; and write compressed data as outfile.
; Abort messages:
; file-open messages
; usage message
; Modules
; CHKOPS
; OPENUT (OPENIN, OPENOU)
; LOOKUP
; History:
; initial code 13 July 84
;===============================================================
maclib environ
dseg
usage:
db AsciiTAB,'PACK infile outfile'
db AsciiCR,AsciiLF
db 'Reads file "infile," compresses its data, and writes the'
db AsciiCR,AsciiLF
db 'compressed result as "outfile." Use the UNPACK program'
db AsciiCR,AsciiLF
db 'to restore packed data to normal. Only ASCII files will'
db AsciiCR,AsciiLF
db 'show significant reduction in size.'
db AsciiCR,AsciiLF
db '$'
infile: filedef 128 ; small input buffer
outfile: filedef 16384 ; big buffer for speed
Literally equ 0E8h ; prefix for nonascii byte
CRLF equ 0E9h ; code for CR, LF pair
CLTAB equ 0EAh ; code for CR, LF, TAB
; EBh through EEh uncommitted
EndFile equ 0EFh ; code for physical end of file
RunBase equ 0F0h ; base code for a run of 2 or more
Run17 equ 0FFh ; code for a run of 17
Verflag equ 0FFh ; prefix for version
Version equ 74h ; month/year in hex for version check
cseg
extrn CHKOPS,OPENIN,OPENOU
prolog
; chkops(1,2)
mvi b,1 ; at least one,
mvi c,2 ; not more than 2, operands
lxi d,usage
call CHKOPS
; openin(1,infile)
mvi a,1
lxi d,infile
call OPENIN
; openou(2,outfile,infile)
mvi a,2
lxi b,infile
lxi d,outfile
call OPENOU
; initialize outfile with version-code
mvi a,Verflag
fputbyte +A
mvi a,Version
fputbyte +A
call process ; process-loop out of line
fclose outfile
ret
Figure 7-7. The initialization code of pack.
It occurred to me that if unpack tried to restore a file that hadn't been packed in the first place it could produce rubbish. It shouldn't accept any that hadn't been prepared by pack. In order that it would be able to recognize such files, I made pack start its output file with a two-byte "version code" that unpack can check for.
The first byte of the version code is FFh, a value that is not likely to be the first byte of an unpacked file. It certainly isn't likely in a text file, nor in a program object file (where it would represent a reset instruction as the first statement of a program). The second byte is an arbitrary choice.
I prepared the first version of pack in the same way that I did previous programs -- by editing the pseudo-code file and inserting assembly statements to implement the pseudo-code actions. The program worked, but it wasn't fast enough to suit me.
We can judge the performance of a utility by the rate at which it consumes input data. I tested pack on a file of 62,000 bytes (performance timings should always be made with large files in order to swamp the time taken to load the program and open its files). It took 47 seconds to process the file. That's an input rate of only 1300 bytes per second, or a processing time of about 760 microseconds per byte. That would be a respectable data rate if the program had been written in a high-level language, but speed is the whole point of using assembly language.
Since the test was made on a machine with large, fast disks, I knew it would be even slower in a system with 5-inch diskette drives, and those are just the machines where pack should be most useful. So I went looking for the place where too much time was being spent.
The first question was, how fast should the program be? To find out, I modified it so that it did almost no processing at all. It was compressing data in a 3:2 ratio; that is, it was writing two bytes for every three it read. I edited the main repeat-until loop so that it did nothing but read three bytes and write two. This gutted version of the program processed (so to speak) at a rate of 1880 bytes per second or 530 microseconds/byte -- a 30% improvement in speed, if not in function.
The next questions were, what part of the main loop was eating up more than 200 microseconds for every input byte, and could it be streamlined? Z80 instructions take from one to three microseconds each. Roughly speaking, that 200 microsecond bulge represented 100 instructions on each trip 'round the repeat loop. Most of the loop consisted of tests and branches. The special cases of carriage returns and of bytes greater than 127, for example, were dealt with in a couple of dozen instructions. Nor could the problem be related to run-length encoding, since the test file had few if any runs.
That left only the implementation of makepair. Its logic and use followed closely after Figure 7-5. It was called for every ASCII byte except a CR; it used lookup to find out if the byte was in the common set; if so, it used lookup once more to check the following letter.
It was clearly inefficient to look up every byte in the list of common letters. Many of them wouldn't be there, and the search took the longest time to return a negative result.
I inserted code so that makepair was called only when the current byte was a space or a lowercase letter between a and u inclusive. In pseudo-code terms, I changed the test
if (x := makepair produces a code)
to the more involved test
if (b = space) or ((b >= 'a') and (b <= 'u')) then
if (x := makepair produces a code)
This change improved the program; it now processed at 1450 bytes/second (690 microseconds/byte). But that amounted to a change of only 10% and I wanted something closer to 25%. To get it, I would have to depart further from the pseudo-code.
It occurred to me that the current byte could be classified through a table look-up rather than a sequential search of a list. I prepared a table having 128 entries. All of the entries contained FFh except the ones that corresponded to the common thirteen; those contained the numbers 0-12 that would encode them. It takes only a few instructions to index the table; the number extracted from it is supplies both the signal that the byte is or is not one of the common ones and its code value when it is.
This version of the main loop appears in Figure 7-8. It consumed input data at 1690 bytes/second, 20% faster than the original implementation of the pseudo-code. However, the pseudo-code plan served an essential function. It made the first implementation of pack easy to build, and that version verified the algorithm. The performance improvements followed, each a small change on a program that was known to be working. This is an application of the motto, "first make it right, then make it fast."
;===============================================================
; In the following we will deal with pseudo-code variables b and
; c as words, and carry them in registers BC and DE respectively
; To reduce (?) confusion we give meaningful (?) names to the
; high and low bytes of the register pairs.
varBhi equ B
varBlo equ C
varChi equ D
varClo equ E
;===============================================================
; readtoC(): read a byte from infile and form it as a word in
; the variable c. Form a value of 256 if end of file is seen.
readtoC:
fgetbyte infile
mov varClo,a
mvi varChi,0 ; assume not end of file
rnz ; (right)
inr varChi ; 00 returned, make c=0100h
ret
;===============================================================
; compareC(A): compare the byte in A to variable c. If c>255
; then it doesn't match anything; otherwise do a byte compare.
compareC:
dcr varChi ; test hi byte for zero by
inr varChi ; decrementing and incrementing
rnz ; c > 255, is eof, matches nothing
cmp varClo
ret
;===============================================================
; cmpBC: compare b=c. If either is > 255 (end of file), they
; don't match. Else do byte-compare.
cmpBC:
mov a,varBhi
ora varChi
rnz ; (exit if either > 255)
mov a,varBlo
cmp varClo
ret
;===============================================================
; the main loop, after the pseudo-code but modified to use the
; above hardware-specific subroutines. A classification table
; is used for quick recognition and translation of the common
; 13 characters " etaoinshrdlu."
dseg
classtable:
$-PRINT ; shorten the listing
rept 128 ; array[0..127] of bytes
db 0ffh ; = not one of the common characters
endm
org classtable+' '
db 0
org classtable+'e'
db 1
org classtable+'t'
db 2
(etc., etc., up to...)
org classtable+'u'
db 12
org classtable+128
cseg
process:
push psw
push b
push d
push h
;b := readone()
;c := readone()
call readtoC
mov varBhi,varChi
mov varBlo,varClo
call readtoC
;repeat
toploop:
; if (b > 127) then
; fputbyte(Literally,outfile)
; fputbyte(b,outfile)
mov a,varBlo ; if byte value
ora a ; ..has high bit of 0
jp lt128 ; ..it is less than 128
mvi a,Literally
fputbyte outfile,+A
mov a,varBlo
fputbyte outfile,+A
jmp botloop
lt128:
; else if (b and c are a compressible pair) then
; form the pair as x
lxi h,classtable
dad b ; HL->classtable[b]
mov a,m ; ..which is FF
ora a ; ..if b not one of " etaoinshrdlu"
jm nopair
call makepair ; try 2nd byte for a pair
ora a ; paircodes have high bit set
jp nopair
; fputbyte(x,outfile)
; c := readone()
fputbyte outfile,+A
call readtoC
jmp botloop
nopair:
; else if (b = CR) and (c = LF) then
mov a,varBlo
cpi AsciiCR
jnz noCR
mvi a,AsciiLF
call compareC
jnz noCR
; x := CRLF
; c := readone()
mvi h,CRLF ; use H for "x" here
call readtoC
; if (c = TAB) then
mvi a,AsciiTAB
call compareC
jnz noTAB
; x := CLTAB
; c := readone(infile)
mvi h,CLTAB
call readtoC
noTAB:
; endif
; fputbyte(x,outfile)
mov a,h
fputbyte outfile,+A
jmp botloop
noCR:
; else if (b = c) then
call cmpbc
jnz norun
call doruncode ; run-code stuff out of line
jmp botloop
norun:
; else
; fputbyte(b,outfile)
mov a,varBlo
fputbyte outfile,+A
; endif
botloop:
; b := c
mov varBhi,varChi
mov varBlo,varClo
; c := readone(infile)
call readtoC
;until (b > 255)
mov a,varBhi
ora a
jz toploop
mvi a,EndFile
fputbyte outfile,+A
pop h
pop d
pop b
pop psw
ret
Figure 7-8. The main loop of pack after performance modifications.
Byte values are easy to manipulate in assembly language, word values less so. Still, the need to carry the pseudo-code variables b and c as words, not bytes, caused less trouble than I'd expected. One fact helped. If you study Figure 7-4 you will see that, throughout the body of the loop, the value in b must be a data byte; it cannot be the end of file value. All input goes to c; only at the bottom of the loop is c copied to b. Immediately afterward the loop condition is evaluated, and execution can continue only if b is still a data value.
That fact made it possible to treat the variable b as a byte at most points; only the variable c had to be handled as if it might contain the end of file signal at any time.
The efficiency changes in the main loop caused changes in makepair as well. It would only be called when b was known to be one of the common letters, and it could be passed the number that encoded that letter. Its remaining job was to check the c byte to see if it was a common follower of b, and to prepare the pair-code if so.
I prepared thirteen strings of follower characters -- the rows of u -- and a separate table of their addresses. Twice the first letter's code value, plus the address of the table, yielded the address of the proper list of followers. Since the pseudo-code function lookup was now used in only one place, I made it in-line code. The final code appears in Figure 7-9.
dseg
aftersp strconst 't aiocsw'
aftere strconst ' rsndcmt'
aftert strconst 'h eorias'
aftera strconst 'nt lrmcs'
aftero strconst ' nrfupmd'
afteri strconst 'ntsclofg'
aftern strconst ' dtgeaso'
afters strconst ' tesia.u'
afterh strconst 'ea iotr.'
afterr strconst 'ea oisty'
afterd strconst ' eios.a,'
afterl strconst 'e lioydv'
afteru strconst 'tslrmned'
followers: ; table of pointers to follower-lists
dw aftersp
dw aftere,aftert,aftera
dw aftero,afteri,aftern
dw afters,afterh,afterr
dw afterd,afterl,afteru
cseg
makepair:
dcr varChi
inr varChi ; if c > 255,
rnz ; ..we can't make a pair
push b
push d
push h
; At this point we know variable c is a byte, not eof, and
; that variable b -- regs BC -- is too. Hence BC=00xx.
; We'll be using B and C as work registers, and will rely
; on B being initially 00.
; p := lookup(b,list1) -- already done
mov c,a ; BC = 00nn, the first number
; q := lookup(c,followers[p])
lxi h,followers
dad b ; add twice 00nn to HL
dad b ; HL->(word)->followers of "b"
mov a,m
inx h
mov h,m
mov l,a ; HL->followers of "b"
makeloop:
mov a,m ; A = possible follower
cmp varClo ; is this it?
jz makepool; (yes)
inr b ; no, increment "q"
inx h ; ..and point to next candidate
ora a ; was that 00 = end of list?
jnz makeloop; (no, continue)
makepool:
; if (q > 7) then return 0
mov a,b
cpi 8 ; did we find c in follower-list?
jnc makedone; (no, exit with A not a pair code)
; return 80h + (p shiftleft 3) + q
mov a,c
add a ! add a ! add a
ora b
ori 80h
makedone:
;end makepair
pop h
pop d
pop b
ret
Figure 7-9. The implementation of makepair.
The implementation of run-length encoding followed very closely on the pseudo-code of Figure 7-5; it appears in Figure 7-10. The only complication came from my realization that it was just barely possible that pack might encounter a run of more than 256 identical bytes. That meant that the count of identical bytes had to be handled as a word, not a byte. This caused no problem while counting up, but it meant that a 16-bit subtract would have to be used while counting down by 17. Once the count has been reduced below 17, however, it may be handled as a byte.
;===============================================================
; doruncode: the logic for forming a run-code, after the pseudo-
; code but moved out of line for clarity. On arrival, we know
; that b=c and therefore c isn't end of file. Regs HL are used
; for variable "n" at first, since we could count a run of more
; than 256 bytes.
doruncode:
push psw
push h
; n := 2
lxi h,2
; loop
runloop:
; c := readone
call readtoC
; while (c < 256) and (b = c)
call cmpBC ; checks both conditions
jnz runover
; n := n + 1
inx h
jmp runloop
runover:
; end loop
; while (n >= 17) do
; fputbyte(FFh,outfile)
; fputbyte(b,outfile)
; n := n-17
; end while
push d ; save DE over loop
lxi d,17 ; ..and carry 17 in it
putloop:
ora a ; (clear carry)
dsbc d ; decrement n by 17
jc putover ; ..and stop if n < 17
mvi a,Run17
fputbyte outfile,+A
mov a,varBlo
fputbyte outfile,+A
jmp putloop
putover:
mov a,l ; A now has residual "n"
add e ; put back the 17-too-much
pop d ; and restore DE
; if (n > 0) then
jz rundone
; if (n > 1) then
cpi 2
jc runsolo
; x := F0h + n-2
; fputbyte(x,outfile)
sbi 2
ori RunBase
fputbyte outfile,+A
; endif
runsolo:
; fputbyte(b,outfile)
mov a,varBlo
fputbyte outfile,+A
; endif
rundone:
pop h
pop psw
ret
Figure 7-10. The implementation of run-length coding.
The pack program reduces the size of most text files by a third, rendering them useless as it does so. It is time to design the program that will restore a packed file to its original form.
The input to unpack is the sequence of bytes that pack wrote. We can list them all; they include
The program can decide what to do next on the basis of a single byte's value. When a program is to select one of several possible actions based on a single value, we can express its shape with a pseudo-code case structure, as shown in Figure 7-11.
next is a byte
next := fgetbyte(infile)
repeat
case (next) of
i 0..7Fh:
fputbyte(next,outfile)
s 80..E7h:
decode the pair as b,c
fputbyte(b,outfile)
fputbyte(c,outfile)
i E8h:
next := fgetbyte(infile)
fputbyte(next,outfile)
F E9h:
fputbyte(CR,outfile)
fputbyte(LF,outfile)
B EAh:
fputbyte(CR,outfile)
fputbyte(LF,outfile)
fputbyte(TAB,outfile)
e F0..FFh:
n := 2 + low four bits of next
next := fgetbyte(infile)
do n times: fputbyte(next,outfile)
end case.
next := fgetbyte(infile)
until (next = EFh)
Figure 7-11. The main loop of unpack, expressed as a case structure.
If you know the Pascal language, you'll recognize the case structure. Even if you don't, its meaning should be clear. The line "case (next) of" means "based on the value of next, select one of the following actions." The action-groups follow, each prefixed by the value or range of values to which it applies.
We can implement a case with a mechanism very much like the character-class table used in pack. The program can classify the current byte by indexing a table; the class-value produced is an index of some sort to the action that should be performed on that byte.
The only thing that isn't detailed in Figure 7-11 is the action for a pair-code, "decode the pair as b, c." It shouldn't be hard to implement, however. Each pair-code consists of two binary numbers, one of four bits and one of three. The first, four-bit, number stands for the first character of the pair. It also stands for the row of u (thirteen times eight) are laid out in row order in storage, the seven-bit concatenation of the two numbers will lead us directly to the correct second character!
The only complicated part of implementing unpack was the implementation of the case statement. It is possible to do this in assembly language in a way that is very fast, but it requires subtle uses of the assembler.
Look back at Figure 7-11. Each action within the case structure is independent; when it completes, control should pass to the end of the entire structure. The obvious way to implement it is to write a label at the head of each action, put a label at the end of the structure, and end each action with a jump to the end.
case1:
action 1
jmp caseend
case2:
action 2
jmp caseend
The only remaining problem is how to select, and jump to, the correct label.
There are several ways to do it. Here's the way I chose to do it for unpack, where the case label is to be selected based on the value of an input byte. I placed a label at the top of the structure. The difference between a case label and the top label, that is, the result of an assembler expression like
case2 - casetop
is the byte offset of that case label within the case structure. If we construct a table with one entry for each possible input byte, and place in that entry the offset to the case that handles that byte, we can select the case very quickly. All we need to do is use the input byte as an index to the table, add the resulting offset to the label of the case structure as a whole, and we have the address of the needed case. The pchl instruction lets us jump directly to that address.
In unpack, all the cases fit within 256 bytes, so each case's offset fit in a byte. Input bytes might have any of 256 values, so the case-table had to have 256 entries, each containing the offset to the relevant case.
It would be incredibly tedious to type 256 table entries of the form
db casex-casetop
There are only six different cases, and three of them account for most of the entries. These three cover ranges of consecutive input values. Most of the table can be described as 128 repetitions of the ASCII case, 104 repetitions of the pair-code case, and 16 repetitions of the run-code case.
The mac and rmac assemblers contain a command that is just what we need. The sequence
rept count
statements
endm
produces count repetitions of the statements. The expression
0E7h-080h+1
yields the count of possible pair-codes, so the sequence
rept 0E7h-080h+1
db casepair-casetop
endm
will generate all those entries of the table. The rest of the table can be produced in the same way, as you can see in Figure 7-12.
;===============================================================
; UNPACK infile outfile
; Read a file created by PACK and restore it to its original
; condition.
; Abort messages:
; file-open messages
; usage message
; "Input file was not created by PACK."
; "Impossible input value -- error in PACK."
; Modules
; CHKOPS
; OPENUT (OPENIN, OPENOU)
; History:
; initial code 17 July 84
;===============================================================
maclib environ
dseg
usage:
db AsciiTAB,'UNPACK infile outfile'
db AsciiCR,AsciiLF
db 'Input file "infile" must have been created by the PACK'
db AsciiCR,AsciiLF
db 'program. Its contents are restored to their original'
db AsciiCR,AsciiLF
db 'form and written as "outfile."'
db AsciiCR,AsciiLF
db '$'
notpacked:
db 'Input file not prepared by PACK.$'
impossible:
db 'Impossible input value -- error in PACK.$'
infile: filedef 128 ; small input buffer
outfile: filedef 16384 ; big buffer for speed
Literally equ 0E8h ; prefix for nonascii byte
CRLF equ 0E9h ; code for CR, LF pair
CRLFTAB equ 0EAh ; code for CR, LF, TAB
; EBh through EEh uncommitted
EndFlag equ 0EFh ; code for physical end of file
RunBase equ 0F0h ; base code for a run of 2 or more
Run17 equ 0FFh ; code for a run of 17
Verflag equ 0FFh ; prefix for version
Version equ 74h ; month/year in hex for version check
cseg
extrn CHKOPS,OPENIN,OPENOU
prolog
; chkops(1,2)
mvi b,1 ; at least one,
mvi c,2 ; not more than 2, operands
lxi d,usage
call CHKOPS
; openin(1,infile)
mvi a,1
lxi d,infile
call OPENIN
; openou(2,outfile,infile)
mvi a,2
lxi b,infile
lxi d,outfile
call OPENOU
; check for the version code
lxi d,infile
fgetbyte +D
cpi VerFlag
abort nz,notpacked
fgetbyte +D
cpi Version
abort nz,notpacked
call process ; process-loop out of line
fclose outfile
ret
;===============================================================
; process: the main loop, from the pseudo-code plan. The case
; structure is implemented using a table that contains one entry
; for each possible input byte. Each entry is the offset from
; "casetop" to the "case---" label appropriate to that byte.
dseg
casetable:
$-PRINT ; shorten the listing
; note: the following uses of REPT revealed a bug in RMAC 1.1.
; If the repetition value is between 61h and 7Ah inclusive, REPT
; performs 20h too few repetitions (i.e. 41h to 5Ah). The IF
; statement after the REPT checks for this and compensates.
count set 1+07Fh-0 ; 0..7f = ascii characters
rept count
db toascii ; "to..." labels defined later
endm
count set 1+0E7h-80h ; 80..E7 = pair codes
temp set $
rept count
db topair
endm
if ($-temp) lt count ; then we didn't get enough repeats
rept count-($-temp) ; make up the lack
db topair
endm
endif
db tononasc ; E8 = nonascii follows
db tocrlf ; E9 = CR, LF
db tocltab ; EA = CR, LF, TAB
rept 1+0EEh-0EBh ; EB..EF = impossible
db toerror
endm
db toerror ; EF = endfile shouldn't come here
rept 1+0FFh-0F0h ; F0..FF = runcodes
db torun
endm
cseg
process:
push psw
push b
push d
push h
; next := fgetbyte(infile)
lxi d,infile
fgetbyte +D
mov b,a ; carry "next" in B
lxi d,outfile ; carry DE->outfile
;repeat
toploop:
; case (next) of
lxi h,casetable
mov a,b
addhla ; HL -> class of byte in A
mov a,m ; get it to A
lxi h,cases
addhla ; HL-> code of case action
pchl ; go do it
cases:
;i 0..7Fh : fputbyte(next,outfile)
caseascii:
toascii equ caseascii-cases
mov a,b
fputbyte +A
jmp casend
;s 80..E7h: decode the pair as b,c
; fputbyte(b,outfile)
; fputbyte(c,outfile)
casepair:
topair equ casepair-cases
mov a,b
call decode ; decode A to B,C
mov a,b
fputbyte +A
mov a,c
fputbyte +A
jmp casend
;i E8h : next := fgetbyte(infile)
; fputbyte(next,outfile)
casenonasc:
tononasc equ casenonasc-cases
fgetbyte infile
fputbyte +A
jmp casend
;F E9h : fputbyte(CR,outfile)
; fputbyte(LF,outfile)
casecrlf:
tocrlf equ casecrlf-cases
mvi a,AsciiCR
fputbyte +A
mvi a,AsciiLF
fputbyte +A
jmp casend
;B EAh : fputbyte(CR,outfile)
; fputbyte(LF,outfile)
; fputbyte(TAB,outfile)
casecltab:
tocltab equ casecltab-cases
mvi a,AsciiCR
fputbyte +A
mvi a,AsciiLF
fputbyte +A
mvi a,AsciiTAB
fputbyte +A
jmp casend
;e F0..FFh: n := 2 + low four bits of next
; next := fgetbyte(infile)
; do n times: fputbyte(next,outfile)
caserun:
torun equ caserun-cases
mov a,b
ani 0Fh ; A = low bits of runcode
adi 2 ; ..plus 2
mov b,a ; save loop count in B
fgetbyte infile
running:
fputbyte +A
djnz running
jmp casend
; the "impossible" input is also a case
caserror:
toerror equ caserror-cases
abort ,impossible
; end case.
casend:
; next := fgetbyte(infile)
fgetbyte infile
mov b,a
;until (next = EFh)
cpi EndFlag
jnz toploop
pop h
pop d
pop b
pop psw
ret
;===============================================================
; decode(paircode in A to characters in B, C) -- decoding is
; done by using the values in the paircode to index tables of
; letters. The code is 1aaaabbb. The first letter of the pair
; is firstab[aaaa] while the second is followtab[aaaa,bbb].
dseg
firstab:
db ' etaoinshrdlu'
followtab:
db 't aiocsw'
db ' rsndcmt'
db 'h eorias'
db 'nt lrmcs'
db ' nrfupmd'
db 'ntsclofg'
db ' dtgeaso'
db ' tesia.u'
db 'ea iotr.'
db 'ea oisty'
db ' eios.a,'
db 'e lioydv'
db 'tslrmned'
cseg
decode:
push h
push psw ; save copy of paircode
; get the 4-bit number "aaaa" to the low four bits of the
; register and isolate it.
rar ! rar ! rar
ani 0Fh
; use it to select the first letter
lxi h,firstab
addhla
mov b,m
; use the whole 7-bits aaaabbb to index the 2nd letter
pop psw
ani 7Fh ; get rid of high bit
lxi h,followtab
addhla
mov c,m
pop h
ret
Figure 7-12. The assembly implementation of unpack.
This use of rept turned up a bug in rmac version 1.1. When I tested unpack, it crashed my system. I ran it under the sid debugging tool several times and finally determined that it crashed while trying to handle the CR-LF code. By stepping it through the case loop I found it was loading an invalid case-offset from the table. I supposed that I must have written one of the repeat-count expressions incorrectly, so I displayed the table and counted its entries. There were too few entries for pair-codes. That made the whole table too short, so that what should have been the entry for the CR-LF code actually fell into a table of ASCII characters. That accidental byte, treated as a case-offset, sent the program off to who-knows-where.
Yet on inspection all the count expressions proved correct. It turned out that the rept command itself was at fault; it repeated 32 times too few for a certain range of counts. What to do? I didn't want to code the table by hand; yet if I stuck in an extra rept to make up the difference, the table would come out too big when assembled by an assembler that lacked the bug. I finally repaired the damage by adding an assembler if statement. It checks to see if the right number of bytes were generated and, if they weren't, executes another rept to make up the difference.
Utility programs, because they're usually simple, used a lot, and need to run fast, are ideal places to apply assembly language. Pack and unpack are good examples. They compress text files at least as well as the (more complicated and slower) public domain squeeze programs, and they run with pleasant speed. But notice that the speed didn't come automatically, just because we used assembly language. The first version of pack was slower than desirable, and it took changes in both the algorithm and the way the algorithm was implemented to speed it up.
With the programs of these two chapters for models, you should be able to construct a variety of utility programs. In the next chapter we will start work on a project of a higher order of difficulty
In this chapter we will begin a major project: the management of "anthologies," large files in which smaller files are collected. The project will require a suite of related programs, several common modules, the use of direct-access files, and advanced uses of strings, files, and dynamic storage. We'll design it in this chapter, and implement it in the next two.
The CP/M file system is flexible and reliable, but it has some shortcomings. These are most evident when it is used to store small files on disk drives of small capacity.
The first problem is that CP/M allocates disk space in fixed units of at least one kilobyte. When a file's size is not an exact multiple of kilobytes, CP/M wastes some space. Half a kilobyte is lost for each file on a disk, on the average. When a disk holds only a few large files this lost space is a tiny percentage of the space in use, but when there are many small files the aggregate loss can add up to a noticeable fraction of the disk's capacity.
The second, and worse, problem is that all files must be recorded in the directory of a disk, and the directory has a fixed size. Every file requires at least one directory entry; larger files may take up two or more. Again, this causes no difficulty when the disk holds a few large files. It's a different story when one wants to store a large number of small files (all the assembly source files of the toolkit modules, for instance). Then it's quite possible to fill up the directory of the disk before the disk runs out of data space.
Both problems are compounded when the disks are small. A TRS-80 Model 4 with CP/M Plus, for example, can store only 150 kilobytes on a disk, and its disk directories allow only 64 entries. That means it can store no more than 64 files, no matter how small the files are. When it puts 32 files on a disk, it will create about 16 kilobytes of allocated but unused space -- 10% of the disk's capacity. An Apple IIe with CP/M Plus has even less capacity, with 48 entries in the directory and 128 kilobytes per disk.
There is no way to avoid these problems during normal use of a system. The command programs and the files they work on must be stored by CP/M in its usual way; everything in the system depends on it. But the problems can be eased in the special case of files that are not used often. It is possible to collect many small, low-use files and pack them into a single file. When small files are packed into a large one, the only wasted space is a single chunk at the end of the collection, while the collection requires only a few directory entries no matter how many files are in it. As many as a hundred small files could be kept in such a collection, and the collection might still fit on a small diskette.
When many small literary works are collected in a single volume, the book is called an anthology. That's the term that I've adopted for files that hold many smaller files. A more common term for them is "library"; on mainframe systems they are sometimes called "partitioned datasets."
The idea of anthologies is not new. In fact, we have been dealing with two versions of the idea right along. A macro library is an anthology of macros, and an object library as built by the lib command is an anthology of object files. Gary Novosielski's Library Utility established a standard for the format of anthologies of public-domain software.
It is possible to create an anthology system of sorts using nothing more than the pip and submit commands. The pip command can concatenate files, and it can extract a part of a file with its s (start) and q (quit) options. These are the essential elements of anthologizing -- the ability to put two files together, and the ability to pull out a portion of the combined file.
You might enjoy implementing a pip-based anthology system; if you do, you'll learn a lot about the design of anthologies and about the CP/M commands. The submit files in Figure 8-1 are a beginning. The first one (shown in two versions) adds a file to an anthology. It prefixes the file with a delimiting line composed of %%% and the filespec, then puts that line and the file at the head of the anthology.
; add file $2 to anthology $1.ANT (CP/M 2.2 version)
xsub
pip $1.ANT=CON:,$2,$1.ANT
%%%$2
^Z
; add file $2 to anthology $1.ANT (CP/M Plus version)
pip $1.ANT=CON:,$2,$1.ANT
<%%%$2
<^Z
; get file $2 from anthology $1.ANT
pip $2=$1.ANT[ s%%%$2^Z q%%%^Z ]
Figure 8-1. Batch files to implement a simple anthology system.
The second submit file uses the start and quit options of pip to retrieve one file. It presumes that every member of the anthology is followed by a delimiter line. That will be true of every member except the last one (the first one added). For it to be true of that member as well, the initial anthology file must be created with a single delimiter line. A submit file that will create an anthology is easy to write.
The pip command isn't sophisticated enough to allow deleting members from an anthology, nor can it be made to list the members in one. However, the CP/M editor ed can be driven from a submit file. It is possible to a build a fairly complete set of anthology commands using ed, pip, and submit. I made one, but I wasn't able to find a way to make it detect errors. It would add duplicate members, crash when asked to retrieve a nonexistent member, and try to add the anthology to itself if I told it to. And it was painfully slow.
Anthology programs can be found in collections of public-domain software. Why, then are we going to build our own? For two reasons: because I didn't care for the existing ones I tried (in particular, I thought they didn't pay enough attention to data integrity); and because the project is a good vehicle for demonstrating the tools and techniques developed in this book at the full stretch of their capacities.
As usual, our first step in building a program is to specify its external appearance. The specification that follows is result of several days' intensive mulling. If some of its features seem odd, trust me; they will be justified later.
An anthology is a special file into which many small files can be collected with a resultant savings in disk and directory space. The anthology commands specified here make it possible to create anthologies, add and delete files in them, list their contents, and retrieve files from them.
You may collect many files in a single anthology. Usually, more files can be kept in an anthology than would fit on a disk as independent files. For example, a disk that can't hold more than 64 files could hold an anthology that contained more than 100 files, so long as their aggregate size fit the disk.
An anthologized file is not as accessible as one that stands by itself. The anthology as a whole can be copied, but the files within it are not visible to the rest of the system. They must be retrieved from the anthology, that is, copied out to become independent files, before anything else can be done with them.
You may compress text files with pack before putting them into an anthology; this will conserve even more disk space. If you do that, it will take two steps to gain access to an anthologized file: it must be extracted from the anthology; then it must be unpacked. The anthology as a whole must never be packed.
An anthology may be copied with pip, renamed with ren, erased with era, or have its file attributes set with stat (set in CP/M Plus). These are the only things that may safely done to an anthology; all other manipulations are done with one of the anthology commands.
An anthology must be created before anything else can be done with it. This is done with the antnew command,
antnew antname
The operand antname names the anthology to be created. It is a filespec, except that the filetype is not needed and will be ignored if given. The antnew program will not create an anthology that already exists. To recreate an anthology, you must first erase it.
The new anthology consists of more than one file. The primary file is antname.ant; it will contain the data of anthologized files. Two other files are part of the same anthology; their names are antname.anx and antname.any. They contain duplicate copies of the directory information for the anthology. The first, antname.anx, is the primary directory. The second is a spare copy for use in case the first becomes unreadable. Whenever an anthology is copied, all three files should be copied, as in
A>pip b:=a:antname.an?[v]
Files are added to, or replaced in, an anthology with the antput command,
antput antname filespec
The command first locates the anthology antname. Then it locates the file filespec on disk, reporting an error if it doesn't exist. The file is copied into the anthology. If a file with the same filename and filetype already exists in the anthology, this file replaces it.
The filespec may be ambiguous (contain asterisks or question marks). When it is, all files that match that filespec will be added to the anthology, one at a time. The name of each file is displayed as it is copied.
The copied files are not erased; they still remain on disk. If a file has a password (CP/M Plus only), the password will not be recorded in the anthology. When later the file is retrieved from the anthology, it will not be protected.
A copy of an anthologized file is retrieved for use with the antget command,
antget antname filespec
The command first locates the anthology antname. Then it searches the anthology for a file with the same filename and filetype as filespec. If none is found, an error is reported. Otherwise, that file's data is copied to disk as filespec, replacing any existing file of that name.
The filespec operand may be ambiguous. If it is, the command will retrieve every anthologized file with a matching name and type, one at a time.
You can display the names of files in an anthology with the antdir command,
antdir antname filespec
The command searches the anthology for all files whose filenames and filetypes match filespec. The filespec operand may be ambiguous. It may also be omitted, in which case it is taken to be *.*, that is, all files.
The command displays one line for each matching file. The line contains a number, which is the size of the file in 128-byte records, and the filespec. After displaying the matching files, antdir displays a total line showing the aggregate size of the listed files, the size of the anthology, and the amount of unused space in it.
You can delete members of an anthology with the antera command,
antera antname filespec
The command locates the anthology and searches it for a file whose filename and filetype match filespec; when found, the command deletes it. The anthology space occupied by the file remains allocated to the anthology (the anthology files will be no smaller on disk) but it is available for reuse by the antput command.
When filespec is ambiguous, antera behaves differently. It searches the anthology for matching files and, as it finds each one, displays its name on the screen and awaits keyboard input. If you want that file deleted, you must enter the letter y and press return. If the file is not to be deleted, type any other letter or merely press return; the file will be left alone.
Since an anthology may be entrusted with files that don't exist anywhere else, it's important to preserve the integrity of the anthology. Although the anthology commands are designed with this in mind, there are failures that they cannot guard against. For example, a disk read error (a "bad sector") in the CP/M disk directory makes all files on that disk inaccessible. A program can't be designed to protect against such a failure. Therefore you should always keep at least one, preferably two, backup copies of any anthology.
A disk read error that falls within a file makes some data irretrievable, but the rest of the file may be recoverable. However, the usual CP/M commands either read all of a file or none of it. The pip command, for instance, will not copy a file that contains a bad sector; it aborts when it sees the error and the data it copied preceding the error is lost.
The anthology commands, however, can usually recover at least part of a damaged anthology. The recovery method depends on whether the error affects the anthology data file antname.ant or the directory file antname.anx.
When an anthology command starts, it displays the note loading directory. When it has finished reading the directory, it displays the word done on the same line. If the program is aborted by a disk read error before the word done appears, you will know that the bad sector lies in the directory file antname.anx. To recover, rename the directory file to have a filetype of .bad (do not erase it; that would just free the bad sector for use by another file). Then rename the duplicate directory file, antname.any to have the filetype .anx, and try the command again. If the command works, immediately copy the .ant and .anx files to another disk. (Copy the .anx file twice, the second time giving the copy the type .any, so as to complete the set.)
The integrity of the anthology directory file is crucial; if it were to be corrupted so that it was no longer a true description of the anthology, all of the anthologized files could be lost or scrambled. All of the commands take great care to prevent this. They are designed so that, with the exception of a few critical seconds at the end of a command, program termination for any cause whatever -- a CP/M error message, a power failure, a disk error or a full disk -- will not harm the anthology on disk.
Furthermore, antera and antput, the commands that update the directory, apply several consistency checks to the directory before writing it to disk. If a test fails, the commands terminate with the message Integrity check, leaving the original anthology unharmed.
Because of this design, the general method for recovering from any anthology error is to analyze the cause of the crash and then to run the failed command again.
While antput is reading a file and copying it to the anthology, it displays the file's name and type. If it crashes due a disk read error (a "bad sector") at this time, the problem lies in the file being copied, not in the anthology. If antput crashes because the disk is full, it simply means that the anthology has gotten too big for the disk. In either case the anthology should be unharmed, although the files added by antput will not be found in it.
After copying the file, antput displays the word checking and reads back the copied data. A disk error at this point indicates a bad sector in the anthology data file, a sector that was used by the file just added. Files that were already in the anthology should be unharmed; use antget to retrieve them to another disk.
Antget displays the name and type of each file as it is retrieved, and done after closing the retrieved file. If antget is terminated for a full disk during this time, it simply means that there wasn't room for the retrieved file; the anthology is all right.
A disk read error during retrieval indicates a bad sector in the anthology data file. Note the name of the file that caused the error. That anthology member, at least, is ruined; further attempts to copy it will also abort. Use antdir to list all the files. Then use antget to retrieve all files except the one with the bad sector. Other files may also cause antget to crash, but most of them should prove recoverable. Retrieve all the files you can to other disks; discard the bad disk; and rebuild the anthology.
CP/M Plus supports file passwords. The password system interacts with anthology use in several ways.
When you use antput to add a password-protected file to an anthology, you may give the file's password as part of the filespec operand, or as the system default password, or you may wait for the program to prompt you for it. In any case, the file's password is not recorded in the anthology. The only security protection for anthologized files is the password of the anthology as a whole.
When you retrieve a file with antget, you may include a password as part of the filespec operand. The password will be applied at the read level to the file or files that are retrieved.
An anthology may be protected with a password. Remember that while an anthology consists of three files, the commands receive only one operand to name them. Therefore all the files of an anthology must have the same password. If they had different passwords, the commands wouldn't be able to work.
If you include a password in the antnew command as part of antname, it will be applied to all files at the read level. Alternatively, you may later apply a password to the data file, the directory files, or both, at any of the three levels read, write, or delete. The number and level of the passwords interacts with the commands' actions in a complex way.
These varied effects allow you to control the actions of a person who doesn't know the password:
Keep in mind that if you copy a protected file with pip, giving the password in the pip command, pip applies the password at the read level to its output.
My goodness, what a complicated specification. Fortunately, most of the material on passwords simply recapitulates functions that are already built into the toolkit. And we may safely defer all considerations of ambiguous filespecs until later. If we design a good mechanism to add, retrieve, or erase one file at a time, it won't be hard to extend it several files.
We had better start by defining a list of design objectives, or policies. We didn't do that for earlier programs. Because they were simple, they could be designed under the implicit policy of finding the cleanest, fastest algorithm that would accomplish the specified task. In the present task we will have many choices to make, and explicit objectives will help make them.
I believe that data integrity ought to be an anthology system's first objective. An anthology should be, so far as we can make it, proof against loss of data. Its design should be such that, if damage occurs, whether by hardware error or program failure, the loss will be confined to the smallest possible area. Such a design is said to be "robust."
It takes a lot of care to create a robust design. For example, we must keep in mind that our programs can be aborted by a disk error on any input, and design them so that no such failure will cause them to leave the anthology in an unusable state. We should also bear in mind that a program can be cancelled at any instant by a power failure or a press of a reset button. So far as possible, no failure of any kind should be allowed to damage the anthology.
Next come some design constraints. The design should not be based on recopying the anthology. The lib library manager, for example, makes a new copy of an object library every time it is run. Recopying is a simple management algorithm, but it has two major problems. First, processing time varies with the size of the anthology, not with the size of the files being added or retrieved. Second, it limits the size of an anthology to one-half the size of a disk. Our anthologies should be able to expand to nearly the capacity of one disk, and that implies that we will have to update or extend them in place.
Another constraint is that the design should reclaim data space automatically. In some library systems, the space occupied by a deleted member is simply lost; the user is expected to rebuild the anthology with a special "pack" or "reclaim" program when the waste space becomes excessive. I don't think that's tolerable. Space allocation can be easy for the program; it is always a major irritation for the user.
A final policy decision is, how large may an anthology become? The choice will affect the design at many points; a design that works well for half a megabyte may not be suitable for handling ten megabytes. There are only a few common disk sizes: there are many around 128 kilobytes (Kb); some around 500 Kb; some around 1000 Kb; and hard disks range upward from five Megabytes (5 Mb or 5,000 Kb).
The smallest disks need anthologies the most. Disks of 500 Kb and up usually have directories with 128 entries or more. Furthermore, an anthology larger than 500 Kb must contain either very large files (which don't benefit from anthologizing) or so many small files that keeping track of them would be very difficult. I think it is safe to set the maximum size of an anthology at 512 Kb; if the disk has greater capacity, the user has the option of creating more anthologies.
These objectives have several implications for our design. The first I saw was that control information -- the directory that shows which data belongs to what file -- must be stored redundantly, and apart from the data. The redundancy is necessary for robustness. While damage to file data affects at most one file, damage to the control information can affect several files or all files. If the directory is stored in duplicate in different places on the disk, the chances of recovering from a disk error are much better.
Some library systems maintain only a single file, interspersing control information among the data of the stored members. We can't do that. If we did, we'd have to read the anthology sequentially to find the control information. Then a disk read error would make inaccessible all the control information following the bad sector, violating our first design objective. Besides, if we are to store the directory data twice, at least one copy will have to be a separate file; so both copies may as well be separate files.
The objectives of not recopying and automatic reclamation will mandate the use of direct access disk I/O. In earlier programs we always processed files sequentially from start to end. The anthology commands will have to read and write "at random" (as it is commonly said); that is, they will need to skip around in the file, reading or writing at any point in any order.
The CP/M file system permits direct access to disk files, and the toolkit contains functions that support it. The fseek function can be used to position a file at any byte, so that subsequent input or output will begin at that byte. The frecseek function has the same effect, but it positions the file in terms of records of some fixed size, not in terms of bytes. The frewind function returns a file to its first byte so that it can be overwritten in place. We don't want to consider the details just yet, but we must know that these abilities exist.
We can design the data file knowing only that much, and knowing that CP/M files consist of a sequence of 128-byte records. We will treat the data file as an expanse of these records. Some of them will be occupied by the data of anthology members, while others may be free. When we add a file to the anthology, we will copy it into such free records are available, and append new records to the end of the data file as required.
The directory file will contain the control information that lets us know what members the anthology contains, what data records are free, and which records of the data file are owned by which members. When we retrieve a member, we will use the directory information to retrieve the data records in their correct sequence, writing each to an ordinary sequential file. When we erase a member, we will mark each of the data records it occupied as being available for use.
We must now choose a design for that directory information. There is any number of ways to structure the directory; however, we want a design that will be as simple and as robust as possible. A simple structure will make the programs easier to write and less prone to bugs. For a robust system, we must have a directory organization such that, if a few bits or bytes should be corrupted, only a limited amount of file data will be lost. Some directory structures, as we will see, collapse catastrophically if they are corrupted in the smallest way.
This is a real fear, by the way. There are three causes of data corruption. One is disk failure. In four years of personal computing, I've seen at least two errors that could only have been due to the disk controller mis-writing a byte and not detecting its own error. A second is a failure in RAM. Eight-bit machines lack the parity-check circuits that would detect failures in the RAM chips, and there is a small but genuine chance that what a program writes into RAM is not what it will read back. The most likely cause of data corruption, of course, is program error.
The anthology directory has nearly the same purpose as an operating system's directory of files on disk. Let's compare two of these to see what we can learn.
CP/M divides a disk into blocks of one or two kilobytes each and numbers the blocks. Each directory entry contains a filespec, an extent number, and a list of eight or sixteen block numbers. To process a file sequentially, CP/M finds the directory entry with the lowest extent number and reads out the block numbers from it. After processing those blocks, it looks for the directory entry with the next higher extent number. In order to know which blocks are in use, CP/M keeps a bit-map for each disk drive. When it first accesses a drive, it reads all directory entries. For each block number it finds, it sets the corresponding map bit to 1; afterward, free blocks are represented by 0-bits.
The CP/M scheme is fairly robust. If one directory entry is corrupted, it will affect only one or a few blocks of one file and at most one other file (two files might end up owning the same block number). However, the CP/M directory contains a lot of redundant information for large files (the repeated filespecs in each extent's entry), and it wastes space on small ones (the unused block-number positions in their entries).
The MS-DOS operating system is quite different. It, too, divides a disk into blocks (of 512 bytes) and numbers the blocks. However, it records the state of all blocks in a single table called the File Allocation Table (FAT). The FAT is an array of binary numbers, each corresponding to one disk block; that is, the nth entry of the FAT is related to disk block n. If a FAT entry contains zero, the related block is free.
An MS-DOS file is given just one directory entry, no matter its size. In the entry there is a single block number, that of the first block owned by the file. The rest of the file's space is recorded as a chain of numbers running through the FAT. To read a file sequentially, MS-DOS proceeds this way:
x := first block number
while (x <> -1)
process block x
x := FAT[x]
end while
Thus the FAT entry corresponding to each block of a file contains the number of the next block of the file.
The MS-DOS scheme avoids the redundancy of CP/M's directory, but it also avoids CP/M's robustness. Its fragility stems from the fact that the numbers in the FAT have no independent meaning. Every number's interpretation depends on the numbers that precede it in its chain. If a single bit in the FAT is altered, the corruption affects all of the blocks that used to follow that entry in the chain. Some blocks will be lost; others will end up being owned by two files. The block numbers in a CP/M directory don't have this interdependence; if one is corrupted, the others are still correct and usable.
MS-DOS compounds the danger by keeping the FAT in storage continually, refreshing it from disk as little as possible but writing it back to disk often. This ensures that when the in-storage copy is corrupted -- and it does happen, as many owners of IBM PCs will attest -- the error will quickly be made permanent.
In our directory, we will emulate the economy of MS-DOS by keeping a single array of record numbers. We will not, however, track a file's records by threading a chain through the table. Each entry in the table must stand alone, so that one corrupt entry won't cause other entries to be misinterpreted.
We can learn something else from the unfortunate example of MS-DOS: we must try to avoid committing a mistake to disk. It's bad enough to corrupt the directory in storage, but so long as we don't make the error permanent by writing it to disk its effects will be limited to a single program's run.
We can achieve this with two rules. First, we must never modify the data file in such a way that the old directory on disk is made invalid. If we stick to that, unexpected program terminations will cause no loss of data. The old directory will be a valid description of the data even after a crash, although it may not describe the changes the program attempted to create. This rule alone makes our system proof against crashes of all sorts -- disk read errors, disk full errors, the user pressing the reset button -- and furthermore we will be free to end the programs with the abort macro at any time.
The second rule is that, after modifying the directory in storage, we must try to verify its correctness before writing it back to disk. It won't be possible to detect all errors, but we can detect most of them. If we can catch a corrupt directory and abort, the first rule will ensure that we've done no permanent harm.
Of course, I wouldn't be saying all these things if I hadn't already prepared a design that met the objectives. We will examine it first at a very high level, deferring all questions of assembly-language implementation.
There will be a data file which we will view as an expanse of 128-byte records. We will number these records from 1 to MaxR, where MaxR is at least 4096 (4096 times 128 makes 512 Kb). There will be an array of integers called R indexed by record numbers, so that the value of R[r] tells the state of record r.
At this high level, we may pretend that there are two I/O functions, copyin(r) and copyout(r). The first will represent reading 128 bytes from the current input file and writing it to record r of the data file; copyout(r) will stand for getting record r from the data file and writing it to the current output file. These pseudo-functions translate directly into toolkit function calls.
We will also suppose that the directory can account for as many as MaxF files, MaxF being some useful number like 500 -- how many doesn't matter. We will number the files from 1 to MaxF and keep track of them in two arrays. The first, F, is an array of strings, the names of the files in filename.typ form. (If we were working in BASIC, we'd write DIM F$(MAXF).) The second, S, is an array of integers, the sizes of the files. Thus F[f] is the name of file f, while S[f] is its size as a count of 128-byte records. If there is no file f, F[f] will be a null string.
When R[r] is zero, record r is free. Otherwise the value of R[r] will be the number f of the file that owns record r. We will always allocate data records starting with the lowest number available. As a result, we could copy a file out of the anthology with this simple loop.
for r := 1 to MaxR
if (R[r] = f) then copyout(r)
end for.
That's the basic structure. It is certainly simple. We can make it quite robust with consistency checks. We can verify, for instance, that every entry of R contains either zero or a file number between 1 and MaxF, and that a file of that number exists (F[R[r]] is not a null string). We can also verify that every existing file owns exactly as many records as the array S says it should. If we add two two more variables -- AlFiles as a count of active files and Frecs as a count of free records -- we can make a complete set of tests. We can verify that there are exactly Frecs entries of zero in R and exactly AlFiles filename strings in F.
If we make these checks just before writing the directory back to disk, we will come close to ensuring that we never create an inconsistent directory. It is remotely possible that a directory could be corrupted in such a way that it would be inaccurate yet self-consistent, but the chances of that are so small that we can ignore them.
Let's design some support functions to make the use of these data structures simpler. (This isn't just a pedagogical dodge; I really did begin my design efforts by working out this set of support functions.) We can begin with functions to manage the filename arrays. The find function (Figure 8-2) searches for a filename string in the array F, returning its file number if it appears and zero otherwise.
find(str: string) returns file number
j := 1
repeat
if (F[j] = str) then return j
j := j+1
until (j = MaxF)
return 0
end find.
Figure 8-2. Support function find.
The add function (Figure 8-3) is used to add a new filename to the directory. It looks for an unused entry in F and sets it to the new filename string. If none exist, the directory must be full.
add(str: string) returns file number
j := 1
repeat
if (F[j] is null) then
F[j] := str
S[j] := 0
AlFiles := AlFiles+1
return j
endif
j := j+1
until (j > MaxF)
abort("directory full")
end add.
Figure 8-3. The support function add.
When retrieving a file we have to read out its records in order. We don't know where the records of a given file fall within the array R, but we have decided that they will appear in ascending order; that is, the next record has a higher number r than the current one. The nextdat function (Figure 8-4) finds the next record of a file, given the file number and the number of the current record. It expects that it won't be called unless there is a next record; hence it aborts with an integrity failure if it can't find one. Note the use of a while loop in Figure 8-4. Why do you suppose nextdat doesn't use a repeat loop as the prior functions did?
nextdat(f:file number, last: record number) returns record number
j := last+1
while (j < MaxR)
if (R[j] = f) then return j
j := j+1
end while
abort("integrity failure!")
end nextdat.
Figure 8-4. The support function nextdat.
With nextdat we can write pseudo-code for the heart of antget, a loop that copies a file f from the anthology.
r := 0
s := S[f]
while (s > 0)
r := nextdat(f,r)
copyout(r)
s := s-1
end while
Again we have used a while loop. Here it is because we will allow an anthology member to have a size of zero. If the user wants to anthologize an empty file, we will allow it.
When we copy in a new or replacement file we will have to allocate record numbers to hold its data. One way to do this is to scan the array R from beginning to end, looking for an entry that contains zero. But more often than not, when we want one free record we will shortly want another. If we scan from the beginning each time, the program will waste progressively more time on fruitless comparisons on each call. Let's borrow a trick from nextdat and search for the next free record after the last one found. This is shown in nextfree in Figure 8-5.
nextfree(f: file number, last: record number) returns record number
j := last+1
while (j <= MaxR) do
if (R[j] = 0) then
R[j] := f
Frecs := Frecs-1
return j
endif
j := j+1
end while
abort("dataspace full")
end nextfree.
Figure 8-5. The support function nextfree.
With nextfree we can sketch the heart of the antput command.
r := 0
s := 0
while (not end of input file)
r := nextfree(f,r)
copyin(r)
s := s+1
end while
S[f] := s
This simple formulation ignores the problem of replacing a file that already exists in the anthology.
When erasing files we have to free record numbers. We may as well have a support function for this purpose. The free function (Figure 8-6) releases all the records owned by a file, performing a consistency check as it goes.
free(f : file number)
size := S[f]
j := 1
repeat
if (R[j] = f) then
R[j] := 0 !
Frecs := Frecs+1
size := size-1
endif
j := j+1
until (j > MaxR)
if (size <> 0) then abort("integrity failure")
S[f] := 0
end free.
Figure 8-6. The support function free, used to erase a file.
We could use free as it stands to erase a file, but not to replace one. Replacement will occur when antput is asked to copy in a file that already exists in the anthology. The simple way to do the replacement is to apply free to that file, releasing all its existing records, then to execute the simple loop shown above. But that loop calls nextfree, which might choose one of the records that was just freed. The new file data would overwrite some or all of the old version of the file.
For robustness we must not alter the data file in such a way as to make the old directory on disk invalid. But this replacement procedure would do just that. After freeing the old file's records and reusing some of them, the old directory wouldn't describe that file correctly. If the program crashed before it could rewrite the updated directory, the anthology would be ruined.
The only solution is to have two kinds of "free" records: records that are really free, and those that will be free when the directory is updated on disk. We might use a value of -1 in R to signify a record that is conditionally free. That will signify that it belongs to no file, but will prevent nextfree from selecting it for use. When we are ready to commit the directory to disk we will convert these marks to zeros, probably as part of performing the consistency checks.
Only antput and antera will use free; antput needs to free records conditionally while antera won't care. Therefore the statement R[r]:=0 in Figure 8-6 may as well be R[r]:=-1 for all cases.
Just as a check on the design, let's sketch the process of committing a directory to disk. This will be done at the end of the antput and antera commands. The logic is shown in Figure 8-7. It depends on an additional array of integers T, in which the true count of records owned by each file is accumulated.
commit
for j := 1 to MaxF do: T[j] := 0
nfree := 0
for j := 1 to MaxR do
if (R[j] = -1) then R[j] := 0
if (R[j] = 0) then
nfree := nfree+1
else
f := R[j]
if (f is not in 1..MaxF)
abort("integrity failure!")
if (F[f] is null)
abort("integrity failure!")
T[f] := T[f]+1
endif
end for
if (nfree <> Frecs)
abort("integrity failure!")
nfiles := 0
for j := 1 to MaxF do
if (F[j] is not null) then
if (T[j] <> S[j])
abort("integrity failure!")
nfiles := nfiles+1
endif
end for
if (nfiles <> AlFiles) then abort("integrity failure!")
end commit
Figure 8-7. Checking the consistency of the directory before writing it to disk.
This scheme seems to work smoothly enough, at least as pseudo-code. But how can it be implemented in assembly language? A literal translation of the pseudo-code design would use the arrays R, F and S, each of a fixed size both on disk and in storage. There are disadvantages to this. Arrays are tedious to manipulate in assembly language; for example, it would be quicker if, where the pseudo-code indexes the array of filenames as F[f], we could actually use the address of that filename string without going the process of computing it from the index and the base address of the array.
A more important problem is that arrays of fixed size are both bulky and inflexible. Consider the storage requirements. We must allow at least 4,096 record numbers, each a two-byte integer. That's 8,192 bytes. We should allow at least 100 filenames. It takes 13 bytes to record the string "filename.typ," plus two bytes for the size of the file -- say 16 bytes for each file. That's another 1,600 bytes. A directory composed of fixed-size, preinitialized arrays would take nearly 10 Kb of disk space regardless of the amount of data in the anthology it describes. Furthermore, its fixed size would hamper the user who needs to store exactly 101 files, or the one who needs to store just 4,097 data records.
The directory may take up a fixed amount of space in storage, but its size on disk should be proportional to the amount of data in the anthology. This is especially important for small disks. Furthermore, it should allow a flexible upper limit on both the number of files and the amount of data. The array R should be able to expand at the expense of arrays F and S, and vice versa.
This can be done in assembly language. The first step is to merge the arrays F and S. The merged array -- let's call it FS -- is an array of data structures, each entry containing a filename string, a size integer, and a spare byte to make up 16 bytes (Figure 8-8).
Figure 8-8. The layout of array FS in storage.
Now imagine a block of storage set aside to hold the arrays. The array R, the list of integers that describes the data records, may occupy the low-address end of the area. The array of file structures can be packed into the high-address end of the area. The space between the end of R and the start of FS is available for the expansion of either.
This situation is diagrammed in Figure 8-9. It shows a block of storage that starts at some address Base. Base is also the address of the first entry of array R; the address TopR points to the first unused word following R.

Figure 8-9. Arrays R and FS can share a block of storage.
Some distance beyond the end of R, the array FS begins. Address BotF points to the first entry of FS. The address TopF points to the byte after the end of FS -- the end of the block of storage.
Under this arrangement, both arrays are open-ended. If we need space to record a new file, we get it by subtracting 16 from BotF. If a new data record must be allocated and none of the existing ones are free, we can create space in R by adding 2 to TopR. In either case, the directory becomes full only if TopR becomes greater than BotF.
Under this scheme the contents of the file entries are no longer indexes to an array F; instead they are addresses of FS records.
Notice that these changes in the representation of the data are not fundamental. They don't affect the logic that we laid out in the last section; the pseudo-code functions displayed there are still accurate statements. There is still an array R; its entries still reflect the state of data records; the contents of arrays F and S still exist and have their planned meanings.
When the directory arrays are laid out in storage this way, it becomes easy to read and write only the relevant parts to disk. The relevant part of the array R extends from Base to TopR; that of FS from BotF to TopF. Define
SizeR := TopR - Base
SizeF := TopF - BotF
Now suppose that when a directory is written to disk, we write only this information:
In a new anthology, SizeR and SizeF are both zero, so the directory of a new anthology would consist of nothing but two words of zero. Once files have been put into an anthology, its directory files on disk will be larger, but their size will always be proportional to the amount of data in the anthology.
Reading a directory into storage is the reverse process. We would allocate an area of storage and set its start and end addresses in Base and TopF. Then we would read a word to SizeR and a word to SizeF. If the sum of those words was greater than the size of our area, we'd have found an integrity failure; otherwise we would
A directory written to disk by one program will be read to storage in other programs. There is no guarantee that the value of Base will be the same in different programs, yet the record entries in R are supposed to be addresses. These addresses won't be accurate if they are loaded to a different Base point.
One more change will fix this problem. After the directory is loaded, R[r] will be the address of the FS entry that owns that record. However, just before writing the directory to disk we will go through R and modify each nonzero entry this way:
R[r] := TopF-R[r]
That converts what was an address into an offset, the distance in bytes from that file entry to the top of the storage area.
After reading a directory we will perform the reverse conversion,
R[r] := TopF-R[r]
(yes, the same expression), to convert an offset back into an absolute address. This peculiar conversion handles two kinds of difference between one program and another. The second program might read the directory to a different area of storage, and it might use a larger or smaller block of storage to hold the directory. The only thing we will depend upon is that all programs will place the array FS at the top of the storage block.
There are two ways in which we could update the directory files. One way is to open them with frewrite and write them sequentially. That replaces the old files with new ones; while the writing is going on both old and new files exist.
The other way is to use the direct-access functions to write the directory data back into the existing files. That could be done by applying frewind to seek back to the head of the files and then writing them sequentially. The new data would be written over the old data in the same disk sectors.
There are reasons for preferring the second method. The first is integrity. Once the directory data have successfully been read from a certain part of the disk, that expanse of magnetic oxide is known to be readable, and we ought to stick with it. If we make new files, they'll go to a new, unproven part of the disk's surface. Another reason has to do with passwords under CP/M Plus. The directory file may have a password at the write or delete level. When the toolkit functions make a new or replacement file, they must install a password at the more stringent read level, so rewriting the directory would have the effect of forcing the password level up. On the other hand, the directory might have only a delete-level password, which normally needn't be given when a file is updated in place. But when a file is rewritten, the old file must be erased, so the password would be required (or would cause a program abort if it wasn't given).
Yet another reason is that while a file is being replaced, two copies exist. On a nearly-full disk, that might force a needless disk-full error. So all in all, it seems best to use direct-access functions to rewrite the directory in place.
Ah, but that last point brings up a new worry. Imagine this scenario: Several files are added to an anthology on a nearly-full disk. The files' data fits, but the new filenames and record numbers cause the directory to expand across a kilobyte boundary. CP/M must allocate a new disk block to each directory file -- and runs out of disk space. If the files are updated from first record to last, the program will be aborted before it finishes writing the directory, but after it has updated that part of the directory that fit in the old directory's allocation. The directories (or perhaps only one of them) are no longer a true description of the anthology. This violates one of our integrity rules.
It took hard thought to arrive at the obvious solution to this danger: use the direct-access services to update the directories from last record to first. The only thing that will make CP/M abort a program during file output is running out of disk space, but that will happen only when the program is writing to a new sector of the file. But if we are writing to a new sector, we can't be overwriting old directory data. Therefore we must write those records of the directory that might be new sectors first. If that causes CP/M to abort us, we can't have overwritten the old directory data; it will still be there, a true description of the anthology.
The routine that updates the directory files on disk will have to write them backwards, from their last 128-byte record back to their first. In order to do so conveniently, the values of SizeR and SizeF will have to be stated in units of 128 bytes; that is, they will have to be counts of 128-byte records.
Wait, there is one more hazard. The directory files antname.anx and antname.any are supposed to be identical. But what if the .anx file is written correctly and then we encounter disk-full while writing .any. The files will be out of step; one will be updated while the other is back-level.
The solution is to write the files alternately by record, from last record to first. Write the last record of .anx; write the last record of .any; write the next-to-last record to .anx and then to .any. This will force CP/M to allocate the new disk blocks that are needed by both files before we write over the old data of either file. If disk-full occurs, neither file's original contents will be changed; if not, both will be changed.
Whew! This is where an integrity policy can lead one. Is it worthwhile? Well, for this application, perhaps not. But the software market is being flooded with so-called "database managers" to which people entrust data of immense value. How many of them take even this amount of care for data integrity and security? Most ignore all such considerations, simply dumping the whole responsibility onto the user with many platitudes about "make lots of backup copies." You have seen the issues and at least a few of the solutions. Should you set out to build a small database manager using the direct-access services of this book's toolkit, you'll have some idea of what to do.
In the next chapter we will attempt to implement this monster we've conceived
We have set the essential parts of the design for the anthology system: the data structures of the directory, the fundamental routines to manipulate them, and the method of storing directory and data on disk. Implementation may commence, and the first thing to implement is a collection of supporting modules.
In the vocabulary of the CP/M assemblers, a "module" is the unit of object code that rmac produces, lib stores, and link merges with other modules to make a program. That's a trivial use of a good word. It's no accident when we isolate a section of code as a module; we do it in order to isolate a functional abstraction.
The supporting functions displayed in the last chapter are functional abstractions. To invoke free(f) is to say "free the records owned by file f; I don't care how, just do it." We can be that carefree while designing the program, and again while coding it, but at some point we must turn our attention to the "how" of accomplishing free(f). Since its "how" is of no interest to the clients of free, there's no need to embed its code in another program's file. We'll only write and assemble it once (we hope), so it would be a waste of machine time to put it where it would be reassembled when some other code was. It will be needed in some programs and not in others, so it would be a waste of space to embed it in an object unit that was linked by programs that didn't need its services. That's why we will make modules (in the rmac sense) of our modules (functional abstractions).
Although they are independent of each other, the modules will require access to information that is common to all of them, notably the anthology files, the arrays R and FS, and the numbers that define the boundaries of those arrays.
If these global variables are defined in one module (assembly source file) they won't be available from others. One solution would be to create a module composed of nothing but data declarations, giving each object -- Base, TopR, etc. -- a public label. A module that needed access to a variable would name it as an external label.
In retrospect that would have been the best solution, but I chose another: the common block. A common block is a named segment of storage. Each module that needs access to its contents includes a definition of the common block; the link program makes sure that each module's definition references the same area of storage. The common block for the anthology system is shown in Figure 9-1.
common /ANTCOM/
; This common area definition is included in all, or most
; anthology programs. It defines the directory in storage.
; The filedefs are assembled in module ANTSUP.
AntHdr equ $ ; following words precede directory
SizeR ds 2 ; size of array R
SpanR ds 2 ; # of 128-byte records over R
SizeF ds 2 ; size of array FS
SpanF ds 2 ; # of 128-byte records over FS
AlFiles ds 2 ; count of allocated files
Frecs ds 2 ; count of free records
AntHdrLen equ $-AntHdr ; bytes written at head of file
Base ds 2 ; -+base of dir. (array R)
TopR ds 2 ; -+low free byte
BotF ds 2 ; -+bottom byte of FS
TopF ds 2 ; -+byte after directory
SizeDir equ 16384 ; in-core size of directory
FSsize equ 14 ; offset to size in FS entry
FSlen equ 16 ; size of an FS entry
AntDat ds FcrLen ; data file antname.ANT
AntDirX ds FcrLen ; directory copy antname.ANX
AntDirY ds FcrLen ; directory copy antname.ANY
AntSeq ds FcrLen ; sequential file in/out
cseg ; end of common
Figure 9-1. The definition of the common block.
This section of code has to be included in every module of the system. Therein lies one danger of common blocks. The link program guarantees that every definition of the block will refer to the same area of storage, but it cannot check on the use of the storage. There will be no error indication if one module's definition of the contents of the common block differs from another module's definition. If one module stored, say, TopR in the eighth word of the common area while another module retrieved it from the sixth word, a very tricky bug would result. The modules would look correct in isolation but wouldn't work together.
The common block's definition must be identical in every module or catastrophe will follow. I made that happen by writing Figure 9-1 as a separate file and pulling it into each file as it was edited. But sure enough, around the fourth module I discovered that another word was needed in the common definition. Then I had to go back and correct the previous modules.
Assume that the code of Figure 9-1 is part of all the remaining figures in this chapter.
Let's look at the code of the most useful modules. In truth, I wrote the modules needed by antnew first, then wrote and tested antnew, then the modules needed by antput, then antput itself, and proceeded in that fashion until all the programs were done. But I had the structure of the whole system in my head in more detail than could be shown in the last chapter. That gave me confidence that it would all come together. You may not have the same sense of the design's solidity, and seeing the modules first may reassure you.
Glance back to figure 8-2, the pseudo-code of a function that finds a name in the directory. Its implementation appears in Figure 9-2.
name 'ANTFIN'
;===============================================================
; find(DE-+FS entry or HL=zero
public ANTFIN
ANTFIN:
push psw
push b
lhld TopF
FINloop:
lxi b,FSlen
ora a ; clear carry
dsbc b ; HL-+next lower FS entry
lbcd BotF ; is HL now lower than lowest?
dsbc b ; (carry is still clear)
jrc FINfail ; (yes, we tried them all)
dad b ; no, restore HL
strcmp +H ; is this the wanted entry?
jrz FINhit ; (yes, stop)
jmp FINloop
FINfail: lxi h,0 ; return HL=0 for failure
FINhit: ; return HL-+FS entry for success
pop b
pop psw
ret
Figure 9-2. The code of ANTFIN, the find function.
Study Figure 9-2 carefully, for it illustrates a method of scanning an array that is used throughout these routines. The array of filename-and-size entries begins at the top (the high-address end) of the in-storage copy of the directory. Its oldest, highest entry ends in the last byte of that area, and common word TopF contains the address of the following byte. Its latest entry is at the lowest address; that address is in common word BotF. In a new anthology the array is empty and BotF = TopF.
The array can be scanned in either direction. In Figure 9-2 it is scanned from highest to lowest address. Before the loop, register HL is set from TopF. At the top of the loop, the dsbc instruction is used to back HL up by the length of one entry. That instruction has to be used with care; it subtracts from HL the contents of a register pair plus the value of the carry flag. That is useful in certain arithmetic routines, but most often the carry flag is irrelevant and we must be sure that it is zero before doing the subtract. The easiest way to clear it is the instruction ora a. That changes no registers, but like all logical instructions it sets carry to zero.
After the subtract, HL points to the next lower array entry -- or does it? If its contents have become numerically less than BotF, it points only to unknown, useless space. To find out if this is the case, HL must be compared to BotF. There is no word-compare in the Z80 instruction set, but binary comparison is nothing more than binary subtraction. In Figure 9-2, BotF is subtracted from HL. If that sets the carry flag, BotF was greater -- there was a "borrow" out of the high bit of HL -- and the loop must end in failure. If not, HL points to a valid array entry. Well, it used to; it no longer does because BotF has been subtracted from it. Its contents must be restored by adding BotF back into it. Then the input string may be compared to the filename string in the array.
When find fails, the new filename may be added to the directory with function add. Its pseudo-code is shown in figure 8-3; its implementation appears in Figure 9-3.
name 'ANTADD'
;===============================================================
; add(DE-+new FS entry initialized with
; the filename string -- or, if there are no free entries,
; aborts with "Directory space is full."
dseg
NoDir: db 'Directory space is full.$'
cseg
public ANTADD
ANTADD:
push psw
push b
lhld TopF
ADDloop:
lxi b,FSlen
ora a
dsbc b ; HL-+next lower FS entry
push h ; (save that)
lbcd BotF
dsbc b ; off the bottom now?
pop h ; (recover -+next entry)
jrc ADDnew ; (yes, allocate a new name)
mov a,m ! ora a ; no, does HL-+free entry (null)?
jrz ADDold ; (yes, reuse old name)
jmp ADDloop ; no, try another
; All allocated FS entries are in use. HL=BotF-16, which will
; do for a new entry provided it doesn't overlap TopR.
ADDnew:
lbcd TopR
push h
ora a
dsbc b ; compare HL vs. TopR
pop h
abort c,NoDir ; ..and quit if they overlap.
shld BotF ; set the new BotF, extending array
mvi m,0 ; make new entry null
; HL-+an available FS entry (contains a null string). Copy
; DE-+string into it...
ADDold:
xchg ; append wants DE-+source
strappnd +H
xchg ; recover HL-+array entry
; ...and set its size word to zero
push h
lxi b,FSsize
dad b ; HL-+size field
xra a
mov m,a ! inx h ; zero it
mov m,a
pop h
; Whatever we did, there is now one more active file entry.
lbcd AlFiles
inx b
sbcd AlFiles
pop b
pop psw
ret
Figure 9-3. The code of ANTADD, the function add.
The pseudo-code plan for add was based on the implicit assumption that the array of filenames had a fixed size. It showed a simple scan for the first unused entry. The real situation is more complicated since the array has a flexible size. It may contain an unused entry (if a file had been erased), but if it does not, it can be extended downward to create a new, unused, entry.
The code in Figure 9-3 starts with a scan down the file array much like that in Figure 9-2. The loop has, however, two exits. If it locates an empty entry (one containing a null string), the new filename may be inserted there. If it reaches the end of the array, however, it attempts to create a new entry. When this succeeds, the case of "add a new entry" has been made identical to the case of "reuse an old entry"; that is, the outcome of "add a new entry" is identical to that of "find an unused entry" -- both end up with HL addressing an available entry. This trick of reducing one case to another is a useful one.
The dsbc instruction is used for word comparisons twice in Figure 9-3, and both times the original value in HL is preserved by pushing and popping HL, whereas in Figure 9-2 it was done by adding back the compared value. The difference is that in Figure 9-2 the contents of HL mattered only in one case and were irrelevant in the other. In Figure 9-3, HL's original contents are needed on both legs of the branch. The branch is taken on the state of the carry flag, but if HL were restored with an add, the restoration would wipe out the state of carry that determines the branch. Accordingly HL must be restored with the slower stack operations.
The nextdat function, planned in figure 8-4, was specified to return the number of the next record owned by a file. It amounts to a simple scan upward through the array of record numbers, R, looking for the next entry that contains the index of the given file.
As implemented in Figure 9-4 the simplicity is rather swamped by the necessary switch in mental levels between indexing an array -- checking the value of R[r] -- and addressing a sequence of two-byte words in storage. The arithmetic involved in the indexing is discussed in the comments at the head of Figure 9-4. The fact that the Z80 cannot treat stored words as units complicates things further. Follow the progress of HL through the loop carefully. It is used to look at first one byte of a word, then the next; but when the loop ends HL is pointing, not at the start of a word, but at its middle.
name 'ANTND'
;===============================================================
; nextdat(HL-+FS entry, DE=last record number):
; Return the next record number after DE which is owned by
; HL-+file. The caller is expected to know whether there IS a
; next record or not, so if there is not, we abort with an
; integrity check 1.
;
; We receive and return DE as an integer record number "r" from
; 1 to (TopR-Base)/2. Internally we deal with addresses of
; record slots, Base+2*r.
;
; Record numbers are origin-1 while the array is really origin-0
; so the slot indexed by DE on entry is Base+2*(DE-1). But we
; want to start with the NEXT slot, so we begin at Base+2*DE.
dseg
msgIC1: db 'Integrity check #1.$'
cseg
public ANTND
ANTND:
push psw
push b
push h ; save FS pointer
lhld Base
dad d ; Base + 2*DE gives...
dad d ; ...HL-+next record slot
pop d ; DE=FS pointer to compare
lbcd TopR ; BC=limit address for checking
NDloop:
ora a
dsbc b ; has HL got up to TopR?
abort nc,msgIC1; (if so, somebody goofed)
dad b ; no, restore HL
mov a,m ! inx h
cmp e ; compare low bytes
mov a,m ; and set up for high ones
jnz NDmiss
cmp d ; compare high bytes
jz NDhit ; (entire word matched)
NDmiss: inx h
jmp NDloop
; HL-+FS entry.
; Convert HL into a record number as (HL-Base)/2 + 1.
NDhit:
dcx h ; back to 1st byte of word
lbcd Base
ora a
dsbc b ; (carry now clear, HL was += BC)
rarr h ; 0 + carry
rarr l ; carry + carry
inx h ; make origin-1
xchg ; DE=record #, HL-+FS entry
pop b
pop psw
ret
Figure 9-4. The code of ANTND, the function nextdat.
This routine can encounter an impossible situation. If nextdat is called, its caller must expect that a "next" data record exists. But one might not; what should nextdat do if it can't find one? Either the calling program has a bug or the directory has been corrupted; whichever, the integrity of the system is in doubt and the only safe course is to abort the program. The routine quits with the first of what eventually became nine "integrity checks." The message it issues isn't very informative, but then it is never supposed to be seen anyway. If the situation ever does arise, there isn't much more that can be said about it than "aghhhh!"
The function nextfree, whose plan appeared in figure 8-5 and whose code is shown in Figure 9-5, has some of the characteristics of both add and nextdat. Like nextdat, it scans upward through the array R. Like add, it is looking for an unused entry and, if its search fails, it tries to create a new entry by extending the array.
name 'ANTNF'
;===============================================================
; nextfree(HL-+FS entry, DE=record number):
; Return the record number of the next FREE record slot after
; DE, and allocate it to HL=file address. If no free (zero)
; entries are found before TopR, create one by sliding TopR
; up, aborting if that overlaps BotF.
; See notes on index arithmetic in ANTND.
dseg
NoDat: db 'Data space is full.$'
cseg
public ANTNF
ANTNF:
push psw
push b
push h ; save FS pointer
lhld Base
dad d
dad d ; HL-+next record slot
pop d ; DE=FS pointer to compare
lbcd TopR ; BC=limit of ever-used records
NFloop:
ora a
dsbc b ; has HL got up to TopR?
jnc NFnew ; (yes, make a new one)
dad b ; no, restore HL
mov a,m ! inx h
ora m ; is this slot zero?
jz NFold ; (yes, use it)
inx h ; no, step over it
jmp NFloop ; ..and continue
; BC=HL=TopR, and no zero entries were seen. If TopR+2 + BotF,
; increment TopR and use this slot. Otherwise abort.
NFnew:
inx b ! inx b ; new TopR, maybe
lhld BotF
dsbc b ; new TopR + BotF? (equal is ok)
abort c,NoDat ; (yes, array R is full)
sbcd TopR ; no, ok, store new TopR
mov h,b ! mov l,c ; and set up HL
dcx h ; ..to point to 2nd byte of slot
jmp NFboth
; We found a record entry that was previously used but is now
; free. We will use it, so decrement Frecs.
NFold:
lbcd Frecs
dcx b
sbcd Frecs
; HL-+2nd byte of a record slot that is available. Store DE
; into it to claim ownership. Then convert the address into
; a record number: 1+(HL-Base)/2
NFboth:
mov m,d
dcx h
mov m,e
lbcd Base
ora a
dsbc b
rarr h
rarr l
inx h
xchg ; DE=record #, HL-+FS entry
pop b
pop psw
ret
Figure 9-5. The code of ANTNF, the function nextfree.
Both the add and nextfree functions could be frustrated by finding no room to expand their arrays, and both abort when this happens. They display different messages, but in fact both are reporting the same condition -- that the two arrays have met in the middle of the in-storage directory. Fortunately, neither message is likely to be seen. The in-storage directory is 16 Kb long, allowing for a megabyte of data, a thousand filenames, or a generous mixture of the two.
The function free, whose plan was shown in figure 8-6, was specified as releasing the ownership of all records owned by a particular file. In order to ensure that antput would not reuse the freed records during a single run (and thus make the old directory invalid), free was to mark each record slot with a -1.
The implementation of free appears in Figure 9-6. It differs from the pseudo-code plan in that it doesn't count the records it releases in Frecs. Since they aren't really free yet, they shouldn't be counted as such. During the commit procedure (the validity checks prior to saving the directory) the marked records will be set to zero and counted.
name 'ANTFRE'
;===============================================================
; free(HL-+FS entry): Find all record slots now owned by this
; file and disown them by putting -1 in each. Check that the
; number found agree with the size field, aborting if it does
; not.
;
; The marked slots are not added to Frecs at this time. They
; will be made officially free (zero) during the next Commit.
dseg
msgIC2: db 'Integrity check #2.$'
cseg
public ANTFRE
ANTFRE:
push psw
push b
push d
push h
lbcd TopR ; BC holds TopR for end-check
xchg ; DE contains -+FS as comparand
lxi h,0 ; count of found records...
push h ; ..is kept on top of stack
lhld Base ; HL scans array R
FREloop:
ora a
dsbc b ; TopR = HL?
jnc FREdone ; (yes, done)
dad b ; no, restore HL
mov a,m ! inx h ; A = low byte, HL-+2nd byte
cmp e
jnz FREmiss ; (low-byte mismatch)
mov a,m
sub d ; (leave A=0 if equal)
jnz FREmiss ; (high-byte mismatch)
dcr a ; A = FFh
dcx h
mov m,a ; 1st byte = FF
inx h ; HL-+2nd byte again
mov m,a ; record slot = -1 (FFFF)
xthl
inx h ; increment count of freed slots
xthl
FREmiss: inx h ; HL-+next slot
jmp FREloop
; All in-use slots of R have been scanned. Those that were
; owned by the indicated file have been set to -1, and the count
; of such slots is on the stack. Make sure it's the same as the
; size field of the FS entry, and set that size to zero.
FREdone:
lxi h,FSsize
dad d ; HL-+ size field
pop d ; DE=count
mov a,e
cmp m
jrnz FREugh
mvi m,0 ; zero low byte
inx h
mov a,d
cmp m
jrnz FREugh
mvi m,0 ; ..and high byte
pop h
pop d
pop b
pop psw
ret
FREugh: abort ,msgIC2
Figure 9-6. The code of ANTFRE, the function free.
As often happens, the body of the loop needed one more variable than I had registers to hold. The Z80's architecture, however, makes the top word of the stack almost as accessible as a register pair. I elected to keep the count of freed records on top of the stack, switching it into HL when it needed incrementing.
The anthology design assumed the existence of two functions for I/O between the data file and a sequential file: copyin to read a file's record and store it in the anthology; copyout to copy an anthology record to a sequential file.
I said that these routines would translate to a series of toolkit macros, and indeed they do. The copyin function's code is shown in Figure 9-7. It requires only a record number (as it would be returned by nextfree), Figure 9-5) and the use of the files defined in the common area. Part of its simplicity stems from its assumption that the sequential file is not at its end; its caller is supposed to assure that.
name 'ANTINP'
;===============================================================
; copyin(DE=r): record r has been allocated to the current file
; and the AntSeq file is not at end of file. Read its next
; 128-byte record and write it to the anthology data file.
dseg
buffer: ds 128 ; buffer for data I/O
cseg
public ANTINP
ANTINP:
push psw
push b
push d
push h
push d ; save record number again
lxi d,AntSeq
lxi h,buffer
lxi b,128
fgetblok +B
lxi d,AntDat
pop h ; HL=record number
frecseek +H ; seek to data record
lxi h,buffer
lxi b,128
fputblok +B
pop h
pop d
pop b
pop psw
ret
Figure 9-7. The code of ANTINP, the function copyin.
The copyout code appears in Figure 9-8. It has to check for one impossible condition. The frecseek function that it uses to position the data file at the required record returns a signal in the Zero flag. If it returns Zero true, it is because CP/M reported that no data existed at that file position (similar to the way in which the sequential-input functions return Zero true at end of file). This should never occur; the record number given to copyout ought to have come from nextdat and, if it is owned by this file, there ought to be data in it. If it does occur, the directory or the copyout's caller has lost all credibility.
name 'ANTOUT'
;===============================================================
; copyout(DE=r): record r is the next in sequence for the
; current output file. Read it from the data file and write it
; to the output file. If the seek operation returns Z true,
; meaning "seek to unwritten data," abort -- we're confused.
dseg
buffer: ds 128 ; buffer for data I/O
msgIC3: db 'Integrity check #3.$'
cseg
public ANTOUT
ANTOUT:
push psw
push b
push d
push h
xchg ; HL=record number
lxi d,AntDat
frecseek +H
abort z,msgIC3
lxi h,buffer
lxi b,128
fgetblok +B
lxi d,AntSeq
lxi b,128
fputblok +B
pop h
pop d
pop b
pop psw
ret
Figure 9-8. The code of ANTOUT, the copyout function.
Each anthology command will need to fetch its first command operand and use it to set up the filedefs of the three anthology files. In addition, each command ought to follow our convention of displaying a usage message when called with no operands or an operand of only a question-mark. These essential formalities are perfect for a module their own. I put them in a module named ANTSET (Figure 9-9). Much of what this setup routine was patterned after the chkops module we used in earlier programs. Two of its features are new.
name 'ANTSET'
;===============================================================
; Setup(DE-+usage message):
; Get the first command operand and use it to set up all three
; anthology filedefs in the common area with drivecode, filename
; and password, and their appropriate filetypes.
;
; The count of operands is returned to the caller in reg. A.
; If there is no first operand, or if it starts with "?," abort
; with the given usage message. Other messages:
; FRUMMAGE is not a valid anthology filespec
; FRUMMAGE is ambiguous; anthology spec must be explicit
; Reopen the common definition and assemble into it the filedefs
; of the anthology files.
common /ANTCOM/
org AntDat ; assemble filedefs into common
filedef 2048
org AntDirX
filedef 1024
org AntDirY
filedef 1024
org AntSeq
filedef 1024
dseg
tokens ds 1 ; save token-count for exit
usage ds 2 ; save -+usage message
string strspace 80 ; space to build abort-message
Ant: strconst 'ANT'
Anx: strconst 'ANX'
Any: strconst 'ANY'
inval:
strconst ' is not a valid anthology filespec.$'
ambig:
strconst ' is ambiguous; anthology spec must be explicit.$'
cseg
public ANTSET
ANTSET:
push b
push d
push h
xchg
shld usage
savetail
sta tokens
ora a ; any tokens at all?
jnz SET1 ; (yes, continue)
abusage: ; come here if token 1 is "?"
lhld usage
xchg
abort ,+D
SET1: mvi a,1
tailtokn +A
ldax d
cpi '?' ; a plea for help?
jrz abusage ; (yes, abort w/ usage msg)
; The first token is present and is not a question mark. Test
; it by assigning it to one file.
xchg ; HL-+token 1
lxi d,AntDat
fassign +H ; assign D:filename.typ;pass
lxi d,inval
jz abspec ; (bad filespec)
lxi d,ambig
cpi '?'
jz abspec ; (ambiguous spec)
; The first-token filespec is a valid one at least for the
; general case. Assign it to the other two files as well.
lxi d,AntDirX
fassign +H
lxi d,AntDirY
fassign +H
; Now force all three to have their correct filetypes, over-
; riding any filetype the user may have given.
typeonly equ 00100b ; no pass, do type, no name, no drive
lxi d,AntDat
lxi h,Ant
fassign +H,,typeonly
lxi d,AntDirX
lxi h,Anx
fassign +H,,typeonly
lxi d,AntDirY
lxi h,Any
fassign +H,,typeonly
; That's that, the filedefs are ready to open.
lda Tokens
pop h
pop d
pop b
ret
; common routine to abort with a message composed of HL-+string
; followed by DE-+string.
abspec:
push d
lxi d,string
strcopy +H
pop h
strappnd +H
lxi d,string
abort ,+D
Figure 9-9. The code of ANTSET, the setup function.
The first new feature is the definition of the anthology files. Every module's source file contains the identical definition of the common block as shown in Figure 9-1. That definition reserves space for the three filedef macros which will represent the parts of the anthology, but it doesn't contain the macro calls themselves.
Here in the ANTSET source file the assembler is made to reopen the common block, move back to each of these names, and assemble the filedef macros. When constant values are to be assembled into a common area, it is best to do it this way. When link processes constant data in a common area, it simply overlays each module's constants on the prior one's. If two modules assemble constants in the same byte, the one that link happens to process second will prevail. It's best to make sure that only one module actually assembles anything in a common area.
When rmac is made to reopen a common area this way, however, it also produces an "E" error flag on one statement in the common definition. This appears to be a bug, but it seems to cause no harm.
The second new thing in Figure 9-9 is the use of a partial assignment of a name to a file. The fassign function is familiar; it assigns a filespec, contained in a character string, to a file definition. Normally it assigns all the parts of a filespec: drivecode, filename, filetype, and password (the password is accepted, but has no effect, under CP/M 2.2). However, fassign may also be used to assign only one of those parts, or any combination of parts, while leaving the others unchanged.
The setup function applies fassign this way. It first assigns the entire first operand to each file. That establishes all four parts, or all of them that were given in the command, in the file definitions. Then it uses the optional fourth operand of fassign to assign a fixed filetype to each file. That filetype replaces any filetype that might have been given in the command operand. This is how the anthology commands apply a single "antname" operand to the three-file suite of an anthology.
All of the anthology commands except antnew will expect that all three anthology files exist and contain data and will have to open them. These additional formalities I placed in another module, ANTOPE (Figure 9-10).
name 'ANTOPE'
;===============================================================
; ANTOPEn: Open all three anthology files with freset. All must
; have some data in them (even a new, empty anthology has one
; data record and one record in each directory) -- so abort if
; they don't.
dseg
string: strspace 64 ; space for message
empty:
strconst ' is empty or nonexistent.$'
cseg
public ANTOPE
ANTOPE:
push psw
push b
push d
push h
lxi d,AntDat
freset +D
jz abempty
lxi d,AntDirX
freset +D
jz abempty
lxi d,AntDirY
freset +D
jz abempty
pop h
pop b
pop d
pop psw
ret
abempty:
lxi h,string
mvi m,0 ; make it null
fgetspec +H ; filespec to string area
xchg
lxi h,empty
strappnd +H
abort ,+D
Figure 9-10. The code of module ANTOPE.
Any CP/M disk file may be used for direct access. As far as CP/M is concerned, there is no difference between a sequential file and a direct one; they are handled using the same data structures, and direct operations may be mixed with sequential ones. As a result, it is permissible to open a file with freset even though it will be used for direct access. That's what ANTOPE does.
The toolkit contains a function specifically designed for opening direct-access files, fupdate. It does what freset does, but in addition it checks for device files and read-only files and aborts in these cases. The check for a device file (a file assigned a device name like CON: for a filespec) is useful, but not necessary in the anthology programs. They assign a filetype to each anthology file, and by the rules of the toolkit functions, a filespec that includes a filetype (like con:.ant) must be a disk file. Of course, no such file would be found, so that case is trapped without the help of fupdate.
As to the check for a read-only file, some of the anthology commands will attempt to modify the files and some will not. The use of fupdate would have required the files to be read-write, even for the antdir or antget commands. It seemed better to ignore the possibility of a read-only anthology, allowing CP/M to terminate the program if the user attempted to antput to a read-only anthology. Our design is such that doing so can't hurt anything.
The setup function is the only module required to make the antnew command work, and that simple program was the first one implemented (Figure 9-11). It uses setup to set up the files, makes sure that none of them exist, then creates them. The frewrite function creates a file that doesn't already exist.
name 'ANTNEW'
;===============================================================
; ANTNEW antname
; This command creates the 3 files of a new anthology as
; antname.ANT, antname.ANX, and antname.ANY. One (empty) data
; record is written to antname.ANT so that it will be visibly
; in existence. One record of all-zeros is written to both
; directory files. This creates a valid directory containing
; no information. If any file of these names exists, the command
; terminates with an error message and does nothing.
;
; messages:
; usage message
; abort messages of ANTSET
; abort "You must erase the existing anthology first."
; history:
; remember to close the darn files 8/2/84
; initial code 8/1/84
;===============================================================
maclib environ
dseg
record ds 128 ; link will fill with zeros
exists:
strconst 'You must erase the existing anthology first.$'
usage:
db AsciiTAB
db 'ANTNEW antname'
db AsciiCR,AsciiLF
db 'Creates a new anthology as "antname." That operand'
db AsciiCR,AsciiLF
db 'must be a valid filename, and may contain a drive letter'
db AsciiCR,AsciiLF
if CpmLevel gt 22h
db 'and/or a file password'
db AsciiCR,AsciiLF
endif
db 'but a filetype is not necessary and will be ignored.'
db AsciiCR,AsciiLF
db 'Any existing anthology of that name on that drive must'
db AsciiCR,AsciiLF
db 'erased by you before; this command won''t replace it.'
db '$'
cseg
extrn ANTSET
prolog
lxi d,usage
call ANTSET ; returns token-count
cpi 2 ; if we got more than 1,
abort nc,usage ; quit with usage message
lxi d,AntDat
call makeit
lxi d,AntDirX
call makeit
lxi d,AntDirY
call makeit
ret
makeit: ; test DE-+file to see if it exists, and create it
freset +D
abort nz,exists
frewrite +D
fputblok +D,record,128
fclose +D
ret
end
Figure 9-11. The implementation of the antnew command.
After making the a file, antnew writes a block of 128 bytes of binary zero to it. The contents don't matter in the data file, but it must contain at least one record or ANTOPE will reject it. In the directory files, the first six words of the first record will be read to the first six words defined in Figure 9-1. Since they will be zero, they will properly define a directory that contains no information. The other commands will have to be written so that this is an acceptable state for a directory -- as the supporting modules have been.
All the other commands will have to load the anthology's directory from disk. That operation clearly deserved a module of its own, and it got one (Figure 9-12). The job of this load routine is to retrieve the directory from disk and set it up in storage in the form that the supporting functions expect. Four steps are involved. I worked them out in pseudocode, and some of the pseudocode can still be seen in the module.
name 'ANTLOA'
;===============================================================
; Load a directory from disk into storage after ANTSET and
; ANTOPE have done their jobs.
; In contrast to ANTSAV, this module does only the most gross
; validity checks. That is so that, if a directory is only
; slightly damaged, files can still be extracted from it. Any
; inconsistencies in the R and FS arrays will be trapped if
; and when ANTSAV is called to update the directory.
; Since ANTSAV writes a directory in two distinct parts (which
; may have overlapped in storage but are separate on disk) we
; must read it back in two distinct parts. However, we can
; read it from low to high in two simple block-reads.
dseg
msgIC9 db 'Integrity check #9.$'
screen: msgfile
load1 strconst 'Loading directory...'
load2 strconst 'done'
cseg
public ANTLOA
ANTLOA:
push psw
push b
push d
push h
fputstr screen,load1
; fgetblok(ANX,significant numbers)
lxi d,AntDirX
lxi b,AntHdrLen
lxi h,AntHdr
fgetblok +B
; if (SizeR+SizeF + SizeDir) then abort(#9)
lhld SizeR
xchg
lhld SizeF
dad d
lxi b,SizeDir
ora a
dsbc b
jnc IC9 ; must be a garbage file
; Base := DSlow(SizeDir)
; TopR := Base+SizeR
; TopF := Base+SizeDir
; BotF := TopF-SizeF
dslow +B
shld Base
xchg ; save Base in DE
lhld SizeR
dad d ; HL = Base+SizeR
shld TopR
mov h,b ! mov l,c
dad d ; HL = Base+SizeDir
shld TopF
xchg
lhld SizeF
xchg ; HL=TopF, DE=SizeF
ora a
dsbc d ; HL=TopF-SizeF
shld BotF
; seek(ANX,record #2)
lxi d,AntDirX
lxi h,2
frecseek +H
; amount := SpanR*128
; start := Base
; getblock(ANX,start,amount)
lda SpanR ; both spans must be +256
ora a
rar ; 0 + carry
mov b,a
mvi a,0
rar ; carry + A
mov c,a ; BC = SpanR*128
push b ; (save for integrity check)
lhld Base
; n.b. fgetblok handles the case of length=0 ok
fgetblok +B
pop h ; HL=count we asked for
ora a ; BC=count we got
dsbc b ; they better be the same,
jnz IC9 ; ..or something is very wrong
; amount := SpanF*128
; start := TopF-SpanF*128
; getblock(ANX,start,amount)
lda spanF
ora a
rar
mov b,a
mvi a,0
rar
mov c,a ; BC=count of bytes to get
push b ; (save)
ora a
lhld TopF
dsbc b ; HL-+where it goes
fgetblok +B
pop h ; count we asked for
ora a
dsbc b ; ..versus what we got
jnz IC9
; for j := 1 to MaxR do
; if (R[r] + 0) then
; R[r] := TopF - R[r]
; endif
; end for
lhld Base
Ldloop:
lbcd TopR
ora a
dsbc b
jnc Lddone
dad b
mov c,m ! inx h
mov b,m ; BC=R[r], HL-+2nd byte of it
mov a,b ! ora c
jrz Ldstep ; R[r]=0=free slot
xchg
lhld TopF
dsbc b
xchg ; DE = TopF - R[r]
mov m,d ! dcx h
mov m,e ! inx h
Ldstep: inx h
jmp Ldloop
Lddone:
fputline screen,load2
pop h
pop d
pop b
pop psw
ret
IC9: abort ,msgIC9
Figure 9-12. The code of ANTLOA, the directory-load function.
The first step is to read the first twelve bytes from the .anx file into the first words of the common block. Four of these words -- SizeR, SpanR, SizeF and SpanF -- define the remainder of the directory. The Size words give the lengths of the two arrays, R and FS, in bytes. The Span words give their lengths as a count of 128-byte records. When these lengths are known, their sum should be checked against the predefined constant SizeDir, the size the directory is to have in storage. The sum ought to be no greater (if it were greater it would indicate either corruption of the file or an immense directory written by a program with a larger SizeDir than this program's).
After verifying that the directory will fit, load can allocate the storage to hold it. The toolkit function dslow allocates a block of storage of a given size at the low-address end of storage (just past the end of the program) and returns its address. That address becomes Base, the base address of the directory.
Only the first twelve bytes are significant in the first record of the directory. The following SpanR records contain the array R; the SpanF records after that contain the array FS. The next step is to read these two spans of records into the allocated storage. In Figure 9-12 this is done with fgetblok, a toolkit function that reads any number of bytes from a file into storage and returns the count of bytes read -- which will be the same as requested, unless early end of file is encountered.
The first span is read to the address in Base; the second is read to an address SpanF*128 bytes below TopF. If the directory were very full, these two blocks of data might overlap, but that would cause no harm since they would also have overlapped when they were written.
The array of filenames and sizes is now complete, but the array R is not. It should contain addresses of entries in FS; instead it contains relocatable offsets. A single scan over the array corrects this.
The load function does only a little integrity checking, validating only the gross sizes of the arrays and guarding against early end of file. It could do a thorough check of the arrays' contents, but doing so would make the system less, not more, robust. Suppose the directory were corrupted in some minor way that affected only a file or two. A thorough consistency check at this point would find the error, but then the program's only response could be to terminate. That would make all files inaccessible for an error that affects only a few. It's better to be permissive at this stage, applying the rigorous checks only when the directory is to be updated on disk.
After antput or antera has modified the directory, it must be saved on disk. Saving the directory is a larger job than loading it. Its contents must be subjected to stringent integrity checks, and then it must be written to disk in reverse order by records as discussed in the last chapter. The implementation of this elaborate procedure is shown in Figure 9-13. It consists of two independent routines, commit to do the checking and update for the disk output. These routines, although lengthy, are straightforward implementations of their pseudo-code (which is included in the source file as comments).
name 'ANTSAV'
;===============================================================
; Contains the logic needed to commit the anthology directory
; to disk, including validation of its consistency and writing
; it in such a way that a crash for disk-full will leave the
; original directory unaltered.
; messages:
; abort "Integrity check #4" record owned by non-file
; abort "Integrity check #5" Frecs + free records
; abort "Integrity check #6" file size incorrect
; abort "Integrity check #7" AlFiles + in-use files
; abort "Integrity check #8" error in size arithmetic
maclib environ
entersub
dseg
msgIC4 db 'Integrity check #4.$'
msgIC5 db 'Integrity check #5.$'
msgIC6 db 'Integrity check #6.$'
msgIC7 db 'Integrity check #7.$'
msgIC8 db 'Integrity check #8.$'
screen: msgfile
save1 strconst 'Saving directory...'
save2 strconst 'done'
cseg
public ANTSAV
ANTSAV:
push psw
push b
push d
push h
fputstr screen,save1
call commit
call update
fputline screen,save2
pop psw
pop b
pop d
pop h
ret
;===============================================================
; Commit: sweep over the array R, doing these things:
; 1. convert conditional-free records (-1) to free (0)
; and add them to the Frecs count of free records.
; 2. count the free records and verify Frecs.
; 3. verify that un-free (nonzero) records contain valid
; file-pointers -- multiples of 16 and in the correct
; range -- which point to active files.
; 4. tally the records owned by each file in a temporary
; word in the file's FS entry.
; 5. convert record file-pointers to relative form.
;
; Then sweep over the array FS, doing these things:
; 1. count active (non-null) entries and verify AlFiles.
; 2. verify that each file's tally of records agrees with
; its size, and clean up the temporary count.
;
; Afterward the directory is known to be self-consistent and is
; in condition to be written to disk.
;
; We need one word per file to tally the records that point to
; each file. The FS entry is laid out this way:
;
; F I L E N A M E . T Y P 00 xx SS SS
;
; where SS SS is the size-word and xx is unused. Since xx will
; always be preceded by 00 ending the string (or by an unused
; byte when the string is short), we keep the tally in the
; "00 xx" bytes. On the last sweep we replace it with "00 00"
; to restore the terminal null to any full-length string.
Commit:
; for j := 1 to MaxF do
; T[j] := 0
; end for
lhld TopF
lxi d,-4
dad d ; HL-+"T" field in top entry
lxi d,-17 ; DE = decrement value
lbcd BotF ; BC = bottom limit for check
xra a ; A = constant zero
C1loop:
ora a
dsbc b ; while HL + BC
jrc C1loopz
dad b ; (restore HL)
mov m,a
inx h
mov m,a ; T := 0000
dad d ; HL-+next lower entry's "T"
jmp C1loop
C1loopz:
; nfr := 0
; for j := 1 to MaxR do
; if (R[j] = -1) then e
; R[j] := 0
; Frecs := Frecs+1
; nfr := nfr + 1
; else if (R[j] = 0) then e
; nfr := nfr + 1
; else e
; f := R[j]
; if (f is valid) and (F[f] is active) then
; R[j] := TopF - f
; T[f] := T[f]+1
; else
; abort("Integrity Check #4")
; endif
; endif
; end for
; if (nfr + Frecs) then abort("Integrity check #5")
dseg
nfr ds 2
cseg
lxi h,0
shld nfr
lhld Base
C2loop:
lbcd TopR ; while HL + TopR
ora a
dsbc b
jnc C2loopz
dad b
mov e,m
inx h
mov d,m ; DE = R[j]
mov a,d ! ora e
jz C2free ; case of R[j]=0 is easy to spot
inx d ; if DE+1 = 0, we have R[j]=-1
mov a,d ! ora e
dcx d ; assuming not, restore DE
jnz C2inuse
dcx h
mov m,a ; (A now is 00)
inx h
mov m,a ; now R[j] = 0
lbcd Frecs
inx b
sbcd Frecs ; count the now-free slot
C2free: lbcd nfr
inx b
sbcd nfr ; count the free slot
inx h ; HL-+next slot
jmp C2loop ; continue loop from here
C2inuse:
push d ; save contents of R[j] = f
push h ; save -+2nd byte of R[j]
; that pointer f should be =+ BotF
lhld BotF
dcx h ; f should be + HL = BotF-1
ora a
dsbc d ; HL = (BotF-1) - f
jnc IC4
; ..and less than TopF
lhld TopF
ora a
dsbc d ; HL=TopF - f
jc IC4
jz IC4
; ..and a multiple of 16
mov a,l
ani 0fh
jnz IC4
; R[j]=f is a valid pointer to an entry of FS and HL=TopF-f
xchg ; DE=TopF - f
pop h ; HL-+2nd byte of R[j]
mov m,d
dcx h
mov m,e ; R[j] := TopF - f
inx h ! inx h ; HL-+next slot
xthl ; HL-+next slot
mov a,m ; is F[f] active?
ora a ; (not null string if so)
jz IC4
lxi d,FSsize-2
dad d ; HL-+T[f]
inr m ; increment low byte
jnz C2pop ; (no overflow to 2nd byte)
inx h
inr m ; (propogate to 2nd byte)
C2pop: pop h ; HL-+next record slot
jmp C2loop
; one of the checks on the value of R[j] failed.
IC4: abort ,msgIC4
C2loopz:
lhld nfr
xchg
lhld Frecs
ora a
dsbc d
abort nz,msgIC5
; naf := 0
; for j := 1 to MaxF do
; if (F[j] is not null) then
; naf := naf + 1
; if (T[j] + S[j]) then
; abort("Integrity check #6")
; endif
; endif
; end for
; if (naf + AlFiles) then abort("Integrity check #7")
dseg
naf equ nfr ; reuse the scratch word
cseg
lxi h,0
shld naf
lhld BotF ; just for variety, go from low to hi
C3loop:
lbcd TopF
ora a ; while BC + HL
dsbc b
jnc C3loopz
dad b
mov a,m ; does HL-+non-null string?
ora a
jnz C3inuse ; (yes)
lxi d,FSlen
dad d ; no, advance to next
jmp C3loop ; ..and iterate
C3inuse:
lded naf
inx d
sded naf ; count active file
lxi d,FSsize-2
dad d ; HL-+T[j]
xra a ; make a zero, clear carry
mov e,m
mov m,a ; pick it up and zero it
inx h
mov d,m
mov m,a
inx h ; DE=T[j], HL-+S[j]
mov c,m
inx h
mov b,m ; BC = S[j]
inx h ; ..and HL-+next entry
xchg ; (carry still clear)
dsbc b ; compare S[j] :: T[j]
xchg
jz C3loop ; ..and if equal, iterate
abort ,msgIC6
C3loopz:
lhld naf
xchg
lhld AlFiles
ora a
dsbc d
rz
abort ,msgIC7
;===============================================================
; update: the directory has been modified in storage, and Commit
; has validated it and made file-addresses relocatable. Now we
; write it to disk updating the files .ANX and .ANY. We write
; from last record to first so that, if CP/M aborts us for a
; full disk, it will do so before we change the existing files.
dseg
recno equ naf ; reuse the scratch word
cseg
update:
; SizeR := TopR-Base
; if (SizeR + 0) then abort("Integrity check #8")
; SpanR := (SizeR+127)/128
lhld Base
xchg
lhld TopR
ora a
dsbc d ; HL = TopR-Base
jm IC8 ; (oops)
shld SizeR
lxi b,127
dad b ; HL = SizeR+127
dad h ; ..shifted left once
mov l,h
mvi h,0 ; ..shifted right 8 times
shld SpanR
; SizeF := TopF-BotF
; if (SizeF + 0) then abort("Integrity check #8")
; SpanF := (SizeF+127)/128
lhld BotF
xchg
lhld TopF
ora a
dsbc d ; HL = TopF-BotF
jm IC8 ; (oops)
shld SizeF
dad b ; ...+127
dad h ; ..shift left
mov l,h
mvi h,0 ; ..and right by 8
shld SpanF
; ,
; ,
;
; recno := SpanR + SpanF + 1
xchg
lhld SpanR
dad d ; HL = SpanF+SpanR
inx h ; ..+1
shld recno ; record number to write first/next
; j := SpanF
; ptr := TopF
; while ( j + 0 ) do
; ptr := ptr-128
; seek(ANX,recno)
; putblock(ANX,ptr,128)
; seek(ANY,recno)
; putblock(ANY,ptr,128)
; recno := recno-1
; j := j-1
; end while
lda SpanF ; has to be less than 256
mov b,a ; ..so carry loop count in B
lhld TopF ; set HL=byte above 1st record
ora a ; any records in this segment?
cnz WRloop ; ..if so, write B records from HL down
; j := SpanR
; ptr := Base+(SpanR*128)
; while ( j + 0 ) do
; e
; end while
lda SpanR
mov b,a
ora a ; clear carry
rar ; 0 + carry
mov d,a ; high 7 bits to D
mvi e,0
rarr e ; carry + E, DE=SpanR*128
lhld Base
dad d ; HL = Base+(SpanR*128)
mov a,b ; now, are there any records?
ora a
cnz WRloop ; ..if so, write them
; frewind(ANX)
; putblock(ANX,significant numbers)
; fclose(ANX)
; frewind(ANY)
; putblock(ANY,significant numbers)
; fclose(ANY)
; fclose(ANT)
lxi h,AntHdr
lxi b,AntHdrLen
lxi d,AntDirX
frewind +D
fputblok +B
fclose +D
lxi d,AntDirY
frewind +D
fputblok +B
fclose +D
lxi d,AntDat
fclose +D
ret
; somehow, TopR is less than Base or TopF is less than BotF
IC8: abort ,msgIC8
; the identical bodies of the above two loops, factored out
WRloop:
lxi d,-128
dad d ; HL-+next lower record to write
lxi d,AntDirX
push h ; (save ptr)
lhld recno
frecseek +H
pop h
fputblok +H,128
lxi d,AntDirY
push h
lhld recno
dcx h ; (insert recno := recno-1)
shld recno
inx h
frecseek +H
pop h
fputblok +H,128
djnz WRloop
ret
Figure 9-13. The implementation of ANTSAV, the procedure to save the directory.
The anthology system is becoming real. Here we have seen the implementation of nearly all the support modules, especially the critical routines that load and save the directory, and the antnew command that initializes an anthology. In the next chapter we will implement the rest of the anthology commands
In chapter 8 we laid out the design of the anthology system; in chapter 9 we implemented the functional abstractions that give access to an anthology and the antnew command that creates one. We are finally ready to implement the rest of the anthology command set.
The logical place to start is with antput, the command that reads sequential files and stores them in an anthology. It must proceed along these lines:
Of these, all but the fourth and fifth steps have been implemented as support modules.
The implementation of this top-level logic of antput is shown in Figure 10-1. Aside from details like declaring a usage message, it is a simple implementation of the preceding list of tasks. The job of making a list of files has been pushed out into a subroutine listall; it is supposed to return a count of the matching files. The job of installing one file in the anthology has been encapsulated as a subroutine doput.
;===============================================================
; ANTPUT antname filespec
; Adds all files that match "filespec" to anthology "antname,"
; replacing any that already exist there.
; messages:
; usage message
; FRUMMAGE...checking...done
; FRUMMAGE is not a valid filespec
; FRUMMAGE -- no disk file found
; FRUMMAGE -- anthology files may not be put in one
; aborts produced in ANTSET, ANTOPE, ANTLOA, ANTSAV,
; ANTADD, ANTFRE, ANTNF, ANTINP
;===============================================================
maclib environ
extrn ANTSET ; set up antname
extrn ANTOPE ; open anthology files
extrn ANTLOA ; load directory
extrn ANTFIN ; lookup filename
extrn ANTFRE ; free records of a file
extrn ANTADD ; add filename
extrn ANTND ; next owned record of f
extrn ANTNF ; next free record for f
extrn ANTINP ; copy record into anth.
extrn ANTSAV ; commit directory to disk
dseg
screen: msgfile
usage:
db AsciiTAB,'ANTPUT antname filespec'
db AsciiCR,AsciiLF
db 'Adds all files that match "filespec" to the anthology'
db AsciiCR,AsciiLF
db 'named "antname." Files that already exist in the anthology'
db AsciiCR,AsciiLF
db 'are replaced.$'
cseg
prolog
lxi d,usage
call ANTSET
cpi 2 ; require 2 operands
abort nz,usage
call ANTOPE ; open all 3 files
call ANTLOA ; load the directory
tailtokn 2
call listall ; list all files, A := count
ora a ; any file found?
rz ; (no, we're done)
mov b,a ; yes, set loop count
Putloop:
call setnext ; set up next file
call doput ; ..and bring it in
djnz PutLoop
call ANTSAV
ret
Figure 10-1. The main-line logic of the antput command.
Very well, we are faced with the task of implementing a subroutine which, given a command operand, will somehow build a list of all the filespecs that match that operand.
There are BDOS services to perform a directory search. They take a CP/M File Control Block (FCB) and return a disk directory entry for the next file that matches the (possibly ambiguous) filespec in the FCB. There are two toolkit services that pass these BDOS services along in terms of the toolkit's abstract type, the file.
The first of these, fdirbegn, takes two files, a source file and a target file. The source filedef must have been initialized by fassign. The fdirbegn function uses the BDOS to locate the first disk file that matches the source filedef. If there is one, it sets up the target filedef with that filespec, just as fassign would do.
The second toolkit function, fdircont (for continue), does the same job for the next matching file. Here, "first" and "next" refer to directory order, the accidental sequence of files in the disk directory.
The only restriction on these functions is that, by CP/M's rules, we may do no disk file operations between fdirbegn and fdircont, nor between one fdircont and the next. We are not allowed to find a first file, open and process it, then find the next. We must make a list of all the matching files, then process the list.
In what form shall we list the files, and where is the list to be kept? The directory-search functions return an initialized filedef, but a filedef is 64 bytes long. It would be more economical to make a list containing only the filespecs as strings. There is a toolkit function, fgetspec, that retrieves a filespec (or parts of one) from an initialized filedef. It's the inverse of fassign. We can use it to extract the filespec from the target file after fdirbegn or fdircont has initialized it.
We should allow for a generous number of files. After all, the user might enter a command like
A+antput b:allofa a:*.*
and that could result in a long list. I chose 100 as an arbitrary but generous limit. A filename and a filetype, as a string, can't exceed 13 bytes, so 1,300 bytes is needed to store the list. If that space were reserved in the program's data segment, it would become part of the antput.com file. A better solution is to acquire the space at run time with dynamic allocation. Read Figure 10-2 with these considerations in mind.
;===============================================================
; Listall(DE-+operand): Check the operand string and prepare an
; array of ready filedefs, one for every matching disk file.
; Return the count of files in A.
dseg
operand dw 0 ; -+command operand
listbase dw 0 ; -+found files
listptr dw 0 ; -+next file
maxfile equ 100 ; most files we allow (less than 256)
specsize equ 13 ; max length of "filename.typ" string
listsize equ specsize*maxfile ; space for maximum list
workfile filedef 128 ; filedef to receive names
ngspec: strconst ' is not a valid filespec.'
nomatch: strconst ' -- no disk file found.'
cseg
Listall:
push b
push d
push h
; Assign the operand to AntSeq, which puts its drivecode and
; password there permanently for use in Copyin, and prepares
; AntSeq as the input to fdirbegn and fdircont.
xchg ; HL-+string
shld operand ; (save for later msgs)
lxi d,AntSeq
fassign +H
jnz LA1 ; (it was ok)
lxi d,screen ; not a good filespec...
fputstr +Hupdate
lxi h,ngspec
fputline +Hupdate
xra a ; count of zero
jmp LAdone
; Allocate space to hold maxfile filedefs and save its address
LA1: lxi b,listsize
dslow +B
shld listbase
shld listptr
; Search the disk directory for the first (or only) file that
; matches AntSeq. If none are found, display a message and
; return a count of zero.
lxi h,workfile ; target filedef
fdirbegn +H ; find and assign
jnz LA2 ; (there is at least 1)
lxi d,screen ; there were no matches
lhld operand
fputstr +Hupdate
lxi h,nomatch
fputline +Hupdate
xra a
jmp LAdone
; At least one matching file was found. In this loop, save
; the filename.typ string of the matching file in a list
; and try for another.
LA2:
mvi b,0 ; initial count of found
lhld listbase ; carry target in HL
LAloop:
inr b ; count this file
mvi a,maxfile
cmp b ; don't go too far!
jz LAloopz ; (found max, stop)
mvi m,0 ; make a null string
fgetspec workfile,+Hupdate,0110b ; (name and type)
inx h ; step over null to next string
fdircont AntSeq,workfile ; try for another
jnz LAloop
LAloopz:
; Ok, we found B files and listptr-+the first one.
mov a,b ; put count in A
LAdone:
pop h
pop d
pop b
ret
Figure 10-2. Listall, a routine to create a list of filespecs that match an operand.
The crux of the algorithm is in the statements
mvi m,0
fgetspec workfile,+Hupdate,0110b
inx h
The fgetspec function extracts any combination of drivecode, filename, and filetype from an initialized file, makes a string of them, and appends that string to the string addressed by its second parameter. Here, the initialized filedef is workfile, which has been set up with a matching file by fdirbegn or fdircont. The third operand, the bit-mask 0110b, specifies that the filename and filetype (but not the drivecode) are wanted. The resulting string is laid out where register HL points, and HL is updated to point to its end.
Before the call to fgetspec, a null is stored where HL points. That creates a null string to which fgetspec may append its result. Afterward, HL points to the null at the end of the result; stepping past that points HL at uninitialized space where the next string, if any, may be built. The result of the loop is to build a compact sequence of strings, each adjacent to the next, each divided from the next by its null-byte delimiter.
Once the list of files has been built, the program needs some way to retrieve them one at a time and set them up in the AntSeq filedef for use. The subroutine setnext does this job (Figure 10-3).
;===============================================================
; setnext: assign the next filename.typ from our list into the
; AntSeq filedef ready to use.
setnext:
push d
push h
lxi d,AntSeq
lhld listptr
fassign +Hupdate,,0110b ; assign name.typ only
inx h ; step over null to next string
shld listptr
pop h
pop d
ret
Figure 10-3. Setnext prepares a listed filespec for use.
The listall routine left the word listptr aimed at the first filespec in the list. Each time it is called, setnext consumes one filespec and leaves listptr addressing the next string in the list.
The crux of setnext lies in these statements:
lhld listptr
fassign AntSeq,+Hupdate,,0110b
inx h
Here for the second time we are using the fourth parameter of fassign. It is a bit-mask that specifies precisely which parts of a filespec are to be assigned. In the ANTSET module we used it to assign only an overriding filetype. Here the AntSeq filedef may already have a drive and a password from the command operand, while the filespec string contains only the filename and filetype. The bit-mask instructs fassign to assign only these parts, leaving the others alone.
The second parameter, +Hupdate, asks that register HL be updated to point to the end of the filespec string. The following increment advances it to the start of the next string in the list.
The doput subroutine has the task of loading just one file into the anthology. By the time it is called, most of the questions we might have about a file have been answered. Since the current filespec is one that was returned by a CP/M search of a disk directory, it is known to be valid, unambiguous, and a real disk file. There is one more test that should be made: we must not allow an anthology file to be put into an anthology. Imagine the horrors that could result if we didn't make this test! The command
A+antput endless endless.ant
would cause us to try to copy the anthology data file into itself. The data file would expand out ahead of itself until the disk filled up. Or consider the command
A+antput nested nested.anx
That could be done successfully, but what would happen when a matching antget command was used? An old directory would be retrieved to replace the existing directory. No, the doput routine must ban a put of any file with a type of .ant, .anx, or .any..
After making this check, doput must look for the file in the anthology directory, deleting it if it appears and adding it if doesn't. Then it may copy the file using the simple loop we planned back in chapter 8. After copying the data, it will apply the fcheckpt function. This forces buffered data to disk and makes CP/M update the disk directory to reflect any new allocations to the data file.
Finally doput should make at least a gesture toward verifying the data it has written to disk. It will be sufficient if it merely seeks to every record it wrote. The file-seek operation does not simply position the file, it also reads a buffer-load of data around that position. Thus if doput seeks to every record owned by the file, it will cause all the relevant disk sectors to be read. If any are bad, the user will find out about it now.
The implementation of doput is shown in Figure 10-4. Here is how a run of antput looks in operation.
A+antput test ant??t.com
Loading directory...done
ANTGET.COM...checking...done
ANTPUT.COM...checking...done
Saving directory...done
A+
;===============================================================
; doput: put one file into the anthology. The file has been
; checked as valid and unambiguous, has been assigned to AntSeq,
; and is known to be a real disk file.
dseg
fstr: strspace 12 ; room for "filename.typ"
type: strspace 4 ; room for just ".typ"
dots: strconst '...'
chkg: strconst 'checking...'
done: strconst 'done'
isant: strconst ' -- anthology files may not be put in one.'
typetab: strtable 3
strentry '.ANT'
strentry '.ANX'
strentry '.ANY'
cseg
doput:
push psw
push b
push d
push h
; Get the file opened.
lxi d,AntSeq ; DE-+filedef
freset +D ; ..open for input
; Extract the "filename.typ" string which will be its
; anthology directory key, and ".typ" with which we
; can check for an anthology.
lxi h,type
mvi m,0
fgetspec +H,0100b ; just the type
lxi h,fstr ; HL-+string
mvi m,0 ; make that HL-+null string
fgetspec +H,0110b ; filename and type
; Put up the filename and type on the screen
lxi d,screen
fputstr +H ; put up FRUMMAGE on screen
; Check to make sure it isn't part of an anthology.
lxi d,type
strlook +D,typetab ; check for illegal types
jrnz notant ; (it doesn't end in ".AN?")
; The file does end in .AN?, complain and give up on it.
lxi d,screen
fputline +D,isant
jmp DPdone
; We have an open file that isn't an anthology. Put up the
; three dots that mean we're reading it.
notant:
lxi d,screen
fputstr +D,dots
lxi d,fstr ; DE-+"filename.typ"
; f := find(fstr)
; if (f=0) then e
; f := add(fstr)
; else y
; delete(f)
; endif
call ANTFIN ; find(DE-+str) gives HL=f
mov a,h ! ora l ; was it found?
jnz DPexists; (yes)
call ANTADD ; add(DE-+str) gives HL=f
jmp DP3
DPexists:
call ANTFRE ; free(HL=f)
DP3:
; recno := 0
; nrecs := 0
; while (not eof(AntSeq)) do
; recno := nextfree(f,recno)
; copyin(recno)
; nrecs := nrecs + 1
; end while
lxi d,0 ; carry recno in DE
lxi b,0 ; carry nrecs in BC
; HL already = f
DPloop1:
feof? AntSeq
jz DPloop1z
call ANTNF
call ANTINP
inx b
jmp DPloop1
DPloop1z:
; S[f] := nrecs
push h ; save -+file entry
lxi d,FSsize
dad d ; HL-+S[f]
mov m,c
inx h
mov m,b ; ..set to count of records
pop h ; HL-+F[f] again
; The "checkpoint" function forces all CP/M-buffered blocks
; of a file onto disk and updates the disk directory.
fcheckpt AntDat
; To check the file, we don't need to "read" it in the sense
; of getting each record to a buffer of our own. The seek
; operation refills the filedef buffer to contain the sought
; data, so all we have to do is seek to every record. That
; will force re-reading all the disk sectors we wrote to.
fputstr screen,chkg
lxi d,0 ; record number in DE
; HL still has "f"
; BC still has S[f]
DPloop2:
mov a,b ! ora c ; while nrec + 0
jrz DPloop2z
call ANTND ; DE gets next record #
xchg ; move it to HL
frecseek AntDat,+H
xchg
dcx b
jmp DPloop2
DPloop2z:
fputline screen,done
DPdone:
pop h
pop d
pop b
pop psw
ret
Figure 10-4. Doput, the routine to enter a file to an anthology.
Before proceeding to the antdir, antget, and antera commands we must face up to a problem deferred earlier: that of searching an anthology for files that match an ambiguous filespec. Antput had a related problem, but not the same one. It had to make a list of all the independent disk files that matched its second operand. That could be done with toolkit functions that rely on CP/M services.
There's no canned solution for the present problem. The next three commands are supposed to operate on all the anthology members that match their second operand. The anthology directory is our problem; CP/M can't help search it.
Still, we can take a pointer from the antput solution. It worked well to list and count the matching files first, then process them one at a time from the list. In the present case, we have a ready-made list -- the anthology directory itself. How about a routine that tags each matching directory entry for later processing? We'll call it once to mark the relevant members; then we can find them all in a scan of the array F. Better still, let's take another cue from the design of antput, and provide a function that finds the next marked function for us. That will isolate all knowledge of what a "mark" consists of in the domain of but a single module. Such "information hiding" is always a good idea.
Thoughts along those lines led me to construct yet another support module, ANTMRK (Figure 10-5). Its main routine, mark, takes an operand string and marks all the entries of array F that match it. A subordinate routine, nextmark, finds the next marked entry and, not incidentally, clears the mark from it so that it won't get into the disk copy of the directory.
name 'ANTMRK'
;===============================================================
; This module provides essential services to ANTGET, ANTDIR,
; and ANTERA. The ANTMRK routine takes an operand token,
; assigns it to AntSeq, and marks every file in the directory
; that matches that (possibly ambiguous) filespec.
; The ANTNMK (nextmark) routine returns the next marked
; directory entry after the one it is given, and clears the
; mark from it.
; messages (aborts)
; FRUMMAGE is not a valid filespec
; Integrity check #10 (improper use of ANTNMK)
;===============================================================
maclib environ
entersub
dseg
ngspec: db ' is not a valid filespec.$'
IC10: db 'Integrity check #10.$'
msg strspace 50
cseg
;===============================================================
; mark(DE-+operand) returns HL=count
; Assign the operand to AntSeq; then extract its filename.typ
; string. Compare to every directory entry and mark the ones
; that match. The mark is to set the high bit in the first byte
; of the filename (cleared in ANTNMK).
public ANTMRK
ANTMRK:
push psw
push b
push d
xchg
lxi d,AntSeq
fassign +H
jnz okspec ; (spec was valid)
lxi d,msg ; not valid, display and abort
strcopy +Hupdate
lxi h,ngspec
strappnd +Hupdate
abort ,+D
okspec:
lxi h,msg ; string-space for filename.typ
fgetspec +H,0110b ; name, type, not drive or pass
lhld TopF ; work our way down from old to new
lxi b,0 ; BC counts matches
AMloop:
lxi d,-FSlen
dad d ; HL-+next file down
lded BotF
ora a
dsbc d ; or is it off the end?
jc AMloopz ; (yes, done)
dad d ; no, restore HL
lxi d,msg ; DE-+comparand
call compare ; ..versus HL-+F[f]
jnz AMloop ; (no match)
mov a,m
ori 80h ; mark the file
mov m,a
inx b ; count match
jmp AMloop
AMloopz:
mov h,b ! mov l,c ; return count in HL
pop d
pop b
pop psw
ret
; Compare DE-+filename string in F.
; The rule is, "?" matches anything except dot and null. When
; we find a "?" versus a dot or null, we skip ?s to a non-?.
Compare:
push d
push h
mov a,m ! ora a ; a null directory entry matches nothing
jnz Comp2 ; (HL-+live entry)
inr a ; ..and this is null, set Z false
jmp Compdone
Comp2: ldax d ! ora a ; a null comparand matches everything
jz Compdone
Comploop:
ldax d ; compare current bytes
cmp m
jnz CompNE ; not equal, check for "?"
; current bytes equal, are we at end of both strings?
ora a
jz Compdone ; yes, end with a match
; current bytes are considered equal but are not at the end.
; step to next bytes and try again.
CompStep:
inx d
inx h
jmp Comploop
; current bytes are not equal. If the comparand byte isn't
; a "?" we have a definite mismatch.
CompNE:
cpi '?'
jnz Compdone
; The comparand is "?" -- if the compared byte is neither a dot
; nor the null at the end, consider them equal.
mov a,m
ora a
jz Compdelim ; (was the null)
cpi '.'
jnz CompStep ; (neither, call it equal)
; We have "?..." versus a delimiter. Step over the ?s to a
; non-? and go back to compare it to the delimiter.
Compdelim:
inx d
ldax d
cpi '?' ; still query?
jrz Compdelim ; (yes, continue)
jmp Comploop
; The comparison is over and the Z flag reflects the result.
Compdone:
pop h
pop d
ret
;===============================================================
; nextmark(HL-+F[f]. Scan down the directory
; for the next marked entry, clear its mark, and return its
; address. We should not be called when there is no next mark.
public ANTNMK
ANTNMK:
push psw
push d
NMloop:
lxi d,-FSlen
dad d ; HL-+next file back
lded BotF
ora a
dsbc d ; is there one?
abort c,IC10 ; (there better be)
dad d ; yes, restore HL
mov a,m ! ora a ; is this one marked?
jp NMloop ; (no)
ani 7Fh ; yes, clear the mark
mov m,a
pop d
pop psw
ret
Figure 10-5. The ANTMRK module, which supports ambiguous filespecs in the anthology directory.
The main loop of mark (at label AMloop) is another familiar scan down the array F. The guts of the routine are in the subroutine compare, where the rules of matching an ambiguous filespec are implemented. Unlike the similar routine that must reside somewhere inside CP/M, this one has only two delimiter characters to worry about: the dot between name and type, and the null that ends a string. I worked out the rules it would have to apply:
No special rules were needed for the asterisk wildcard character. The module begins by assigning the user's operand to a file with fassign which, when it processes an asterisk, converts it into a sequence of question marks. Then fgetspec is used to retrieve the filename and type from the file. This twice-processed string is used for comparison, and it contains only question marks, not asterisks.
It proved difficult to plan the compare routine in pseudo-code, since the pseudo-code notation I use doesn't have any tidy way to express "the byte addressed by pointer DE or HL." I wrote it in assembly language first (a rare act) and then was filled with doubt that it actually did what I intended. I had to trace it through several examples before I was sure it did.
At last we have all our ducks in a row; we can code antget. Its implementation (Figure 10-6) relies heavily on the support modules. As a result there is almost nothing to be said about it. Everything in it has already appeared at least once in another command or module. Here is what a run of antget looks like in execution.
A+antget test ant??t.*
Loading directory...done
ANTGET.COM...done
ANTPUT.COM...done
A+
;===============================================================
; ANTGET antname filespec
; Retrieves selected members of anthology "antname." When the
; "filespec" operand is ambiguous, retrieves each matching
; member-name. The drivecode and password of "filespec" apply
; to all members retrieved.
; messages:
; FILESPEC...done
; No matching files.
; aborts from ANTSET, ANTOPE, ANTLOA, ANTMRK, ANTND
; usage message
;===============================================================
maclib environ
entersub
extrn ANTSET ; set up operands
extrn ANTOPE ; open anthology files
extrn ANTLOA ; load directory
extrn ANTMRK ; mark matching files
extrn ANTNMK ; get next marked file
extrn ANTND ; next data record number
extrn ANTOUT ; copy record to AntSeq
dseg
screen: msgfile
nofile: strconst 'No matching files.'
dots: strconst '...'
done: strconst +
usage:
db AsciiTAB,'ANTGET antname filespec'
db AsciiCR,AsciiLF
db 'Retrieves the members that match "filespec" from anthology'
db AsciiCR,AsciiLF
db '"antname" as independent files. The drive and password of'
db AsciiCR,AsciiLF
db '"filespec" apply to all members retrieved.'
db AsciiCR,AsciiLF,'$'
cseg
prolog
; Set up the anthology files for use, and find out how many
; command tokens there are. We require 2.
lxi d,usage
call ANTSET
cpi 2
abort nz,usage
; Get the directory open and ready for use.
call ANTOPE
call ANTLOA
; Mark all the members of interest, returning the count in HL.
; If there are zero matches, say so and exit.
tailtokn 2 ; DE-+operand string
call ANTMRK
mov b,h ! mov c,l ; set up count in BC
mov a,b ! ora c ; is count zero?
jnz gotsome ; (no, proceed)
lxi d,screen
lxi h,nofile
fputline +H
jmp fini
; Copy out all the marked members.
gotsome:
lxi d,screen
lhld TopF ; Scan from oldest down
loop:
call ANTNMK ; HL-+next marked entry down
fputstr +H
fputstr +D,dots ; document our progress
call copy ; copy the file
fputstr +D,done
dcx b ; count it
mov a,b ! ora c ; and if there are more,
jnz loop ; ..continue
fini:
ret
; Copy(HL-+entry): Set up AntSeq with the filename and type
; from the entry, and open it for output. Then copy all its
; records from the .ANT data file.
copy:
push psw
push b
push d
push h
lxi d,AntSeq
fassign +H,,0110b ; assign filename and type only
frewrite +D ; prepare for output
; nrecs := S[f]
; recno := 0
; while (nrecs + 0)
; recno := nextdat(f,recno)
; copyout(recno)
; nrecs := nrecs - 1
; end while
lxi d,FSsize
dad d ; HL-+S[f]
mov c,m ! inx h
mov b,m ; BC=S[f]
pop h ! push h ; restore HL-+F[f]
lxi d,0 ; DE holds record number
coploop:
mov a,b ! ora c
jrz copover
call ANTND
call ANTOUT
dcx b
jmp coploop
copover:
lxi d,AntSeq
fclose +D
pop h
pop d
pop b
pop psw
ret
Figure 10-6. The implementation of the antget command.
Ah, we're rolling now. The module set is so complete that antera, like antget, contains almost nothing new. The only code of special interest in it (see Figure 10-7) is in the use of the subroutine confirm. The main loop is based on three statements,
call ANTNMK ; find next marked file
call confirm ; get confirmation on it
cz delete ; delete if confirmed
The job of confirm is to return the Zero flag true if the current file is indeed to be deleted. The following call to delete is effective only if confirm says "yes."
;===============================================================
; ANTERA antname filename.typ
; Deletes selected members of anthology "antname." When the
; "filename.typ" operand is ambiguous, displays each matching
; member-name and requests confirmation.
; messages:
; FILENAME.TYP -- delete (y/n)?
; aborts from ANTSET, ANTOPE, ANTLOA, ANTMRK, ANTSAV
; usage message
;===============================================================
maclib environ
extrn ANTSET ; set up operands
extrn ANTOPE ; open anthology files
extrn ANTLOA ; load directory
extrn ANTMRK ; mark matching files
extrn ANTNMK ; get next marked file
extrn ANTFRE ; delete a file's records
extrn ANTSAV ; save the directory.
dseg
screen: confile
Ambig: db 0 ; set to '?' if we must prompt
query: strconst ' -- delete (y/n)? '
anslen equ 10 ; max answer allowed
answer: strspace anslen
nofile: strconst 'No matching files.'
usage:
db AsciiTAB,'ANTERA antname filename.typ'
db AsciiCR,AsciiLF
db 'Deletes member "filename.typ" from anthology "antname."'
db AsciiCR,AsciiLF
db 'If the second operand is ambiguous, each member that'
db AsciiCR,AsciiLF
db 'matches it is shown and you are asked to confirm its'
db AsciiCR,AsciiLF
db 'deletion. Enter Y to delete, anything else to leave it.'
db AsciiCR,AsciiLF,'$'
cseg
prolog
; Set up the anthology files for use, and find out how many
; command tokens there are. We require 2.
lxi d,usage
call ANTSET
cpi 2
abort nz,usage
; Get the directory open and ready for use.
call ANTOPE
call ANTLOA
; There is a difference between an explicit filename.typ that
; matches one member and an ambiguous one that just happens
; to match only one. ANTMRK doesn't tell us which happened,
; so we do a redundant fassign here just to find out if the
; operand is ambiguous.
tailtokn 2
xchg
lxi d,AntSeq
fassign +H
xchg
sta Ambig ; = "?" if ambiguous
; Mark all the members of interest, returning the count in HL.
; If there are zero matches, say so and exit.
call ANTMRK
mov b,h ! mov c,l ; set up count in BC
mov a,b ! ora c ; is count zero?
jnz gotsome ; (no, proceed)
lxi d,screen
lxi h,nofile
fputline +H
jmp done
; Delete all the marked members.
gotsome:
lhld TopF ; Scan from oldest down
loop:
call ANTNMK ; HL-+next marked entry down
call confirm ; get confirmation if nec.
cz delete ; delete if permitted
dcx b ; count it
mov a,b ! ora c ; and if there are more,
jnz loop ; ..continue
; Update the directory to disk
call ANTSAV
done:
ret
; Confirm(HL-+entry): Get confirmation from the user, if
; necessary, that this entry should be deleted.
confirm:
push d
push h
lda ambig
cpi '?' ; was command ambiguous?
jrz askuser ; (yes, ask the question)
xra a ; no, no confirmation needed
jr confirmed
askuser:
lxi d,screen
fputstr +H ; FILENAME.TYP
lxi h,query
fputstr +H ; ...-- delete (y/n)?
lxi h,answer
mvi m,0 ; clear answer field
fgetstr +H,anslen
mov a,m
toupper +A
cpi 'Y'
confirmed:
pop h
pop d
ret
; delete(HL-+entry) Free this entry's records, make its name
; the null string, and decrement AlFiles.
delete:
call ANTFRE
mvi m,0
push h
lhld AlFiles
dcx h
shld AlFiles
pop h
ret
Figure 10-7. The implementation of antera.
The confirm routine applies two rules. If the second command operand was an explicit filespec, it presumes that the user knew his or her own mind, so it returns Zero true immediately. If the operand was ambiguous, the user ought to be alerted to the possible consequences; perhaps he or she overlooked the chance that this particular file would match.
The routine shows the filespec and gets an answer with fgetstr. You probably remember that when a string is gotten from the keyboard, the operator must enter a complete line ended with the Return key. Ten bytes are allowed for the response, so the operator may enter "you bet" or "NIX!"; however, only the first character is examined. It is made uppercase so that the cases of "Y" and "y" are merged. It might be any character and might even by a string-ending null if the operator only pressed Return. The routine simply exits after setting the Zero flag by comparing the response byte to "Y."
Antdir was the last command implemented (Figure 10-8); prior to doing it I used bdump to check on the output of the commands. Here is what a run of antdir looks like.
A+antdir test
Loading directory...done
d
records filename
d
58 ANTPUT.COM
49 ANTGET.COM
--------
107 (of 107; 0 allocated but unused)
Its report has a very simple format and is produced very quickly. The format could be improved; for a large anthology, the list of files scrolls off the top of the screen so quickly, it's almost impossible to freeze the display with control-S.
;===============================================================
; ANTDIR antname filename.typ
; Lists selected (or all, if "filename.typ" is omitted) members
; of anthology "antname." The display has one line per member
; showing the member's size in 128-byte records and its name.
; It is followed by a summary line showing total records for
; the members displayed, total allocated to the anthology, and
; total allocated but not in use.
; messages:
; aborts from ANTSET, ANTOPE, ANTLOA, ANTMRK
; usage message
; history:
; initial code 6 August 1984
;===============================================================
maclib environ
extrn ANTSET,ANTOPE,ANTLOA,ANTMRK,ANTNMK
dseg
totrecs dw 0 ; count of records listed
screen: msgfile
header: strconst +
divide: strconst +
lpof: strconst ' (of'
inuse: strconst ' in use;'
unused: strconst ' allocated and unused)'
usage:
db AsciiTAB,'ANTDIR antname filename.typ'
db AsciiCR,AsciiLF
db 'Displays the names of files held in anthology "antname."'
db AsciiCR,AsciiLF
db 'If the second operand is omitted, all files are shown.'
db AsciiCR,AsciiLF
db 'The second operand may use CP/M-style wildcards.'
db AsciiCR,AsciiLF,'$'
cseg
prolog
; Set up the anthology files for use, and find out how many
; command tokens there are. We support either 1 or 2 -- if
; there is but 1, a request for the 2nd one will get us the
; null string instead, which ANTMRK can handle.
lxi d,usage
call ANTSET
cpi 3
abort nc,usage
; Get the directory open and ready for use.
call ANTOPE
call ANTLOA
; Display a blank line and the column-header.
fputstr screen,header
; Mark all the members of interest, returning the count in HL.
; If there are zero matches, proceed direct to the totals line.
lxi h,0
shld totrecs ; clear total records
tailtokn 2
call ANTMRK
mov b,h ! mov c,l ; set up count in BC
mov a,b ! ora c ; is count zero?
jz lastline ; (yes, skip the details)
; Display detail lines for all the marked members.
lhld TopF ; Scan from oldest down
loop:
call ANTNMK ; HL-+next marked entry down
call detail ; display it
dcx b ; count it
mov a,b ! ora c ; and if there are more,
jnz loop ; ..continue
; Display the totals.
lastline:
call totals
ret
; Display(HL-+entry): display the size and name of this
; member -- the size as a decimal number in a 7-byte field,
; a space, and the filename.
detail:
push psw
push d
push h
lxi d,FSsize
dad d ; HL-+S[f]
mov a,m ! inx h
mov h,m ! mov l,a ; HL = S[f]
xchg
lhld totrecs
dad d ; accumulate total
shld totrecs
xchg
lxi d,screen
mvi a,7 ; field-width
fputbwad +A ; write number
fputchar +D,AsciiBlank ; one space
pop h ; HL-+filename string
fputline +H ; finish the line
pop d
pop psw
ret
; Totals: display "rrrr (of tttt; fff allocated but unused)"
totals:
lxi d,screen
lxi h,divide
fputstr +H ; divider below bytes column
lhld totrecs ; display total records
mvi a,7 ; ..in 7-byte field
fputbwad +A ; rrrr
lxi h,lpof
fputstr +H ; rrrr (of
lhld SizeR ; total allocated is SizeR/2
xra a ; (clear carry, field size 0)
rarr h
rarr l ; 0 + L
fputbwad +A ; rrrr (of tttt
lxi h,inuse
fputstr +H ; rrrr (of tttt;
lhld Frecs ; total allocated-but-unused
fputbwad +A ; rrrr (of tttt; fff
lxi h,unused
fputline +H ; rrrr (of tttt; fff alloc..)
ret
Figure 10-8. The implementation of antdir.
Read the string constants defined in Figure 10-8 carefully; something new is being done with strconst. That macro will accept more than a simple quoted string. It can be given any sequence of operands that the assembler's db statement would take. When there is more than one element to be defined, as in
strconst +
the list must be enclosed in angle-brackets. This is a convention of the mac and rmac assemblers: a list enclosed in angle-brackets constitutes a single macro parameter.
Although this feature of strconst is useful -- as here, where a line and two blank lines are being defined with a single macro -- the assembler's treatment of list parameters can cause problems. One of its quirks is that rmac reduces all pairs of quotes to single quotes within a list. Pairs of quotes are used to signify a single apostrophe constant. If you attempt that in a list, as in
strconst +
what is passed through to the macro is the list
AsciiTAB,'I can't do that',AsciiBEL
and that is not valid assembly syntax.
The anthology system constitutes a sizeable software package. Its construction fell into three phase. The design phase was the longest; I debated it with myself and with friends throughout the time I was preparing the first seven chapters (thanks to Dave Arnold for first suggesting that the directory data should be kept in a separate file, a suggestion that proved to be the key to a robust system). A lengthy design period is one hallmark of good software.
Designing and coding the support modules was the second phase; that took most of a week. This, too, was time well spent. One of the most important skills a programmer can develop is the ability to find an effective "functional decomposition"; that is, to find the smallest, tidiest set of independent functional units from which a solution can be constructed. A scratch version of antput, one that handled only explicit filespecs, was used as a test bed for the modules. Because they were so simple, each one's operation could be verified by stepping through its execution with zsid. Very few bugs cropped up then or later, and all that affected the directory trapped out as "integrity check" messages.
Once the modules existed, the commands fell together quickly. As you have seen, each consists of an initialization pass (calls to a sequence of modules) followed by a single loop whose body consists mostly of calls on modules or on command-specific subroutines.
This completes the first part of the book. In it you have watched the construction of a variety of useful programs; seen the application of a particular design approach -- careful planning aided by pseudo-code notation; and you've been introduced to the use of a toolkit of functions that support and simplify most things an assembly-language programmer wants to do. I hope you have success in applying these things in your own programs
In this chapter we begin a survey of the internal design and operations of the toolkit functions. We must start with a study of the macro library that defines it as a programming environment, environ.lib.
The Z80 Toolkit creates a programming environment in two senses. It places you, the programmer, in a realm where you may draw on certain functions and abilities if you know the ritual incantations that invoke them. The assembly of those incantations, those macro calls, create the environment on which the tools depend upon for their operation. Thus when I set about designing the toolkit macros, I was designing a human interface and a software interface at the same time.
The environment begins with a vocabulary of named constants (see Figure 11-1). Most are constants that are needed over and over in CP/M programming: names for the fields of the CP/M-formatted areas in the base page and names for the ASCII control characters. Some of them will be used in any assembly language program, although names like CpmBuffer are needed much less often when the toolkit is in use.
; these names can be used in any conditional assembly operation.
CpmLevel equ 30h ; SET TO 22h FOR CP/M 2.2
true equ 0ffffh ; allows IF to succeed
false equ 00000h ; forces IF to fail
; important locations in storage
WarmStart equ 0000h ; vector to BIOS re-boot
BdosJump equ 0005h ; vector to CP/M BDOS
BdosAddress equ 0006h ; address in the Bdos jump
CpmPass1 equ 0051h ; ->first password in tail
CpmPass1Len equ 0053h ; length of 1st password
CpmPass2 equ 0054h ; ->second password in tail
CpmPass2Len equ 0056h ; length of 2nd password
CpmFcb equ 005Ch ; default FCB, file operand 1
CpmFcb2 equ CpmFcb+10h ; file operand 2
CpmBuffer equ 0080h ; offset to file buffer 80..FFh
CpmTailLen equ CpmBuffer ; length of command tail
CpmTail equ CpmBuffer+1 ; the tail itself
TransientArea equ 0100h ; start of the .COM file
; important ASCII values
AsciiBEL equ 07h ; Bell
AsciiBS equ 08h ; Backspace
AsciiTAB equ 09h ; Tab
AsciiLF equ 0Ah ; LineFeed
AsciiFF equ 0Ch ; Formfeed
AsciiCR equ 0Dh ; CarrierReturn
AsciiSO equ 0Eh ; Shift-out
AsciiSI equ 0Fh ; Shift-in
AsciiDC1 equ 11h ; turn device on (was XON)
AsciiDC2 equ 12h ; another turn-on
AsciiDC3 equ 13h ; turn device off (was XOFF)
AsciiDC4 equ 14h ; another turn-off
CpmEof equ 1Ah ; ^Z, end of ascii file
AsciiESC equ 1Bh ; escape character
AsciiBlank equ 20h ; blank
AsciiDEL equ 7Fh ; DEL, highest valid byte
; Names related to files and file-attribute operations
FcrLen equ 40h ; size of a filedef
FileAttF1 equ 40h ; bits for encoding a file
FileAttF2 equ 20h ; attribute mask in a
FileAttF3 equ 10h ; single byte -- four user
FileAttF4 equ 08h ; attributes from filename
FileAttRO equ 04h ; and three attributes in
FileAttSY equ 02h ; the filetype.
FileAttAR equ 01h
Figure 11-1. The vocabulary of equated names defined in environ.lib.
Three of the names are used in conditional assemblies, that is, in assembly text controlled by assembler's if statement. The names true and false correspond the values produced by the assembler when it evaluates a relational expression. They could have been defined this way:
true equ 2 eq 2
false equ 2 ne 2
Since they summarize "truth" and "falsehood" as the assembler understands those things, these names can be assigned to other names and those names used in conditional statements. For example, your program might contain
BigBuffer equ true
and at some later point you could write
buffer:
if BigBuffer
ds 1024
else
ds 128
endif
The assembler doesn't care what column a statement starts in; therefore I usually begin conditional statements close to the left margin and indent normal statements by one tab.
The third name in this group, CpmLevel, is equated to the value that should be returned by a BDOS service 12, Get Version Number. That BDOS service returns a value of 22 (hexadecimal) under CP/M 2.2 and 30 (hex) under CP/M Plus. The name CpmLevel really should not be needed in most programs. The two systems are almost perfectly compatible, and a program that works in one will almost always work in the other. However, there are a few functions in the toolkit that take advantage of features that are unique to CP/M Plus. These functions have to contain different code in CP/M 2.2. Both versions are written into their source files, and if statements that test CpmLevel are used to select the correct version.
Aside from FcrLen, the assembled size of a filedef, the last group of names in Figure 11-1 has to do with the toolkit functions that get and set the attributes of a file.
The instruction set of the Z80 CPU is the very air our programs breath, yet the assembler can translate only the subset of them that were native to the older Intel 8080. The environment library defines the rest of them. It uses the same operation-code names that are used in the macro library that Digital Research distributes with its assemblers, but the definitions were rewritten to be as compact as possible.
Many of the instructions can be assembled from no more than a couple of constant byte values. The ldir instruction is one of these (Figure 11-2). This macro is going to be the same no matter who writes it; there's just no other reasonable way to define it.
ldir macro ;; for(;BC;)i
db 0edh,0b0h
endm
Figure 11-2. Macro defining the ldir instruction.
Other instructions are parameterized by the name of a register -- the dsbc instruction, for example (Figure 11-3). This definition relies on an assembler feature. The assembler predefines all the one-letter register names as if they were ordinary symbols equated to numeric values. The numbers that names like B and D stand for are precisely the bit patterns that are required to parameterize either the 8080 instructions or the Z80 ones like dsbc; the macro just has to shift them as needed to line up with the bit-field of the opcode byte.
dsbc macro dreg ;; HL -= dreg + Cy
db 0edh,dreg*8+42h
endm
Figure 11-3. Macro defining the dsbc instruction.
Other names are not predefined by the assembler. The Z80 has a battery of bit-oriented instructions whose opcodes are parameterized by the number of a bit, from 0 to 7. The macro library defines symbolic names BIT0 through BIT7 for use with these. The bit-related instructions like bit (Figure 11-4) are parameterized by both a bit number and a register number. Of course, the macro can't tell and doesn't care how its bit or register numbers are expressed, as symbolic names or raw constants.
BIT7 EQU 7
BIT6 EQU 6
BIT5 EQU 5
BIT4 EQU 4
BIT3 EQU 3
BIT2 EQU 2
BIT1 EQU 1
BIT0 EQU 0
bit macro bit,reg ;; Z = reg.bit
db 0cbh,bit*8+reg+40h
endm
Figure 11-4. Symbolic names for the Z80 bit numbers, and a bit-oriented instruction.
Many Z80 instructions take an operand that is a one-byte displacement ranging from -128 to +127. It's easy to err by writing an instruction with a displacement larger than this narrow range, and the assembler ought to alert you to this mistake. The test of a valid displacement was needed by so many instructions that it was factored out to a sub-macro. That macro and two that call on it appear in Figure 11-5. The assembler does not recognize signed numbers; although it allows us to write "-127," it converts all numeric expressions into 16-bit unsigned values. The range of valid displacements, considered as 16-bit patterns, breaks into two ranges, from 0000h through 007fh and from ffffh through ff80h. Rather, there appears a single range of improper displacements, from 0080h through ff81h inclusive. The macro doesn't test for a valid parameter; it tests for one that falls in the range of invalid displacements.
ckdisp macro ?disp ;; test 8-bit displacement in -80h..+7fh
if (?disp gt 7fh) and (?disp lt 0ff80h)
++ displacement &disp too large
endif
endm
andx macro disp ;; A &= *(IX+disp)
ckdisp disp
db 0ddh,0a6h,disp
endm
ldbwx macro dreg,disp
ckdisp disp+1
db 0ddh,(dreg+1)*8+46h,disp ;; ldx dreg+1,disp
db 0ddh,dreg*8+46h,disp+1 ;; ldx dreg,disp+1
endm
Figure 11-5. A macro to validate 8-bit displacements and two macros that use it.
The andx instruction takes a displacement from the address in the IX register; it uses ckdisp to validate its operand. The ldbwx -- load binary word based on IX -- and a companion stbwx are synthetic instructions that aren't usually part of the Z80 set. So often in the file routines did I find myself coding sequences like
ldx e,WordField
ldx d,WordField+1
to load or store a binary word from a control block, that I added these instructions to handle them.
The relative jumps also use an 8-bit displacement, but it's a displacement from the instruction itself or, more precisely, it's a displacement from the byte that immediately follows the instruction (a displacement of zero is a jump to the following byte, one of -2 is a one-instruction loop). The present location counter is available as a 16-bit value under the symbolic name $, while the target of the jump is specified as another 16-bit value, a label elsewhere in the program. Is that label within a valid displacement of the instruction? I defined a sub-macro to form the displacement, test it, and assemble a relative jump given the desired opcode. It and one of the jumps that use it appear in Figure 11-6.
+jr macro label,op
local disp
disp set label-$-2
ckdisp disp
db op,disp
endm
jr macro label
@jr label,18h
endm
Figure 11-6. The macro design for all relative jumps.
The environment library defines 67 instructions, but it doesn't cover all the Z80's abilities. In order to keep its size down, I omitted from it all the input/output instruction and all those related to index register Y. The first omission is unimportant, but someone might need to use IY. They can do so by including the rest of the Z80 as macro library otherz80.lib.
Every main program that uses the toolkit must invoke the prolog macro as its first executable statement. This is the magical incantation that sets up an execution environment in which the toolkit functions can work.
Its first step (see Figure 11-7) is to get the size of available storage. The top of storage is the address of the entry to the BDOS. The prolog code sets this as the top of the program stack. It deducts 256 so as to allow for a stack of 256 bytes. This is a large stack, but toolkit functions call each other to considerable depths and are very liberal about saving registers.
PROLOG macro ;; no operands
local Start,SetRet
extrn +ZZPRG ;; end-of-.COM-file, must be last-linked
extrn +RAMAA ;; initializes dynamic allocation
lhld BdosAddress ;; hl->top of storage
mvi l,0 ;; round down to a page
sphl ;; set as top of stack
dcr h ;; allow 1-page stack
lxi d,+ZZPRG ;; de->end of program
call +RAMAA ;; set up dynamic allocation
call Start ;; commence execution
; Normally the program will end with a "ret," bringing it back
; here to terminate with a return code of "success"
if CpmLevel gt 22h ;; under CPM Plus, set return code
lxi d,0 ;; return code of "success"
SetRet equ $
mvi c,108 ;; BdosSetRet
call BdosJump
endif ;; under CPM 2.2, just end
jmp WarmStart
; If the program (or a linked routine) executes an ABORT macro,
; it will come here. On an abort, all registers are as they
; were when the ABORT macro was entered, the top stack word is
; the address of the abort, and the next stack word is either
; 0000 or the address of a message.
public +ERROR
+ERROR: nop ;; allow one -T before spoiling regs
pop h ;; abort-address
pop d ;; message address
mov a,d ! ora e ;; is it zero?
mvi c,9 ;; (BdosString)
cnz BdosJump;; type the message if given
if CpmLevel gt 22h ;; under CPM Plus, set retcode
lxi d,0fff0h;; return code of "failure"
jmp SetRet ;; set program return code, exit
else ;; under 2.2 just quit
jmp WarmStart
endif
; This code is a public gateway to the CP/M BDOS. It preserves
; registers BC, DE, IX, and IY over a BDOS call. The BDOS does
; not alter IX/IY, but some vendors' BIOSes do
public +BDOS
+BDOS: push b
push d
db 0ddh ;; manual-code PUSHIX in case
push h ;; ..smallz80.lib not included
db 0fdh ;; PUSH IY
push h
call BdosJump
db 0fdh ;; POP IY
pop h
db 0ddh ;; POP IX
pop h
pop d
pop b
ret
; the code of the program begins here.
Start equ $
endm
Figure 11-7. The prolog sets up the execution environment for all toolkit functions.
The normal CP/M environment doesn't give us any lower bound to free storage; it simply begins at the end of the program as loaded, and CP/M assumes that a program knows where its own object code ends. Unfortunately, a program composed of many linked modules does not know this. The link program collects the modules in the order in which they appear in the object libraries it searches; separates their code and data segments; then merges the segments with the data segments last. So the end of a loaded program is the end of the last data segment definition in the module that just happened to be linked last.
The toolkit environment locates the end of the program by a gimmick. The very last name in the toolkit object library, environ.irl, is a data definition with the public name +ZZPRG. The prolog macro references that name as external. So long as environ.irl is the last library searched, that name will be placed at the end of the program and the prolog code can learn the low boundary of available storage by loading its address. Then it passes the high and low addresses of free storage to the dynamic-storage allocator for use later.
Once it has sized storage and prepared a stack, the prolog macro passes control to the rest of the program by calling the statement that follows the macro. Since it uses a call, the program may end with a return. When it does so, the remainder of the prolog code returns to CP/M for a warm start.
Under CP/M Plus, programs may set a return code that can be tested by statements in a batch command file. The prolog macro supports this feature; when CpmLevel indicates a CP/M Plus system, it generates code to set a return code of "success" on normal exit from the program. No harm will result if this code is executed under CP/M 2.2; the earlier BDOS simply ignores calls it doesn't support.
The toolkit functions contain many calls on the CP/M BDOS. The prolog macro supports them by providing the public label +BDOS, a short stretch of code that saves registers, calls CP/M, restores the registers, and returns. It saves the register pairs BC and DE, since these are changed by the BDOS in a random way. As written, it also saves the Z80 registers IX and IY. The CP/M BDOS is written for the Intel 8080 CPU and knows nothing about index registers; as a result they should not change during a BDOS call. However, the BDOS calls the BIOS, the vendor-written I/O support. Some vendors allow their BIOS code to use IX and IY without saving them (the CP/M Plus BIOS for the Tandy TRS-80 Model IV, for example). If you are sure that your BIOS will never alter IX or IY, you might delete the saves of these registers in the prolog code. If you do so, there is a chance that programs assembled on your machine won't run on another system.
The prolog macro also generates the code to terminate the program when the abort macro is used. This code, which has the public label +ERROR, retrieves the address of the termination message, displays it at the console, and ends the program. Under CP/M Plus it does one other thing -- it sets the program return code to a value of "failure." Under CP/M Plus, commands in a batch command file can be made conditional on a program's success.
The label +ERROR is a no-operation, so that no registers will have been altered when the breakpoint is displayed.
The abort macro (Figure 11-8) forms the interface to the prolog code at +ERROR.
ABORT macro ?cond,?msg
local do,dont
if not nul ?cond
j&?cond do
jr dont ;; skip abort if condition false
do equ $
endif
if not nul ?msg
+unrel %?msg
if +D
push d ;; stack message address
else
push h ;; save HL
lxi h,?msg
xthl ;; stack ->message, restore HL
endif
else ;; message omitted
push h
lxi h,0
xthl ;; stack 0000 meaning no message
endif
call +ERROR
if not nul ?cond
dont equ $
endif
endm
Figure 11-8. The abort macro sets up to terminate the program with a message.
This macro has two jobs. Its first operand (which is optional) is a jump-condition under which the abort is to be performed. The macro code concatenates the parameter to the letter j, forming a jump instruction that will take control to the body of the macro. When the condition is not true, a relative jump takes the program around the termination code to the next statement. It would have been possible to write the macro so that it found the inverse of the condition given as the operand (i.e. NC when the given condition was C, Z when it was NZ, and so forth). That would have allowed the macro to generate a single jump instead of a jump around a jump. The method used simplifies the macro at the expense of two bytes of code and a trifling amount of execution time.
As you read Figure 11-8 do not be concerned at the peculiar statement +unrel %?msg. This is part of the operand-decoding process that is our next topic.
One of my objectives in designing the toolkit environment was that its functional macros should use a consistent parameter syntax. A second was that this syntax should be both simple and flexible, or come as near to those often-conflicting goals as it could. A third was that the macros should generate as little code as possible, when that didn't conflict with the other two aims. It was a knotty problem, and I don't claim to have solved it perfectly.
Almost all the toolkit functions are implemented as subroutines; all the subroutines take only a few parameters; and all the parameters are passed in machine registers. Therefore the usual purpose of a macro is to set up a subroutine's parameters in registers and call it.
Clearly the macros could have a consistent syntax only if the subroutines used a consistent convention for register use -- so I gave them one. In general, a toolkit subroutine
These rules echo the way the Z80 uses registers in its string instructions.
All subroutines preserve all the registers they are given, except when they have some useful value to return. Then they return
The Z80 flags are also preserved unless the subroutine can return useful information in them. If a subroutine can discover an unusual condition it reports it in the Zero flag, with Zero false meaning the normal case and Zero true meaning the unusual case. Such subroutines are allowed to modify the A-register, since it's difficult to return a flag value while preserving the accumulator.
Some of these rules had to be bent to suit the circumstances, but they hold for most subroutines.
It would have been possible to omit a macro interface to such well-behaved subroutines. It would be barely acceptable to merely document the way each subroutine used its registers, leaving the programmer to write
lxi d,file1
lxi h,somestring
call FPSTR
to accomplish putting a string to a file. Barely acceptable, yes, but macros make a great deal more possible. To begin with, they can eliminate the need to code all the extrn statements that are required to gain access to external subroutines.
Then too, macros may have names as long as eight characters, while public labels may have no more than six. The difference in clarity between writing strcomp or fputblok as verbs, versus writing strcmp or fptblk as operands of a call, was alone enough reason to use macros. Furthermore, I decided (perhaps unwisely) to give all subroutines names that began with the + character so there would be no conflict with public names you might invent. That reduced them to only five useful characters.
Another great advantage to macros is the ability to reference parameters by name and have them loaded into registers automatically. Registers are a scarce resource in the Z80, and one of the keys to efficient programs is to get the most important things into them and keep them there. It's a relief to be able to write
fputstr file1,somestring
and know that the macro will save the present contents of the registers, load the necessary values into them, call the subroutine, and restore the registers, all without upsetting a careful assignment of important values to the registers.
On the other hand, the macro mustn't get in the way when you have a good reason to load the registers yourself. Sometimes the parameters must be computed. Sometimes the parameters themselves are the important things that ought to be kept in registers all through a loop.
One way of telling a macro that a parameter value has already been loaded is to use omitted parameters; to establish, for instance, that if you code
fputstr ,somestring
it means that register DE already has the address of the file. However, I dislike omitted parameters. They are ambiguous: that statement could be read equally well as "there is no file," or as "use the magic default file that has no name." The one thing that it definitely does not convey is, "register DE has already been loaded with the address of the file."
I decided to allow omitted parameters only in cases where omitting a parameter could mean explicitly "there is no parameter." (The parameters of the abort macro, for instance, have this interpretation: omitting the condition means an unconditional abort, while omitting the message means there is no message.) In all other cases, I declared, macros will require all their parameters to be written in some form. If a parameter requires special treatment, it will have a special form.
I could see a need for two special forms. One would say, "this operand has already been prepared as a register," with the implication that it was to be preserved over the subroutine call. The second form would say the same, with the addition that the subroutine would return an updated value that was needed. The subroutines were written for the most general case; if there is a result that they can return, they return it. All the string functions, for example, receive a string address and return that address updated to the end of the string. The first special parameter form would say "here is the value the subroutine needs, all set up," while the second would say "here is the value it needs, and it is ok if the subroutine updates it."
The rmac assembler doesn't allow many variations in the form of a parameter. It is designed to permit any valid instruction operand to be given as a parameter, nothing else. Nor does it offer any way to test the written form of a parameter. There is no way to say "if the exact spelling of a parameter is this, do that." The operands of the if command are evaluated as assembler expressions; if tests the 16-bit binary value of its operands, not their superficial spelling.
I knew the normal form of a macro parameter would be an assembler expression, usually just a label. The macro would save the necessary register by pushing it on the stack, load it with the value of the expression, and restore it after the subroutine call.
For the special forms I defined a set of register names (Figure 11-9). The names had to be given some binary value; I gave them large binary numbers. In relocatable assemblies, address constants are relative to the current module, so they are almost always small numbers. It is almost (but not quite) impossible for the value of a register name to be confused with the value of a label that might be used as a normal parameter.
+A equ 0ffffh ; byte value in register A
+H equ 0fffeh ; word value in register HL
+Hupdate equ 0fffdh ; value in HL, don't save it
+D equ 0fffch ; word value in register DE
+Dupdate equ 0fffbh ; value in DE, don't save it
+B equ 0fffah ; word value in register BC
Figure 11-9. The register names defined to convey special handling as macro parameters.
The names +H, and so forth stand for the first special form; they say "this register already contains the needed value, and I want it back unchanged." A macro that receives one of these names has to know whether the subroutine it calls will alter that register and, if it will, save and restore it.
The two names +Hupdate stand for the second special form, saying that the register is loaded and the subroutine is to be allowed to change it.
At once a problem cropped up. The obvious way for a macro to test its operand was with statements like
if file ne +D
push d
lxi d,file
endif
When the parameter was actually given as +D, that worked. After substitution, the if would become
if +D
which the assembler could evaluate as
if 0fffch ne 0fffch
The assembler could handle that. However, when the parameter was written as a label -- screen, for example -- then under macro substitution the if statement would become
if screen ne +D
The assembler would call this an error. The problem was that, to rmac, all expressions have both a binary value and a relocation type. The label screen had a 16-bit binary value (equal to its offset in the data segment) which might be compared to the binary value of +D has a relocation type of "absolute constant." Since their relocation types differ, the assembler calls any attempt to compare them an error. Ordinarily, this is a sensible rule: Since it doesn't know what the final value of the label will be after the program is linked, the assembler can't make a valid comparison between it and an absolute constant.
Unfortunately, this sensible rule was impeding an equally sensible parameter convention, so I had to find a way to flummox the assembler. The key lay in another assembler rule: when the parameter of a macro has an initial character of %, the assembler will evaluate it and replace it with its numeric value. This is done while the macro call is being scanned and before the assembler has looked at its contents.
This odd rule permitted me to write an even odder macro:
+UNREL macro anything
+unrel set anything
endm
The macro merely assigns the value of its parameter to the name +unrel. The trick lies in its use. We may now write
+unrel %file
(note the percent sign). While scanning this macro call, the assembler will evaluate whatever expression is being substituted for the parameter name file and reduce it to a 16-bit binary value. It will convert the value to decimal digit characters, and that decimal constant is what will be passed into the macro as the substitute value for unrel's parameter, anything. The numeric value of the expression, with a relocation type of "absolute constant" will become available for testing under the name +unrel.
You can see this trick in use in Figure 11-8. The parameter referred to as ?msg might be the label of a message constant or might be +D. After it has been run through unrel, the parameter value can be compared to a constant without error.
The environ macro library grew quickly, and soon reached such a size that the assembler spent more of its time reading the library than it did assembling the source file that included it. Furthermore, the macros were all as large as abort because they all had tests for special parameter forms. Since most macros handled their parameters the same way, the macro equivalent of a subroutine would simplify their code and shrink the library at the same time.
I set up three inner macros to handle three cases of parameters. The +opca macro (Figure 11-10) handles the case of a parameter that is expected to be a byte constant. It is called from within any function macro that wants to load a parameter value into register A.
+opca macro op,msg,save?
if not nul op
if op ne +A
if save?
+baka set true
push psw
endif
mvi a,op
endif
else
+++ operand required as MSG or '+A'
endif
endm
Figure 11-10. The opca macro, to decode a byte constant parameter.
This macro illustrates the method used in all three. It takes three parameters. The first is whatever parameter the calling macro was given; it might be an expression, or the register name +A, or it might have been omitted.
The second parameter is a word or phrase to be inserted in an error message that will appear if the operand was omitted. The message is written in the macro as
+++ operand required as MSG or '+A'
where this second parameter will replace MSG. The leading plus signs are a syntax error to the assembler; if it is allowed to assemble that line it will display it as an error and so deliver the macro's diagnostic to the programmer.
The third parameter, referred to by the name save?, will a value of either true or false. It will be true when the subroutine to be called returns nothing in register A, so the programmer's assigned value of A must be saved before loading the parameter. It will be false when register A should not be preserved because the subroutine will be returning a value in it or the Zero flag.
The function fputchar, for example, takes a parameter that is a byte to be written to a file. It may be written as either
fputchar file,+A
meaning, write the byte in A, or as
fputchar file,AsciiTAB
giving an assembler expression as the second parameter. This macro calls +opca to decode its second parameter, passing it
In the first case, when the parameter is +A, opca will generate no instructions. In the second, it will generate
push psw
+baka set true
mvi a,AsciiTAB
To take another case, the fassign macro knows that its subroutine always alters register A and the Zero flag. Its fourth operand is a byte constant, but it will pass a signal of false to +baka to true.
Let's see how word parameters are handled. There are two cases. The first is a parameter that a subroutine won't return updated. These may be given as assembler expressions (usually simple labels) or as +opwr, for operand-word-register (Figure 11-11).
+opwr macro op,reg,msg,save?
if not nul op
+unrel %op
if +®
if save?
+bak® set true
push reg
endif
lxi reg,op
endif
else
+++ operand required as MSG or '+®&'
endif
endm
Figure 11-11. The opwr macro, to decode a normal register parameter.
The intent of +opca: to do nothing if the correct register was named, or to save and load the necessary register if it wasn't. Its code is similar, but complicated by the fact that the acceptable register-letter (B, D or H) is passed as a parameter.
The third macro is +H, it only saves it; if is an update form it generates no code.
+opwu macro op,reg,msg
if not nul op
+unrel %op
if +®&update
+bak® set true
push reg
if +®
lxi reg,op
endif
endif
else
+++ operand required as MSG, '+®&update'
endif
endm
Figure 11-12. The opwu macro, to decode a register or register-update parameter.
Each of these macros, if it pushes a register on the stack, sets a variable to true. The +bakem macro (Figure 11-13) uses those variables to pop saved registers off the stack. It is handed a list of register-letters (an rmac list is a sequence of items set off by commas within angle-brackets). It cycles through the list using the irp command. For each letter in the list it tests the variable that would have been set when that register was saved; if it is true, it generates a pop instruction.
+bakem macro list
irp r,<list>
if +bak&r
if r ne a
pop r
else
pop psw
endif
+bak&r set false
endif
endm
endm
Figure 11-13. The +bakem macro restores the registers that may have been saved when a parameter was decoded.
The most complicated functional macro in the toolkit is fassign; it takes four parameters and uses all three inner macros. Here is how it is written (neglecting omitted parameters).
FASSIGN macro ?file,?str,?dflt,?bits
+opwr ?file,D,file,true
+opwu ?str,H,string
+opwr ?dflt,B,default,true
+opca ?bits,<bit map>,false
extrn +FASGN
call +FASGN
+bakem <B,H,D>
endm
That may be read as follows:
In each case there is the additional instruction: if this parameter is null, display an error line showing that the file, string, or bit map is required and in what register.
In fact, fassign is unusual in that it permits its third and fourth operands to be omitted, so its code is slightly more complicated than shown.
Under CP/M the status of the system keyboard is part of a program's environment. It's often desirable to see if a key has been hit, and if so, to break out of a loop to see what the user wants. There is a BDOS function to test the keyboard status, but it's tedious to code a BDOS service call in the middle of a loop. And while the toolkit contains support for making BDOS calls, I meant to make it unnecessary to use them except in the most elaborate programs.
It might have been possible to subsume the whole idea of the keyboard into the concept of an abstract file, but it didn't seem to fit well. Accordingly I added the testcon macro to the environment (Figure 11-14). It performs the BDOS service request and sets the Zero flag accordingly. However, it alters only the machine flags, so it can be inserted almost anywhere the test is needed without any effort.
TESTCON macro
push h
push psw
mvi c,11 ;; BDOS function
call +BDOS ;; call BDOS saving b,d,ix,iy
ora a ;; zero if no key hit
pop h ;; psw to HL (H = old A, L = flags)
mov a,h ;; restore A but not flags
pop h
endm
Figure 11-14. The testcon macro is an in-line test of the keyboard status.
The Z80 CPU itself is the major part of the programming environment, but it can stand improving. It has an instruction, ldir, that can be used to copy a block of storage of any length from one address to another. The same instruction can be used to fill a block of storage with a particular byte value in very quick time. Both of these uses of ldir require careful planning and code to set up of the machine registers -- the same registers that we need for other things. I decided to incorporate these functions into the toolkit environment using the same macro syntax as all the other functions.
The copyblok macro is really the ldir instruction in sheep's clothing, as you can see from Figure 11-15. However, since it is in a macro, we can use it without messing up register values, or while updating only one or two of the three registers it alters. Since the macro restores register BC, the same count can be set once and used in several moves without change.
COPYBLOK macro ?to,?frm,?len
+opwu ?to,D,target
+opwu ?frm,H,source
+opwr ?len,B,length,true
ldir
+bakem <B,H,D>
endm
Figure 11-15. The copyblok macro civilizes the ldir instruction.
The other use of ldir, propogating a byte value throughout an area by an overlapping move, is even trickier to set up by hand and even harder for a reader to decipher. The fillblok macro covers it nicely. However, the function takes several instructions to carry out, so it went into an external subroutine. Both the macro and the subroutine it calls are shown in Figure 11-16.
FILLBLOK macro ?adr,?len,?byte
+opwu ?adr,D,<block address>
+opwr ?len,B,length,true
+opca ?byte,<fill byte>,true
extrn +RAMFL
call +RAMFL
+bakem <A,B,D>
endm
public +RAMFL
+RAMFL:
push psw
push b
push h
mov h,a ; save byte a second while we
mov a,b ! ora c ; ..check for a length of zero
jrz Done ; ..which would become 65,536
mov a,h
stax d ; store the first byte
mov h,d ! mov l,e ; HL->start of area with byte
inx d ; DE->next byte after
dcx b ; first byte has been installed
mov a,b ! ora c ; check for a length of 1
jrz Done
ldir ; propogate for remaining length
Done: pop h
pop b
pop psw
ret
end
Figure 11-16. The fillblok macro and the subroutine it calls.
The original source files that apppear in these chapters, by the way, have lengthy prolog commentaries, name, title, and maclib statements, copyright notices, and other repetitive formalities. These have been deleted from the figures in order to save space.
CP/M gives a program an expanse of working storage to operate in, but provides no controls or aids for allocating or structuring that storage. It isn't difficult to parcel the storage out to different data structures, but the bookkeeping can be tricky and is always distracting. And if it is done wrong, the program can fail in terrible ways.
Storage allocation is very important, yet even more difficult, when chunks of storage are to be allocated to different modules written by different people at different times (as when your programs use the toolkit modules). Perhaps the greatest advantage that CP/M-86 has over eight-bit CP/M (or MSDOS!) is that it has a good scheme for storage allocation that is built into and enforced by the operating system. The toolkit had to have one, too.
As we have seen, the prolog macro's first action is to take the size of available storage and pass it to an external routine. That routine is part of the package for dynamic storage allocation. Once it has been initialized in this way, the package can support its primary function, that of dealing out blocks of storage to any code that requests them. All of the dynamic storage routines are in a single module. Its code appears in Figure 11-17. Three of the macros are shown there as well; the others are very similar.
DSLOW macro ?size
+opwr ?size,B,length,true
extrn +RAMLO
call +RAMLO
+bakem <B>
endm
; DSHIGH and SPACE? are almost identical to DSLOW
DSLOCK macro
extrn +RAMLK
call +RAMLK
endm
DSUNLOCK macro ?low,?high
+opwr ?low,D,<low boundary>,true
+opwr ?high,H,<high boundary>,true
extrn +RAMAA
call +RAMAA
+bakem <H,D>
endm
name 'DSALOC'
dseg
lock db 0 ; when non-zero, we are locked.
lospace dw 0 ; ->next byte to be allocated low
hispace dw 0 ; ->last byte allocated high
MsgNoRoom:
db AsciiCR,AsciiLF,AsciiBEL
db 'Storage allocation exhausted.'
db AsciiCR,AsciiLF,'$'
MsgLocked:
db AsciiCR,AsciiLF,AsciiBEL
db 'Attempted allocation while storage locked.'
db AsciiCR,AsciiLF,'$'
cseg
; RAMAA(DE=low,HL=high): called from PROLOG or DSUNLOCK macros.
public +RAMAA
+RAMAA:
shld hispace
xchg
shld lospace
xchg
push h ; (save caller's HL)
lxi h,Lock
mvi m,0 ; unlock allocation
pop h
ret
; RAMCK(BC=size) called via SPACE? macro.
public +RAMCK
+RAMCK:
push d ; save caller's DE
lhld lospace
xchg
lhld hispace ; HL=high free, DE=low free
ora a ; (clear carry before "dsbc")
dsbc d ; HL=size of free space
pop d ; (restore DE)
ora a ; (clear carry)
dsbc b ; subtract proposed allocation
rnc ; if room enough, return
lxi h,0 ; no room, return HL=0000
ret ; ..and carry set
; +RAMHI(BC=size) returns HL->block of size
+RAMHI:
push psw
call CheckLock ; abort if we are locked
push d ; (save DE)
lhld lospace ; get low-top for checking
xchg ; ..into DE
lhld hispace
ora a ; (clear carry)
dsbc b ; HL-> allocated space, maybe
shld hispace ; set new upper boundary, then
push h ; ..save returned address and
ora a
dsbc d ; ..make sure that there's room
jrc RamAbort
pop h ; (recover HL->allocated space)
pop d ; (recover caller's DE)
pop psw ; (and psw)
ret
; +RAMLO(BC=size) returns HL->block of size
public +RAMLO
+RAMLO:
push psw
call CheckLock ; abort if we are locked.
push d ; (save DE)
lhld hispace
xchg ; DE contains upper limit
lhld lospace ; HL->allocated space
push h ; save that for returned value
dad b
shld lospace ; save new lower boundary
ora a
dsbc d ; SHOULD produce carry
jrnc RamAbort; (oops)
pop h ; HL->allocated space
pop d ; (recover caller's DE)
pop psw
ret
; +RAMLK(): called via DSLOCK macro to gain exclusive control
; of unallocated space. Returns HL with present high boundary,
; DE with the present low boundary.
public +RAMLK
+RAMLK:
push psw
call CheckLock ; abort if locked already
mvi a,255 ; ok, set the lock
sta Lock
lhld lospace
xchg ; DE has low boundary
lhld hispace ; HL has high boundary
pop psw
ret
; CheckLock aborts the program when a dynamic storage call is
; made after we have been locked.
CheckLock:
lda Lock
ora a ; nonzero?
rz ; (no, ok to proceed)
abort ,MsgLocked
RamAbort: ; out of space, hi or lo: quit with message
abort ,MsgNoRoom
Figure 11-17. The macros and module that implement dynamic storage allocation.
A block of storage can be requested from either the high or the low end of working storage. Blocks from the high end are taken from the highest usable address, just below the program's stack, working down. Blocks from the low end are taken starting at the end of the program as loaded, working up. The block of storage in the middle is available. If it shrinks to zero, the program is aborted with a message.
The dynamic storage routines include two other functions. The space? macro serves two purposes. It takes a length and returns the amount of free space that would remain if a block of that length were allocated. It can be used to predict and avoid running out of space. Given a length of zero, it has the effect of reporting the total available space.
Finally, the package implements what may be an unecessary frill, the ability to lock and unlock the dynamic allocation scheme. These functions cover the times when a program needs the ability to manipulate all available storage in its own way. The dslock routine returns the boundaries of free storage and sets a flag that is tested by the allocation routines. The program is free to do what it likes within the returned boundaries, but if it (or a module it calls) attempts to use the normal allocation mechanism, the program is aborted. When the program has finished using storage by its own rules, it can set updated boundaries and release the allocation mechanism with the dsunlock macro.
This feature might be used when a program had to build a table of a size that was initially unknown. Instead of allocating a large table and possibly wasting part of it, it may lock storage, build the table to the necessary size at one end of storage, then unlock storage giving new boundaries that exclude the table it constructed. Alternatively, dsunlock could be used to reset the the boundaries of storage to discard a set of prior allocations.
The "tail" of a command, that is, all the characters the operator typed following the command's name, is an essential part of the CP/M environment. CP/M converts it to uppercase and leaves it at location 0080h for the program to scan. It parses the first two "tokens" (blank-delimited units) as filespecs and puts them in known locations. This is of little help, since CP/M doesn't recognize either the tab or the comma as a delimiter; these tokens might not be meant for filespecs; and the program is still on its own for the third and later tokens.
What causes the difficulty is that the command tail is an unpredictable string of characters. You can't dictate what users will type. They will delimit operands with tabs, commas, or single or multiple spaces as they please. They'll omit operands and get them in the wrong order. And they will always expect your program to tell them, clearly and politely, just what they did wrong and how to fix it. In a program that comes anywhere near being "friendly," the code to parse and diagnose the command tail can become larger than the rest of the program put together.
The toolkit environment had to contain some help for this task. The main requirement was to bring the units of the command tail under the umbrella of the string abstract data type, so that all the other toolkit functions could be brought to bear on them. In the end, I adapted the conventions used in the C programming language.
The toolkit's support for the command tail is in two parts. The first is the single function savetail, which assembles to a call on the subroutine +CMSAV (all the command-tail code is shown in Figure 11-18). This routine captures the command tail in the form of a sequence of strings, each string containing a single token. Notice that it builds the table in dynamically-allocated storage and clears it with fillblok; thus do the toolkit functions build on each other.
SAVETAIL macro ;; no operands
extrn +CMSAV
call +CMSAV
endm
TAILTOKN macro ?number
+opca ?number,<token number>,true
extrn +CMTOK
call +CMTOK
+bakem <A>
endm
TableSize equ 63 ; bytes in the table
TokenSize equ 128 ; size of token-space
Table dw 0 ; will address the table
Tokens dw 0 ; will address the tokens
cseg
public +CMSAV
+CMSAV:
push b
push d
push h
; The first step is to allocate a block of storage to hold the
; table and tokens.
lxi b,TableSize+TokenSize
dshigh +B ; allocate whole area
shld Table ; save ->area -- table is first part
push h ; (save ptr for clearing)
lxi d,TableSize
dad b ; HL->string-space after table
shld Tokens
pop d ; recover ->whole area
xra a ; fill with zeros
fillblok +A
; We will walk DE along the tail-text, HL along the strings,
; and BC along the table.
lbcd Table
lxi d,CpmTail
; Here commence a new string by advancing HL, leaving the null
; that ends the prior string. (The first time it leaves the
; empty string at Tokens+0.)
NextString:
inx h
; Search for the start of the next token, skipping blanks,
; commas, and all control chars. When a null appears we have
; reached the end of the command tail.
FindString:
ldax d ! inx d ; DE->next byte after one in A
ora a ; are we done?
jrz TailEnd ; (yes)
cpi ' '+1 ; space or control char (tab)?
jrc FindString
cpi ',' ; comma?
jrz FindString
; [A] is the first byte of a string and DE->the next. Compute
; the present offset and store it in the current table entry.
mov m,a ; save 1st byte now
push h ; save string-addr
push b ; save table-addr
lbcd Tokens
ora a ; clear carry
dsbc b ; L=offset of string from Tokens
pop b ; recover table address
mov a,l
stax b ; ..make table entry
inx b ; ..and advance to next
pop h ; and recover string-pointer
; copy the rest of the string until a delimiter appears.
CopyString:
inx h ; to next string-byte
ldax d ; view next text-byte
cpi ' '+1 ; is it a blank/control char?
jrc NextString ; (yes, loop)
cpi ',' ; or a comma?
jrz NextString ; (uh-huh)
mov m,a ; no, copy it
inx d ; and step text-pointer
jr CopyString
; That's it. Compute the number of strings seen as the
; difference between Table and BC.
TailEnd:
mov d,b ! mov e,c
lhld Table
xchg ; HL=table-pointer, DE=table-base
ora a
dsbc d
mov a,l ; A = count of entries
pop h
pop d
pop b
ret
public +CMTOK
+CMTOK:
push h ; save one reg
dcr a ; make number relative to 0
cpi TableSize ; is the number reasonable?
jrc NumberOK
lhld Tokens ; no, so return the empty string
jr NumberBad
NumberOK:
mov e,a
mvi d,0 ; make a 16-bit token number
lhld Table
dad d ; HL->Table[number]
mov e,m ; DE=offset to token
lhld Tokens
dad d ; HL->desired token
NumberBad:
xchg ; DE->desired token
pop h
ret
Figure 11-18. The macros and module that support manipulation of the command tail.
A second macro, tailtokn, takes a token number (counting from one) and returns the address of that token's string. One obvious design question came up right away: what should this routine do when called with an invalid token number? It could abort the program, but it seemed better to define the null string as the generic token, and make it the value of any token that isn't there. In the anthology programs we made use of this; some of them ask for a token without regard for whether it exists or not. They simply treat the null string that is returned as the default case.
The big design problem with these functions was, what is a token? To CP/M, a token is any sequence of nonblanks delimited by blanks. At least in CP/M 2.2, the tab character is a nonblank. That is clearly wrong; if a keystroke looks like a blank on the screen, a program ought to treat it as a blank.
But what about other delimiters? I chose to treat the comma as a token delimiter because it seemed to make for a very natural command syntax. But delimiters are not part of the tokens they delimit, so when I came to write the emit program, I found that there was no way for it to receive a comma except as a keyword. Besides the blank, tab, and comma, CP/M commands support a bewildering variety of delimiters, some of which are valid only in certain contexts (we'll discuss them further in the next chapter). Often the meaning of a syntactic unit depends more on the delimiters that set it off than on its contents.
It would have been nice to find a way to support a larger set of delimiters, or an heirarchical set so that a list of options within brackets could be handled cleanly, but I couldn't find it.
One aim of the toolkit was to make it possible to write major applications without a single BDOS call. The anthology system demonstrates that this goal was achieved. Still, the toolkit functions themselves must call the BDOS, and some user, somewhere, will want to do so. I codified the interface to the CP/M BDOS as an extension to the toolkit environment in order to serve these needs.
The BDOS interface is contained in a separate macro library, services.lib. It defines names for all the request numbers, and defines a service macro to execute a BDOS call. These things are shown in Figure 11-19. The services macro library is included in a number of the toolkit modules that we will read in following chapters.
BdosKeyin equ 1 ; one console input byte
BdosType equ 2 ; type byte at console
BdosAuxIn equ 3 ; input from AUX:
BdosAuxOut equ 4 ; output to AUX:
BdosPrint equ 5 ; print one byte
BdosRawKbd equ 6 ; raw keyboard status or input
BdosString equ 9 ; type 'string$' at console
BdosLineIn equ 10 ; read a buffered console line
BdosTestCon equ 11 ; test console, A>0 if key hit
BdosVersion equ 12 ; get version number to HL
BdosResetAll equ 13 ; reset all drives
BdosSetDrive equ 14 ; select default drivecode
BdosOpen equ 15 ; open a disk file
BdosClose equ 16 ; close (output) file
BdosSrch1 equ 17 ; initial directory search
BdosSrchn equ 18 ; successive directory searches
BdosErase equ 19 ; erase a file
BdosRead equ 20 ; read disk sequential
BdosWrite equ 21 ; write disk sequential
BdosMake equ 22 ; create a file directory entry
BdosRename equ 23 ; rename file
BdosDrive equ 25 ; get default drive number
BdosSetBuffer equ 26 ; set file buffer address
BdosSetAttr equ 30 ; set file attributes
BdosDirRead equ 33 ; direct-access read
BdosDirWrite equ 34 ; direct-access write
BdosFileSize equ 35 ; get file size
BdosGetRecno equ 36 ; get current record number
; the following are available only in CP/M 3.0
BdosSetMulti equ 44 ; set multi-sector count
BdosErrMode equ 45 ; set error mode
BdosBios equ 50 ; call the Bios for us
BdosFileInfo equ 102 ; get passlevel, timestamps
BdosPutXFCB equ 103 ; set password on file
BdosDaTime equ 105 ; get date and time
BdosSetRet equ 108 ; set program return code
BdosParse equ 152 ; parse filespec
SERVICE macro ?svc,?val,?hlret
+opwr ?svc,B,<service number>,true
if not nul ?val ;; some services need no DE value
+opwr ?val,D,,true
endif
; don't preserve HL if 3rd operand is +Hupdate
if nul ?hlret
+bakh set true
push h
else
if ?hlret ne +Hupdate
+++ third operand assumed to be '+Hupdate'
endif
endif
call +BDOS
+bakem <H,D,B>
endm
Figure 11-19. The names and macro that provide an interface to the CP/M BDOS.
The parts of the toolkit surveyed here are the ones that work together to make an environment, both a mental environment for the programmer and a software environment for the other functions to run in. All the remaining functions operate in and rely on the surroundings created by the standard names, the prolog and abort macros, the dynamic storage module, and the BDOS interface. The macros make up the action vocabulary of the toolkit rely on the inner, parameter-checking macros to handle their parameters. In the following chapters we will assume the existence of all this support
The toolkit is concerned with the manipulation of four abstract data types, the simplest being the ASCII character. Here we will examine the functions related to the character data type.
Does it seem pompous of me to speak of an "abstract character data type"? After all, ASCII characters are the simplest, commonest objects that the Z80 can deal with. Shouldn't we just relax and talk about "characters," or maybe just plain old "bytes"?
Well, no. There is no necessary connection between a byte value and a particular character, nor between a byte in a file and the symbol that will appear when that byte is written to a printer or a screen. The only connections are arbitrary conventions, and all too often different conventions apply in different contexts. There isn't any such thing as a character in computer storage; there are only encodings, sets of numbers that by common agreement will stand for sets of characters.
The phrase "abstract data type" is merely a way of formalizing such a common agreement. It means agreeing: that we will pretend that "characters" exist and have certain properties; that we will represent them by a certain numeric code; that only certain operations are valid on them; and that we will not perform an operation on a character code that makes no sense, even though it might make sense when applied to a number.
In naked assembly language we are supposed to respect the idea of the character data type while manipulating characters in the form of the bytes that stand for them. With practice this comes to seem perfectly natural. The syntax of the assembler helps, in that we may write statements like
mvi a,'B'
sta MyChar
to store a character, or (with the help of the environment's standard names) we may write
mov a,m
cpi AsciiDC3
to compare a character to a constant value.
All the toolkit adds is a set of functions that make it easy to test a byte for membership in certain sub-classes of the ASCII code, plus a function to convert a lowercase letter to an uppercase one. The list of comparison functions is shown in Table 12-1.
| Macro Name | Tests for: |
| control? | control character |
| graphic? | printable character |
| alnum? | alphabetic or digit |
| alpha? | alphabetic |
| upper? | uppercase alphabetic |
| lower? | lowercase alphabetic |
| digit? | digit character |
| hdigit? | hexadecimal digit (converts a-f to A-F) |
| white? | blank or tab |
| delim? | blank, tab, comma |
| fdelim? | blank, tab, comma, dot, or + |
All the character functions take a single parameter which is a reference to a character in a byte. All of them return that character in register A, and the tests set their result in the Zero flag.
I wanted to be able to refer to a character in any of three ways: as the contents of register A, as the byte addressed by HL, or as the byte addressed by DE. A fourth way, as the byte at a given label, was possible, and I could think of others (a byte at some offset from IX, for example). But the first three seemed to cover the most likely cases; and all the others could be reduced to register A by loading the register.
Using the alpha? function (test for an alphabetic character) as an example, the three forms became
alpha? +A ; test byte in A
alpha? +D ; test byte at DE
alpha? +H ; test byte at HL
In order to simplify the subroutines behind the functions, I specified that they would operate strictly on register A, leaving it up to the macro interface to load A as necessary. Since all these macros would handle their parameters alike (and in a way unlike other groups of macros), a new inner macro was called for.
This macro, +H, it displays an error message. Normally, one of the if tests will find equality. In two cases the macro generates an instruction to load register A; in the third case it needs to generate nothing.
+loada macro ?arg
if ?arg ne +A
if ?arg ne +D
if ?arg ne +H
+++ operand of '+H' required
exitm
else ;; +H
mov a,m
endif
else ;; +D
ldax d
endif
endif
endm
graphic? macro ?arg
+loada ?arg
extrn +CKGRP
call +CKGRP
endm
Figure 12-1. The macro used by the character functions to prepare register A.
All sorts of character-translation functions are possible, but the only one that seemed really necessary was toupper, a function to return the uppercase form of a character. Although the code to implement it is short, it's tedious to write it in-line (Figure 12-2).
public +TOUPR
+TOUPR:
cpi 'z'+1
rnc ; greater than z
cpi 'a'
rc ; less than a
ani 255-('a'-'A')
ret
Figure 12-2. The subroutine that implements the toupper function.
The bulk of it is spent in deciding whether or not the character is really a lowercase letter. If it is not, no conversion should be done. The cheap way of converting lowercase ASCII is to mask out bit 5 of the byte. That's exactly what the next to last line in Figure 12-2 does, but if that is done to non-alphabetic characters it causes an invalid conversion.
As I pondered the tests I'd specified, I began to see some relationships between them that could be exploited in assembly language to reduce the total code size.
Some tests could be implemented as a simple test of the input against the lower and upper ends of a range of values. The tests for digits, printable characters, uppercase and lowercase could all be done this way.
Then, some tests were only combinations of other tests. The alphabetic test, for instance, was the combination of tests for lowercase and uppercase letters, while the test for an alphanumeric character combined the alphabetic and digit tests. If all six of these tests were put together in one module, a few bytes would be saved. The combined module is shown in Figure 12-3.
; CheckRange(A) returns Z: nondestructive test of A versus a
; range of values [B]..[C] inclusive, returning Z true if the
; byte in A falls into the range.
CheckRange:
cmp b ; is it less than [B]?
rc ; (yes, out of range)
cmp c ; no..is it less than [C]?
rnc ; (if no carry, Z is correct)
cmp a ; B +, force Z true
ret
; +CKGRP(A) returns Z: test for range of printable characters.
public +CKGRP
+CKGRP:
push b
lxi b,('!' shl 8)+'~'
call CheckRange
pop b
ret
; +CKALN(A) returns Z: combine the alphabetic and numeric
; tests -- if alpha fails, fall into the numeric test.
public +CKALN
+CKALN:
call +CKALF
rz
; +CKDIG(A) returns Z: test for range of digit characters.
public +CKDIG
+CKDIG:
push b
lxi b,('0' shl 8) + '9'
call CheckRange
pop b
ret
; +CKALF(A) returns Z: do alphabetic test by combining
; the lowercase and uppercase tests.
public +CKALF
+CKALF:
call +CKUPR
rz
; +CKLWR(A) returns Z: test range of lowercase letters.
public +CKLWR
+CKLWR:
push b
lxi b,('a' shl 8) + 'z'
call CheckRange
pop b
ret
; +CKUPR(A) returns Z: test range of uppercase letters.
public +CKUPR
+CKUPR:
push b
lxi b,('A' shl 8) + 'Z'
call CheckRange
pop b
ret
Figure 12-3. The module that implements tests that can be based on range-checks.
There is an argument against this technique. When a program uses any one of the tests involved, its object module will contain the code of all six of them and its link symbol table will be cluttered with all six entry points. The argument in favor of it is that it was a lot easier to create that one module than it would have been to code and assemble six separate ones. It's a matter of trading the implementor's convenience for object size in an unknown number of using programs -- a trade that should almost always be resolved against the implementor. In this case, I chose the other way (and was probably wrong).
Another group of tests were related to testing for delimiters of one kind or another. Control characters are usually delimiters. The normal delimiters -- the characters that would separate a token in the command tail, for example -- include the control characters (notably the tab, return and linefeed) and also the space and comma. The special class of filespec delimiters includes the token delimiters and adds to it several punctuation characters that mark the end of a filespec to CP/M. These three tests could be cascaded one on the other, each falling into the next when its own special tests failed.
The test for whitespace (blank and tab) was stuck into the same module for my convenience. In some languages, the line-ending character counts as whitespace. This is the case in Pascal, where the end-of-line condition is read as a space, and in C where the formatted-read function ignores line boundaries. It seemed to me that assembly language programs went together more smoothly when the line-ending character was treated as a control character (and thus a delimiter) rather than a white-space character.
The source of the module containing all these delimiter tests is displayed in Figure 12-4. Some of the tests exploit the conditional-return instruction to shorten their average execution times. The tests are ordered from highest byte value to lowest. After each test, the rnc instruction eliminates a whole group of possibilities. The return will occur if the byte in register A is equal to the comparand (in which case the Zero flag will be true), or if it is larger. If it is larger, two things are true: the Zero flag will be false, and the value in A can't possibly match any of the tests that follow.
; +CKWHT(A) returns Z: test for whitespace.
public +CKWHT
+CKWHT:
cpi AsciiBlank
rz
cpi AsciiTAB
ret
; +CKFLM(A) returns Z: test for filespec delimiter.
; Filespec delimiters include the regular delimiters (below),
; plus the nonspaces that delimit a filespec to CP/M (the equals
; sign and the square and angle brackets), plus two that are
; meaningful only within filespecs: the dot and semicolon.
public +CKFLM
+CKFLM:
cpi AsciiDEL
rnc
cpi '['
rnc
cpi ']'
rnc
cpi '+'
rnc
cpi '='
rnc
cpi '+'
rnc
cpi ';'
rnc
cpi '.'
rnc
; +CKDLM(A) returns Z: test for normal text-delimiter.
; Text delimiters include control characters (below) plus
; the comma and the blank.
public +CKDLM
+CKDLM:
cpi ','
rz
cpi AsciiBlank
rz
; +CKCTL(A) returns Z: test for ASCII control character.
public +CKCTL
+CKCTL:
cpi AsciiBlank
jrc iscontrol
cpi AsciiDEL
ret
iscontrol:
cmp a ; force Z true for values below 20h
ret
Figure 12-4. The module that implements tests for various classes of delimiters.
The test for a control character takes care to check for the DEL character. This is a bit of nit-pickery. The DEL is defined as a control character by the ASCII standard, although most people don't think of it that way and it almost never occurs in a text file. It might come in over a phone line, though, in which case this test function will classify it correctly.
The remaining test checks for hexadecimal digits. I expected to use this test later in routines that extracted hex numbers from strings and files. In those applications, the software shouldn't require a user to write hex digits in a particular case. If the user wants to give a hex number as AceD, well, fine. However, it would simplify things if this test routine would, by some remarkable coincidence, discover only uppercase hex characters. All the other tests are nondestructive, but I gave this one the extra job of converting the byte in A to uppercase when (and only when) it found a lowercase letter that was a hex digit.
The module that implements the test is shown in Figure 12-5. It plays tricks with the condition flags. It abandons its test as soon as it has established that the byte can't possibly be a hex digit. At some of these points the Zero flag may be set incorrectly, so all the failures exit through one point at which it is forced to the false state. In both cases where the test has succeeded, Zero may again be set wrongly. These cases exit through a common point that forces Zero true.
public +CKHEX
+CKHEX:
cpi 'f'+1
jrc trylowera ; (less than or equal to "f")
; value is not a hex digit -- force Z false and exit
Fail: cpi 'f'
ret
trylowera:
cpi 'a'
jrc tryupper ; (less than "a")
; value is in a..f, make it uppercase and return Z true
ani 255-('a'-'A')
jr Succeed
; value is less than "a", try for A-F
tryupper:
cpi 'F'+1
jrnc Fail ; (greater than "F")
cpi 'A'
jrnc Succeed ; (between A and F)
; value less than "A", try digits
cpi '9'+1
jrnc Fail
cpi '0'
jrc Fail
Succeed:
cmp a ; force Z true
ret
Figure 12-5. The module that implements the test for hex digits.
The second abstract data type that the toolkit supports is the integer. Integers are the native data type of the Z80 CPU, but its support for them is incomplete: it can add and subtract unsigned integers, but it can't multiply or divide them. The toolkit extends the CPU's native abilities to cover more of the operations of integer arithmetic.
Although 'rithmetic is one of the first things we learn in primary school, binary arithmetic at the assembly language level is a subject that has many subtleties, mostly because the computer doesn't deal with numbers but with patterns of bits. Once again we have a conflict between an abstract, ideal concept and the reality of a computer implementation. When we humans do arithmetic, we deal with the idea of numbers. Ideal numbers present no difficulty when doing a sum like
41,239
+ 24,297
-------- (((set solid rule)))
65,536
But if we do that sum in the Z80's registers we find that
41,239
+ 24,297
-------- (((solid rule)))
0 (plus a carry)
which is not quite the same thing. That's not the only paradox of machine arithmetic; there are plenty more. Nor does the toolkit attempt to fix this one; as an assembly language programmer you must constantly be aware of the limitations of the 16-bit binary word.
This is not the place for a tutorial on the binary number system. I shall assume that you have had enough practice with it that you can do binary addition on paper, and that you appreciate such odd binary properties as the fact that adding a number to itself, shifting it left one bit, and doubling it are all the same thing.
When we implement the abstract idea of an integer as binary numbers of fixed length, we immediately run into two problems of representation. The first is the choice between signed and unsigned representations. An abstract integer always has a sign, plus or minus. A binary number does not; it's just a pattern of bits.
We may choose to say that all binary numbers are positive, with implicit plus signs in front of them. In that case, all of the bits of a number are available to encode its value, and the number is said to be unsigned. Eight-bit bytes are almost always treated this way; we say that the 256 possible patterns of eight bits represent the numbers from zero to 255 inclusive. Sixteen-bit words may be treated so; when they are, we say that the 65,536 possible patterns of 16 bits stand for the numbers from zero to 65,535 inclusive. Machine addresses are unsigned 16-bit numbers.
Alternatively, we may choose to say that a bit pattern may stand for either a positive or a negative number, i.e. it will be signed. Then we have to say how the sign value will be encoded in the number. The most common way (there are others) is called two's-complement encoding. It is almost always used only with 16-bit words, although it can be applied to bytes as well.
The two's complement encoding has some properties that are convenient for machine execution. The property that most people learn first is that the most significant bit of a number is its sign bit. When the high bit of a signed word or byte is 1, the number is negative. A more important one is that the sign bits of two numbers can be treated as part of the numbers during addition and subtraction and the result will (usually) come out with the correct sign. That property lets us add and subtract signed numbers using unsigned hardware and (usually) get correct answers.
A third handy property is the ease of complementing a signed number. The rule is "invert all the bits and add 1." To get the arithmetic complement of a signed byte in register A we need only do
cma ; invert all the bits...
inr a ; ..and add 1
(although the Z80 has a single instruction, neg, which does the whole job).
But there are paradoxes in the signed numbers. There are 65,536 possible 16-bit patterns. One of them, 0000h, is dedicated to representing zero. The others extend out either side of zero on the number line, with 0001h meaning 1, FFFFh meaning -1, 0002h for 2, FFFEh for -2, and so on. However, only 65,535 patterns remain after we take out zero. That's an odd number, so the count of positive and negative numbers cannot be equal; there must be one more of one or the other.
In two's complement notation, the odd pattern is 8000h. Superficially it must be negative, since its sign bit is 1. But if we take its complement, we get 8000h again! If the complement of minus 1 is plus 1, of minus 2 is plus 2, then the complement of 8000h (minus 32,768) ought to be plus 32,768 -- and it is! The problem is that the bit patterns for minus 32,768 and plus 32,768 are identical.
This and all the other paradoxes of binary arithmetic stem from the finite precision allowed by machine storage. The true representation of minus 32,768 is not 8000h, it is FFF...F8000h, with an infinite number of binary 1's stretching off to the left. The true representation of plus 32,768 is 000...08000h, with an infinite number of binary 0's to its left. These encodings are quite distinct. When binary numbers have infinite precision, the paradoxes vanish.
Alas, the Z80's registers are all too finite. The binary numbers they permit are truncated on the left, with the result that what should be a line of numbers stretching to infinity on either side of zero becomes instead a circle that wraps back upon itself.
we can make practical use of these truncated integers provided we understand their limits. So long as we are sure that a sum will not exceed the capacity of a word, we can do all the arithmetic we like. In fact, if we are sure that all the numbers of interest fall into a certain range, we may choose the precision of the numbers (the number of bits in them) to suit ourselves. By choosing short precisions we can save storage and speed up a program.
The toolkit functions are designed around three precisions: the byte (8 bits), the word (16 bits), and the longword (32 bits). The toolkit supports unsigned arithmetic on all three precisions, and signed arithmetic on words alone.
When I began designing the arithmetic functions I resisted the idea of longwords, but they forced themselves upon me. They are necessary for multiplication, since the product of two 16-bit numbers must contain 32 bits. Oh, in a certain case you may know in advance that the product of certain variables will always be less than 17 bits in length. But a general-purpose multiplication routine cannot make that assumption; it must develop and return a 32-bit result. You are free to discard the most significant bits, but there is no way to recover them if the multiply routine doesn't return them.
Once it had its nose in the tent, the longword was unstoppable. Shouldn't there be a way to display a longword in decimal or hex digits? And if you had two longwords, it would be silly not to be able to add them or subtract them, or increment or decrement them by 16-bit quantities. Anything could be done with longwords except multiplication; there I drew the line, not being able to cope with the idea of a 64-bit result and another round of escalation.
The main use of unsigned arithmetic is the calculation of addresses. The notions of the array and of subscripting an array are built into most high-level languages. When we translate these useful ideas into assembly language, the operation of subscripting an array becomes the operation of calculating an address. If the elements of an array are numbered from zero, then the address of a given element n is
base + length * n
where base is the address of the array and length is the number of bytes in one element. Of course if each element is one byte, the address of an element is just its subscript added to the base. Often the subscript n is less than 256, so it fits in a byte.
The toolkit contains four functions to assist such address calculations. In each case the value n is in register A, another factor is in register HL, and the result is returned in HL. The functions are
The uses of the first two are clear; they are for subscripting one-dimensional tables of bytes and words, respectively. Their code is simple. The macros and the module that implements them are shown in Figure 13-1.
ADDHLA macro ;; no operands
extrn +ADDAH
call +ADDAH
endm
ADDHL2A macro ;; no operands
extrn +AD2AH
call +AD2AH
endm
name 'ADDAHL'
dseg
saveA db 0
cseg
; +ADD2AH(HL,A) : add twice-A to HL by adding A to HL twice
public +ADD2AH
+ADD2AH:
call +ADDAH
; +ADDAH(HL,A) : add A to HL w/o destroying A
public +ADDAH
+ADDAH:
sta saveA
add l
mov l,a
lda saveA
rnc
inr h
ret
Figure 13-1. The macros and module that add a byte to an unsigned word.
The function mpy816 multiplies the unsigned contents of A and HL yielding a result in HL. When an 8-bit number and a 16-bit one are multiplied, the product could contain as many as 24 meaningful bits. Mpy816 doesn't handle that case; it truncates the result to its lowest 16 bits and gives no warning. It is not meant for general arithmetic; it is intended solely for the multiplication of a small subscript times a small element length to yield an offset into an array. It could also be used to multiply register A times a constant less than 256 with result in HL.
The macro and module that implement mpy816 appear in Figure 13-2. This subroutine is the simplest possible version of binary multiplication. We will be looking at more complicated versions, so this one will repay study.
MPY816 macro ?op1,?op2
+opwr ?op1,H,constant,false
+opca ?op2,constant,true
extrn +MPYBB
call +MPYBB
+
endm
name 'MPY816'
public +MPYBB
+MPYBB:
push psw
push d
push b
xchg ; carry the multiplicand in DE
mvi b,8 ; set loop count in B
lxi h,0 ; clear partial product
Loop:
dad h ; shift product (ignore carry)
ral ; next multiplier bit to carry
jrnc Skip ; (it's zero)
dad d ; add multiplier to product
Skip:
djnz Loop
pop b
pop d
pop psw
ret
Figure 13-2. The mpy816 macro and its subroutine.
The method is like the pencil-and-paper method of multiplication we learned in primary school, with these differences. In school we learned to write down all the partial products first. Then we added them up to get the complete product. In Figure 13-2, each partial product -- the result of multiplying one digit of the multiplier times all the digits of the multiplicand -- is added into the product as soon as it is developed.
The second difference is that in school we processed the digits of the multiplier from least significant to most. However, the order of developing partial products makes no difference to the result. In Figure 13-2 the digits of the multiplier are scanned from most down to least significant because it's easier to shift words left than right.
The third difference is that, since this is binary not decimal, one "digit" of the multiplier is a bit that has one of only two values, zero or one. Therefore there are only two possible values for each partial product: the multiplicand itself or zero. So multiplication comes down to adding or not adding a copy of the multiplicand into the product, depending on the value of the current bit of the multiplier.
The final byte-vs.-word function is div816. It divides the contents of register A into the unsigned word in HL. It returns the quotient in HL and the remainder in A. It can be useful in working with arrays (after scanning an array to find an element, you may divide the offset of the element by the size of an element to get its subscript), but the main reason for its presence in the toolkit is speed. Binary division is the slowest operation, and often we need it only to divide a word by a constant less than 256. Div816 handles this case faster than a more general routine can do. The implementation of div816 appears in Figure 13-3. Like mpy816, the algorithm is analogous to the "long division" we learned in school, but the parallel may be obscured by a programming trick.
DIV816 macro ?op1,?op2
+opwr ?op1,H,constant,false ;; don't save
+opca ?op2,constant,false ;; don't save
extrn +DIVBB
call +DIVBB
endm
name 'DIV816'
public +DIVBB
+DIVBB:
push b
mvi b,16 ; set loop count in B
mov c,a ; hold divisor in C
xra a ; start partial remainder at zero
Loop:
; shift dividend bit into carry, shift partial quotient left
dad h ; carry + 0
; accumulate dividend bit in A, and see if we have grown to
; the size of the divisor.
ral ; carry + carry
cmp c
jrc Skip
; subtract the divisor from the remainder and make the low
; bit of the quotient a 1.
sub c
inr l
Skip: djnz Loop ; repeat 16 times
pop b
ret
Figure 13-3. The div816 macro and its subroutine.
The code must examine the dividend a bit at a time. It does this by holding the dividend in register HL and shifting out each bit with a dad h instruction. The routine also generates the quotient a bit at a time. This must be done by shifting one bit after another into the low end of a word register. The programming trick is that register HL is used for both these things. Whenever HL is shifted left with dad h, one bit of the dividend is squeezed out of its high-order bit and one bit of zero enters at the least-significant end. That low-order zero is regarded as the current bit of the quotient. If the code decides that the bit really ought to be a 1, it is made so with inr l. (That's another programming trick -- since the low bit of register L must be zero, incrementing the register can have no effect other than to make its low bit 1.) After 16 cycles of the loop, the entire dividend has been ejected from the top of register HL and the entire quotient has been inserted in its place.
Now that you have studied Figure 13-3, here's a quiz: what will it yield when the divisor is zero? Is that a reasonable answer, or should it have included a test for a zero divisor? If it did, what should it do when it found one?
The Z80 supports some unsigned arithmetic on words. We used its word-add and -subtract instructions often in the anthology programs. Since signed words may be added and subtracted with unsigned instructions -- safely, so long as you keep in mind that adding two large negative numbers can produce a false positive answer and vice versa -- the toolkit contains no functions for those operations.
It does contain two functions that require sequences of instructions: cplbw to complement a word, and cmpsw to compare two signed words. Complementing a word is simple, but it takes nine instructions to do it without altering register A; that's enough to justify a subroutine. The macro (Figure 13-4) uses the normal mechanism for loading register HL, but the ability to name a constant instead of the register isn't much use here. If you want the complement of a constant in register HL, why not just load it with one instruction?
CPLBW macro ?op1
+opwr ?op1,H,constant,false
extrn +CPLBW
call +CPLBW
endm
name 'CPLBW'
public +CPLBW
+CPLBW:
push psw ; it's the old rule,
mov a,l ! cma ! mov l,a ; you invert all
mov a,h ! cma ! mov h,a ; the bits, then
inx h ; add 1
pop psw
ret
end
Figure 13-4. The implementation of cplbw, to complement a signed word.
The macro-parameter mechanism is more effective when applied to cmpsw. This function compares two signed numbers but affects only the flags (the flags are set as if the second operand were subtracted from the first). The macro interface permits comparing register HL versus a constant, or a constant versus register DE, or HL against DE. The comparison code is interesting (Figure 13-5).
CMPSW macro ?op1,?op2
+opwr ?op1,H,constant,true
+opwr ?op2,D,constant,true
extrn +CMPSW
call +CMPSW
+
endm
name 'CMPSW'
public +CMPSW
+CMPSW:
push b ; have to save contents of A,
mov b,a ; we only alter the flags
mov a,h
xra d ; compare the sign bits
jm fakeit ; signs differ, fake the flags
push h ; signs equal, do unsigned compare
dsbc d ; (xra cleared the carry flag)
pop h
Exit:
mov a,b
pop b
ret
; The signs differ. Register A = 1xxx xxxx from the XRA
; above. If HL is positive, HL + DE and H = 0xxx xxxx.
; If HL is negative, HL + DE and H = 1xxx xxxx. In either
; case, XRA H; ANI 80h; CPI 7Fh yields the correct flags.
fakeit: xra h ; is HL the positive one?
ani 80h ; A = 80h if so, 00 if not.
cpi 7fh ; set flags as for HL-DE
jr Exit
Figure 13-5. The implementation of cmpbw, to compare signed words.
When the sign bits of the two numbers are alike, the dsbc instruction will set the flags correctly regardless of what the signs are. Only when they are different will a subtract yield a wrong result (the negative number, considered as unsigned, is larger than the positive one). In this case I chose to force the flags to the correct setting by comparing byte values that are proxies for the actual numbers.
The mpy816 function is useful for small numbers, but a full word-times-word multiply is sometimes required. The toolkit function mpybw multiplies two unsigned words. As noted earlier, it must allow for a result that has as many many as 32 significant bits. It develops this longword result in the four registers DEHL. That was convenient and seemed fairly natural, so I adopted the general rule that longword parameters would always appear in those registers, just as byte parameters are always passed in A and word parameters in HL.
The four functions for word arithmetic have identical syntax and, except for their names and the subroutines they call, their macros were identical. To save space in the macro library, I created a common inner macro they could all use. The mpybw macro and its sub-macro are shown in Figure 13-6.
+arith macro ?op1,?op2,?mod
+opwr ?op1,H,constant,false
+opwr ?op2,D,constant,false
extrn ?mod
call ?mod
endm
MPYBW macro ?op1,?op2
+MPYBW
endm
Figure 13-6. The macro interface for mpybw. The divbw, mpysw and divsw macros are nearly identical.
The subroutine that performs word multiplication can be read in Figure 13-7. It works very much like Figure 13-2. The difference is that the multiplier has 16 bits and the product, 32. The multiplier is supplied in register DE, and that is the destination of the most significant word of the product. So, as in Figure 13-3, DE is used for both purposes, with multiplier bits being squeezed out of it as product bits are shifted in at the other end.
name 'MPYBW'
public +MPYBW
+MPYBW:
push psw
push b
mvi a,16 ; A counts iterations 16..0
mov b,h ! mov c,l ; carry multiplicand in BC
lxi h,0 ; initialize partial product in HL
Loop:
; Shift the product least-sig. word left, its high bit going
; to the carry flag.
dad h
; Shift that bit into the low end of the product most-sig.
; word, and shift the high bit of the multiplier into carry.
ralr e
ralr d
; if the multiplier bit was a 1, add a copy of the multiplicand
; into the partial product.
jrnc mult0 ; (multiplier bit = 0)
dad b ; add to product and,
jrnc mult0 ; if the result has 17 bits,
inx d ; propogate the carry.
mult0:
dcr a ; repeat 16 times
jnz Loop
pop b
pop psw
ret
Figure 13-7. The subroutine for multiplying unsigned words.
This routine consumes about 1,300 Z80 clock cycles (325 microseconds, in a machine with the usual 4MHz clock). To put it another way, a program in typical hardware could perform at most 3,000 multiplications per second.
You might like to assure yourself (as I had to do) that no matter what the value of the multiplier and multiplicand, the developing product will never catch up to and mingle with the multiplier bits in DE. After all, why would the increment of DE just before label mult0 not cause the product bits to overflow up through DE to pollute the multiplier?
At what age are the principles of signed arithmetic taught these days? I don't think I was exposed to the complexities of multiplying signed numbers until the tenth grade -- but that was a long time ago and in a rural school. Ah well, once we have an unsigned multiply, signed multiplication follows easily. If both operands are positive, unsigned multiplication gives the right answer. If both are negative, the result is to be positive ("minus times a minus is a plus," I can remember parroting with very little comprehension), and it can be achieved by complementing both operands and doing an unsigned multiply.
When the input signs differ, the result is to be negative. Getting it takes three steps: we complement the negative operand, do an unsigned multiply, and then complement the result.
The implementation of mpysw is shown in Figure 13-8.
name 'MPYSW'
extrn +CPLLW
public +MPYSW
+MPYSW:
push psw
; If the signs of multiplier and multiplicand are positive,
; an unsigned multiply is sufficient.
mov a,h
ora d ; or together the sign bits, and
jp mult ; if both positive, get on with it
; If the signs are both minus, an unsigned multiply of the
; absolute values is needed -- -5 * -3 is +15.
mov a,h ; at least one negative -- are both?
xra d ; xor yields 1 when bits unequal
jm differ ; (signs differ)
call +CPLBW ; complement multiplicand in HL
xchg
call +CPLBW ; complement multiplier in DE
xchg ; unneeded xchg, mult. is commutative
mult:
call +MPYBW
pop psw
ret
; The signs differ: take the absolute value of the negative
; word, multiply, and complement the result.
differ:
mov a,h ! ora a ; is HL the negative one?
cm +CPLBW ; ..if so, complement it
xchg
mov a,h ! ora a ; is DE the negative one?
cm +CPLBW ; ..if so, complement that one
xchg
call +MPYBW ; multiply the result, and
call +CPLLW ; complement the resulting longword
pop psw
ret
Figure 13-8. The subroutine for signed multiplication is really a cover over unsigned multiplication.
A function to divide one unsigned word into another is sometimes essential (although no need for one arose in the programs in this book). Once we have that, division of signed words is, like their multiplication, only a matter of adjusting the signs of the result.
The function for unsigned division, divbw, takes its divisor in DE and its dividend in HL. It returns the quotient in HL and the remainder in DE. (If you aren't sure of the use of those four terms, look them up. They are indispensable to a discussion of division.) The implementation is shown in Figure 13-9.
name 'DIVBW'
public +DIVBW
+DIVBW:
push psw
push b
mov b,d ! mov c,e ; carry divisor in BC
xchg ; dividend/quotient in DE
lxi h,0 ; initialize remainder in HL
mvi a,16 ; loop count in A
; The dividend in DE is shifted out one bit at a time (and as
; it is, the quotient is developed in DE one bit at a time).
; Each dividend bit is shifted into HL. When it reaches the
; size of the divisor, it is reduced by the divisor and the
; current quotient bit is made a 1.
Loop:
xchg ! dad h ! xchg ; dividend bit to carry
jrnc skip1 ; (it was zero)
inx h ; (it was one, duplicate in HL)
skip1:
ora a ; clear carry and
dsbc b ; ..trial-subtract divisor
jrnc skip2
; carry true, divisor is still greater than remainder, so
; add it back to the developing remainder and leave the
; current quotient bit a zero.
dad b
jmp skip3
skip2:
; carry false, divisor was += remainder (and remainder has
; been reduced by divisor). Make the current quotient bit 1.
inx d
skip3:
dcr a ; count down and
jrz skip4 ; ..exit after 16 shifts
dad h ; shift remainder left
jmp Loop ; and continue
skip4: pop b
pop psw
xchg ; DE=remainder, HL=quotient
ret
Figure 13-9. The subroutine for dividing unsigned words.
This code uses the same method as Figure 13-3: accumulate bits of the dividend until they equal the divisor, then knock them down by the size of the divisor and put a 1-bit in the quotient. What's left at the end is the remainder.
It executes in around 1,800 clock cycles or 450 microseconds in most systems. The same function will serve for div and mod (to use the Pascal terminology), since "mod" and remainder are the same for positive integers.
Signed division is again a matter of doing an unsigned operation and playing with the signs of the operands and the result. However, the rules are different from those of multiplication. In the unsigned case, we can say that division consists of
(A div B) yielding (Q and R)
such that afterward
(Q mul B) + R yields A
The aim of signed division is to make that identity true for all values A and B.
There are four cases of the signs of A and B. If you work them out you will find that a simple procedure will keep the identity true. Note the signs of dividend and divisor, then do an unsigned divide of their absolute values. Afterward, apply these two rules:
These are the rules applied by the implementation divsw shown in Figure 13-10.
name 'DIVSW'
extrn +DIVBW
public +DIVSW
+DIVSW:
push psw
push b
mov b,h ; save sign of dividend
mov c,d ; save sign of divisor
mov a,h ! ora a ; take absolute value of
cm +CPLBW ; ..dividend if needed
xchg
mov a,h ! ora a ; check sign of divisor
cm +CPLBW ; ..and make absolute if needed
xchg
call +DIVBW ; divide: abs(HL)/abs(DE)
mov a,b ! xra c ; if signs unlike, hi bit is 1
cm +CPLBW ; if so, complement quotient
xchg ; remainder to HL
mov a,b ! ora a ; test sign of dividend
cm +CPLBW ; if minus, complement remainder
xchg ; rmdr back to DE
pop b
pop psw
ret
Figure 13-10. The subroutine for signed division uses unsigned division.
The ethereal pleasure of "preserving an identity" was so great that I decided to preserve another one. The identity was that since
A mul B yields P
it followed that
P div B should yield A
but P was a longword and there was no function to divide an unsigned word into a longword. It turned out to be possible to make one, after a fashion. The implementation of the divlwbw function (divide longword by binary word) is shown in Figure 13-11. It works to the extent that it preserves the identity above. It is not a general division routine. Its result will be correct only so long as the divisor is equal to or larger than the most significant word of the longword dividend. That has to be the case when the dividend is one of the original factors input to mpybw (think about it).
However, if the divisor is less than the most significant word of the dividend, the answer will be wrong. The true quotient will have more than 16 bits, but only 16 will be returned. Still, the function is potentially useful for converting a file offset into a count of records, so I left it in. I did not attempt to make a signed version of this routine, even though signed multiplication produces a signed longword.
DIVLWBW macro ?dvsr ;; dividend is DEHL
+opwr ?dvsr,B,divisor,true
extrn +DIVLW
call +DIVLW
+
endm
name 'DIVLW'
public +DIVLW
+DIVLW:
push psw
xchg ; carry longword as HLDE now
mvi a,16 ; A holds the loop count
Loop:
; shift the entire dividend left by one bit, and shift a 0
; into the quotient developing in DE
xchg
dad h ; 0 into quotient, shift l.s. word left
xchg
dadc h ; ..and into m.s. word
; trial-subtract divisor from dividend m.s. word, and if it
; fits, make the new quotient bit a 1.
ora a
dsbc b
jp incquot ; yes, BC was += HL
dad b ; no, restore dividend
jmp skip1
incquot: inr e ; make low bit of quotient 1
skip1: dcr a
jnz Loop
xchg ; HL=quotient, DE=remainder
pop psw
ret
Figure 13-11. The macro and subroutine for function divlw.
It soon became clear that the toolkit would have to recognize long integers as a valid data type. Not only are they the natural outcome of multiplication, but longwords are essential to a decent implementation of direct-access files. And, when they can be displayed in decimal, longwords become useful accumulators for large counts and totals. I implemented functions to perform simple arithmetic and other manipulations of them.
The function to complement a longword is needed in signed multiplication. It is simply an extension of the cplbw function to four registers. The implementation of cpllw is shown in Figure 13-12. Like all the functions on longwords, it assumes that its primary parameter is present in registers DEHL.
CPLLW macro ;; no operands, use DEHL
extrn +CPLLW
call +CPLLW
endm
name 'CPLLW'
public +CPLLW
+CPLLW:
push psw ; it's the old rule,
mov a,d ! cma ! mov d,a ; you invert all
mov a,e ! cma ! mov e,a ; the bits, then
mov a,l ! cma ! mov l,a ; add 1.
mov a,h ! cma ! mov h,a
push b ; however, adding 1
lxi b,1 ; to a 32-bit word
dad b ; is complicated.
jnc Exit ; (no carry from HL)
inx d ; propogate carry to DE
Exit: pop b
pop psw
ret
Figure 13-12. The implementation of cpllw, complement a longword.
Left and right shifts are used with all types of binary numbers as quick ways of multiplying or dividing by 2. A longword in registers DEHL can be shifted either direction with a short sequence of Z80 instructions. I implemented a left-shift and a logical right-shift as macros (Figure 13-13). An arithmetic right-shift (one that preserves the sign bit) would be equally simple to do.
SRLLW macro ;; no operands, longwords are always DEHL
srlr d ;; zero into high bit
rarr e
rarr h
rarr l ;; low bit to carry
endm
SLLLW macro ;; no operands, always DEHL
dad h ;; zero to low bit
xchg
dadc h ;; high bit to carry
xchg
endm
Figure 13-13. The macro implementation of longword shifts.
If a longword is to be used to accumulate a total, there must be a way of adding and subtracting from it. I implemented macros addlwbw and sublwbw to add and subtract unsigned words into longwords (Figure 13-14). These are very limited functions. They do not work for signed words. They do not set the processor flags as word-arithmetic does, so there is no way to detect overflow or a zero result. They are really the longword equivalent of the increment and decrement instructions, which have the same failings.
ADDLWBW macro ?value ;; assume longword in DEHL
local skip
+,true
dad b
jrnc skip
inx d
skip equ $
+
endm
SUBLWBW macro ?value ;; assume longword in DEHL
local skip
+,true
ora a
dsbc b
jrnc skip
dcx d
skip equ $
+
endm
Figure 13-14. The macros that add and subtract words into longwords.
To this point, longwords have been held in the machine registers. There must be some way of putting one down in storage, and some way of loading another from storage into the registers. But in what order should the four bytes of a longword appear? I decided that the logical order would be the extension of the Z80's storage order for the bytes of a word: the least significant byte should be at the lowest address, the most significant at the highest.
The instruction sequences to lay down and pick up a longword were long enough to justify their implementation as subroutines. I elected to put both subroutines in a single module. It seemed to me that any program that used one would probably use the other as well, so there would be no waste of object space. The implementation is shown in Figure 13-15.
STORELW macro ?where
+,true
extrn +STOLW
call +STOLW
+
endm
LOADLW macro ?where
+,true
extrn +LODLW
call +LODLW
+
endm
name 'LWLDST'
; load longword from *BC -- just pick up the bytes one at a time
; from least-significant to most.
public +LODLW
+LODLW:
push psw
push b
ldax b ! inx b
mov l,a
ldax b ! inx b
mov h,a
ldax b ! inx b
mov e,a
ldax b
mov d,a
pop b
pop psw
ret
; store longword to *BC -- just put em down in low-to-high order.
public +STOLW
+STOLW:
push psw
push b
mov a,l
stax b ! inx b
mov a,h
stax b ! inx b
mov a,e
stax b ! inx b
mov a,d
stax b
pop b
pop psw
ret
Figure 13-15. The code and macros that store and load longwords.
It may occur to you that register BC can be saved twice by the code in Figure 13-15, once by a macro and again in the subroutine it calls. In fact, why are the subroutines saving BC at all? Wouldn't it be useful for them to return BC updated to the byte after the longword in storage, as the string functions return register DE updated?
Well, it might have been useful, but the parameter conventions I'd established did not allow for an updated value in register BC. There was no magic name +B, the generated code will not have saved it. If the macro does save the register, it will be saved twice, which is a pity.
Now that longwords could be stored it became possible to do arithmetic between two longwords, one in storage and the other in the registers. I implemented three such functions: addlw to add two longwords; sublw to subtract them; and cmplw to do an unsigned comparison between them. In all three cases the primary operand was the longword in the registers. The storage longword was added or subtracted from it, leaving the result in the registers.
In all these functions the processor flags would have their usual meanings for unsigned arithmetic at the end of the process. I coded all three subroutines (Figure 13-16) so that they returned the flags, but did not modify the contents of register A. This made the functions a close analogue of the Z80's word-arithmetic instructions.
ADDLW macro ?lw
+,true
extrn +ADDLW
call +ADDLW
+
endm
name 'LWARTH'
; Add to DEHL the four bytes at BC. The addition is byte-by-
; byte, propogating a carry upward.
public +ADDLW
+ADDLW:
push b ; returns BC unchanged as usual
push psw ; save A only
ldax b ! inx b
add l ! mov l,a
ldax b ! inx b
adc h ! mov h,a
ldax b ! inx b
adc e ! mov e,a
ldax b
adc d ! mov d,a
pop b ; B=accum, C=old flags
mov a,b ; restore A, return add-flags
pop b ; restore BC
ret
; Subtract from DEHL, the longword in storage at BC. We are
; treating DEHL as the "accumulator" for longwords, comparable
; to the way A acts in byte arithmetic. However, it is not
; convenient to have the address in BC just now because we
; want to do "sub m." So we put the low-order 16 bits into
; BC and the storage address in HL temporarily.
public +SUBLW
+SUBLW:
push b ; BC returns unchanged
push psw ; save only accumulator
push h
mov h,b ! mov l,c ; HL-+storage longword
pop b ; and operand 1 is DEBC
mov a,c
sub m ! inx h
mov c,a
mov a,b
sbb m ! inx h
mov b,a
mov a,e
sbb m ! inx h
mov e,a
mov a,d
sbb m
mov d,a
mov h,b ! mov l,c ; result back to DEHL
pop b
mov a,b ; restore A, return flags
pop b
ret
; Compare DEHL versus the longword at BC. This is an unsigned
; compare -- we compare bytes from high-order back to low-order
; and stop with the first inequal byte. Again the result is
; as for DEHL minus storage, so we need the storage address in
; HL and the first operand in DEBC.
public +CMPLW
+CMPLW:
push b ; save BC for exit
push psw ; ..and save A
inx b
inx b
inx b ; move along to most-sig. byte
push b
mov b,h ! mov c,l ; longword is DEBC
pop h ; HL-+top byte of storage operand
mov a,c
cmp m
jnz done
dcx h
mov a,b
cmp m
jnz done
dcx h
mov a,e
cmp m
jnz done
dcx h
mov a,d
cmp m
done:
mov h,b ! mov l,c ;recover DEHL longword
pop b
mov a,b ; ..and A, returning flags
pop b ; ..and BC
ret
Figure 13-16. The implementation of longword arithmetic. Macros not shown are nearly identical to addlw.
The third of the four toolkit data types is the character string. Once defined, the string quickly became indispensable to both files and numeric conversion. Strings, in fact, became the glue that holds the toolkit together. In this chapter we will examine their implementation.
A string, you'll recall, is a sequence of characters ending in a null byte. More formally, a string is a sequence of zero or more adjacent bytes followed by a byte of zero. In chapter 2 I compared this to other ways of implementing strings and concluded that this definition (which is lifted from the conventions of the C programming language) is the easiest to work with. One of the things that make it easy to use is the nice property that any byte of a string is the head of a string. Even a null byte alone is still a string (the null string), and it's easy to write code that handles the null string as a normal case.
The string definition is easy to implement as well. To see that, let's look at the macros that declare string variables in a static way. There are four, but two have to do with tables of strings. Defer them, leaving only strspace to declare room for a string and strconst to declare an initialized string.
The strspace macro (Figure 14-1) is simplicity itself. Its parameter is the maximum length that the contents of the string may attain. It reserves that many bytes and one more for a null, and initializes the first byte to null. The declared space is ready to receive a string, but it is also a string just as it stands. If we took its length we would get the result zero, just as we should.
STRSPACE macro ?len
db 0 ;; initialize to nul
ds ?len ;; set aside space
endm
Figure 14-1. The strspace macro.
The strconst macro (Figure 14-2) is almost as simple but it has some subtle features. Basically it assembles its first parameter as a db command, followed by a null to make a string of it.
STRCONST macro ?literal,?len
local here
here set $
db ?literal
db 0
if not nul ?len
org here+?len
endif
endm
Figure 14-2. The strconst macro.
That first parameter may, by rmac's rules, be a parameter list enclosed in angle brackets, while the parameter of db may be a list of items separated by commas. That makes it possible to declare a string of mixed values, as in
strconst +
The assembler strips off the angle brackets (and changes pairs of quotes to single quotes) but otherwise keeps the parameter together and substitutes it whole in the db command.
The second parameter of strconst was an afterthought, and not entirely a good one. The idea is that one might want to initialize a short string in a long space, so that data could be appended to it later. If the parameter is omitted, the string has the length of its constant parts. If the parameter is given, it specifies the exact length. But there's no check to see that the length is greater than the constant part. As written, it's entirely possible to assemble
strconst 'abcdef',3
so that the next assembler statement will assemble on top of the letters "def."
Early on I adopted the rule that, in any string operation, register DE would address the target string and register HL the source string. The original reason was to facilitate use of the Z80 string instructions. But the convention made for a convenient macro structure and didn't impose too many restrictions, so I carried it through the file macros and, suitably modified, into characters and integers.
Occasionally the rule got in the way. The strnull function is an example. This simple operation is closely related to declaring strings; it consists of jamming a null byte into some address. But the only way to do that without destroying register A or the flags is to use a mvi m,0 instruction. The address of the target string is wanted in register HL, but to let that show in the syntax of the macro would be inconsistent. The macro (Figure 14-3) shows the strain of the compromise, and I found myself ignoring the macro and simply coding the necessary store of a zero by hand.
STRNULL macro ?str
if not nul ?str
+unrel %?str
if (+Dupdate)
xchg
mvi m,0
xchg
else
push h
lxi h,?str
mvi m,0
pop h
endif
else
+++ string required as label or '+D'
endif
endm
Figure 14-3. The strnull macro makes a string null.
Now we will examine the fundamental manipulations on strings. At first glance there are six:
but that list is longer than it has to be. Some of those operations could be implemented in terms of others. Appending a string to another could be done in terms of appending a character to a string, for one example; for another, advancing to the end of a string is an automatic by-product of taking the length of a string. For the sake of performance, however, most of those operations should be implemented as separate functions.
One of them is definitely redundant, however. If we choose "replace a string with another" as a fundamental operation, then "append a string to another" can be done by advancing to the end of the other string and "replacing" its terminal null with the source string.
On the other hand, we could choose "append a string to another" as fundamental, in which case "replace a string with another" could be done by making the other string null, then appending to the now-null target string.
Which ought to be the fundamental operation and which the derived one? I chose to make "append" the primary function and to derive "replace" from it. It seemed to me that programs would do a lot more appending than replacing. I pictured a program setting up a null string, appending a constant, appending a converted number, appending another constant, and so forth until a complete line of output was ready.
If appending data is to be the fundamental operation then we ought to be consistent about it: whenever a function generates a string value, it ought to append it to its output target. If we mean that output to stand alone as a string, the target will have to be made null before the function is called.
You may think that this policy results in a lot of making-a-string-null operations, and it does. But consider the opposite policy, that any function that generates a string will replace its target with its output. That would result in a need to declare many, many little target strings and in the need for many, many append operations to pull these results together.
However, if generating functions are to append their output, each will have to begin operations by advancing to the end of its target string. That makes the speed of the strend function crucial to good performance.
The macro of strend is shown in Figure 14-4. The purpose of the function is to advance a pointer, and the pointer must (by convention) by register DE. That makes the macro unusual in that the only parameter that makes sense with it is +D or a label) would imply saving and restoring register DE, which would nullify the action of the function.
STREND macro ?str
if not nul ?str
+unrel %?str
if +Dupdate
extrn +STEND
call +STEND
else
+++ operand must be '+Dupdate'
endif
else
+++ operand required as '+Dupdate'
endif
endm
Figure 14-4. The strend macro makes no sense without a parameter of +Dupdate.
Now, what about making the function run quickly? There are two ways to advance DE to the end of a string. One is the short, simple loop
push psw
loop: ldax d
ora a
jrz atend
inx d
jmp loop
atend: pop psw
ret
The other is to use the Z80 string instruction cpir. It is designed to scan a series of bytes looking for a particular value. It seems made for this job -- scanning a sequence of bytes looking for a zero -- but it needs quite a bit of preparation. You can see how much by reading Figure 14-5. Not only is the preparation of registers lengthy, the instruction itself is not terribly fast. It consumes 21 machine cycles for every byte that does not match the comparand, and a final 16 cycles on the successful match.
name 'STREND'
public +STEND
+STEND:
push psw
ldax d
ora a ; already at the end?
jrz atend ; (yes, skip it)
push b
xra a ; zero comparand for CPIR
mov b,a
mov c,a ; count of 65,536 for CPIR
xchg ; CPIR uses HL
cpir
dcx h ; back up to the NUL we found
xchg ; string address back to DE
pop b
atend: pop psw
ret
Figure 14-5. The subroutine that implements strend.
The choice of methods is by no means obvious. Just looking at their code, it seems possible that the simple loop might run as fast or faster than the elaborate code of Figure 14-5 -- and it does, for some strings.
The choice was made on a quantitative basis. I counted the machine cycles each would use for a variety of string lengths, with these results:
| number of bytes preceding null | |||||||
| method | 0 | 1 | 2 | 4 | 8 | 16 | 32 |
| simple | 54 | 88 | 122 | 190 | 326 | 598 | 1142 |
| CPIR | 54 | 133 | 154 | 196 | 280 | 448 | 784 |
The simple loop runs faster on strings of one to four bytes. After that, the elaborate method passes it. When the string is 32 bytes long, the cpir method runs in 69% of the simple loop's time. That still wouldn't have been decisive but for two more considerations. It seemed to me that there was a good chance that the input pointer would already be at the end of the string. In that case, the two methods take the same amount of time. But when the string length wasn't zero, I thought it much more likely that the routine would have to traverse at least five bytes to find its end. That gave the nod to the code in Figure 14-5.
Finding the length of a string is almost the same thing as finding its end; it's just a matter of counting the non-null bytes while looking for the end. The strlen function was to return a 16-bit length in HL (no nonsense here about 255-byte strings!). It could be written this way.
push psw
lxi h,0
loop: ldax d
ora a
jrz atend
inx d
inx h
jmp loop
atend: pop psw
ret
Or it could use non-looping code as shown in Figure 14-6.
STRLEN macro ?str
+opwu ?str,D,address
extrn +STLEN
call +STLEN
+
endm
name 'STRLEN'
public +STLEN
+STLEN:
push psw
push b
xra a ; a zero for comparison
mov b,a
mov c,a ; initial count of zero in BC
xchg ; CPIR uses, increments, HL
cpir
dcx h ; back up to the NUL
xchg ; string address back to DE
mov a,b ! cma ! mov h,a
mov a,c ! cma ! mov l,a
pop b
pop psw
ret
Figure 14-6. The implementation of strlen.
The numbers worked out in favor of the longer routine again, as shown in t. The cpir instruction breaks even around the fourth byte and pulls ahead fast after that. It seemed to me that programs would take the length of strings of four or more bytes quite frequently.
| Number of bytes preceding null | |||||||
| method | 0 | 1 | 2 | 4 | 8 | 16 | 32 |
| simple | 64 | 104 | 144 | 224 | 384 | 704 | 1344 |
| CPIR | 118 | 139 | 160 | 202 | 286 | 454 | 790 |
The code in Figure 14-6 makes a reverse use of the registers changed by cpir. That instruction decrements BC and increments HL on every iteration, including the iteration that finds a match to register A. Preloading zero into BC gives the instruction a "repeat count" of 65,536. When the instruction finishes, it has decremented BC by one more than the number of bytes in the string, which makes BC the one's (not two's) complement of the string's length. Inverting the bits (but not adding 1) yields the string length.
Once strend existed, strput, the function of appending a byte to a string, was easy. Its code is shown in Figure 14-7. It is so short that it might be made into an all-macro function to be expanded in-line where needed. At the time I wrote it, however, I had the feeling that it would be used often to add a tab or a return to a string, or in a loop to pad a string with blanks, and so forth. Now I find that it is used much less often than I expected. When there's one byte to be appended to a string, there are usually several declared as a constant string, so strappnd is used instead.
STRPUT macro ?st1,?byte
+
+opca ?byte,constant,true
extrn +STPUT
call +STPUT
+
endm
name 'STRPUT'
extrn +STEND
public +STPUT
+STPUT:
call +STEND ; get to end of string
xchg
mov m,a ; append new byte
inx h
mvi m,0 ; append new NUL
xchg
ret
Figure 14-7. The implementation of strput.
The job of appending one string to another could of course be done a byte at a time using strput, but that would be slow indeed. The function is used so often that it deserves its own, optimized, implementation.
Once more there were two ways to do the same task, with and without the help of the Z80's string instructions. But this time the two loops looked almost identical. Here is the obvious code. Assume that strend has already been performed, so that register DE points to the null at the end of the target string.
loop: mov a,m
stax d
ora a
jrz atend
inx d
inx h
jmp loop
atend:
It simply copies the source string to the end of the target string until it has copied the null.
The Z80 instruction that copies bytes is ldir, but it can't be used here because it requires a count. (We could use strlen to count the bytes of the source string, but that would take too much time.) However, the ldi instruction does most of the work; it copies one byte and increments both DE and HL. Since it moves only one byte per execution, it can be used in a loop that tests the moved byte. The resulting code is shown in Figure 14-8.
STRAPPND macro ?st1,?st2
+
+
extrn +STAPP
call +STAPP
+
endm
name 'STRAPP'
extrn +STEND
public +STAPP
+STAPP:
call +string
push psw
push b
Loop:
mov a,m ; save byte about to be moved
ldi ; in C: *DE++ = *HL++; BC--
ora a ; did we just move the NUL?
jnz Loop ; ..no, carry on
dcx d
dcx h
pop b
pop psw
ret
Figure 14-8. The implementation of strappnd
Despite the similarity of the central loops, the counts of machine cycles for these methods work out in favor of the Z80 instruction. The comparison can be made as easily from a formula as from a table. The simple loop costs
61 + 47*N
machine cycles (where N is the number of bytes preceding the source null), while the ldi loop consumes
100 + 37*N
cycles. The second method incurs additional setup overhead, but works it off within five bytes and runs 20% faster thereafter. In a typical Z80 system, it copies 100,000 bytes per second!
Once strappnd exists, it is simple to implement strcopy as a macro that builds on it. The macro is shown in Figure 14-9.
STRCOPY macro ?st1,?st2
+
+
xchg
mvi m,0 ;; make first string null
xchg
extrn +STAPP
call +STAPP ;; append second to null first
+
endm
Figure 14-9. The strcopy function is merely a special case of strappnd.
I specified that the strcmp function would compare two strings and return the processor flags set as for the comparison of the first unequal bytes with register A containing the unequal byte from the first string. (While it's sometimes useful to get back the unequal byte, the real reason for returning it is that I didn't want the extra overhead of preserving the contents of A but not the flags.) The resulting implementation appears in Figure 14-10.
STRCMP macro ?st1,?st2
+
+
extrn +STCMP
call +STCMP
+
endm
name 'STRCMP'
public +STCMP
+STCMP:
Loop:
ldax d
cmp m
rnz
ora a
rz
inx d
inx h
jmp Loop
Figure 14-10. The implementation of strcmp, the function that compares strings.
String comparison is a function that is very heavily used in some applications, so it has to be as fast as possible. Once more there were two ways to do it, with and without the Z80's iterative-compare instruction cpi (or cmpi as it had to be called in the macro library, since to rmac, cpi means "compare immediate value").
This time, the numbers did not work out in favor of the string instruction. The toolkit code in Figure 14-10 uses approximately 50 machine cycles for each byte compared, while the best use of cmpi that I could devise used 57 cycles per byte. One reason is that the faster version needn't save register BC (which the Z80 instruction modifies), so it could use the conditional return instructions to both test its result and exit.
Time after time we write programs that must interpret user input, so time after time we face the same problem: given a word of text, is it a word that the program handles and, if so, which one? Our emit program was typical of the breed.
I've solved the problem in an ad hoc way on several occasions; on several others, daunted by its tedious difficulty, I've opted for a rigid, unfriendly input syntax just to simplify the program. No more, I decided; the toolkit must contain a generic solution to the problem.
That's the aim of the table lookup function. It has two parts, a pair of macros that make it easy to declare a table of constant strings and a function to look up an unknown string in a table. When the search succeeds, the value returned makes it easy to translate the string to an internal form.
A table of strings has a simple structure. It consists of a one-byte count of the entries, that many pointers to the comparison strings, and a final null byte. The initial count is used during lookup as a loop count. The final null is used as a default comparison string in case the programmer fails to define all the entries.
The strtable macro (Figure 14-11) initializes a table from its count. It assembles the count, the null, and between them the necessary number of string-pointers, all initialized to address the default null string. It also sets an assembler variable, +tabnext, to the address of the first pointer.
STRTABLE macro ?count
local tabend
tabend set $+(2*?count+1)
db ?count ;; number of entries
+tabnxt set $ ;; where next entry assembles
rept ?count ;; point all words to null string
dw tabend
endm
db 0 ;; null string at end of table
endm
Figure 14-11. The macro that sets up a string table.
The strentry macro (Figure 14-12) fills in one entry of the most recently-defined table. Like strconst, it assembles a string constant. But it also sends the assembler back to the table of string-pointers to assemble the address of the new constant. A series of strentry statements will thus fill in the table with the addresses of the component strings.
STRENTRY macro ?literal
local here
here set $
org +tabnxt ;; back into the table
dw here ;; make next entry point here
+tabnxt set $ ;; update next-entry addr
org here
db ?literal
db 0
endm
Figure 14-12. The macro that declares one table entry.
The strings needn't be adjacent to each other or the table. That's an important feature. The idea is that each entry may be followed by some value -- a byte, a word, anything -- that is to be related to that entry.
There are no safeguards in these macros, and perhaps there ought to be. As written, there is nothing to prevent you from defining more entries than the table can accomodate, with the result that entry addresses will be assembled outside the bounds of the table. The strtable macro could set an assembler variable to the count, and strentry could decrement it and test for this condition.
Since there is no requirement that table entries be ordered, the only kind of search that can be done is a sequential scan, comparing the unknown string to each entry in turn until a match is found or the count is exhausted. That is just what the strlook function does, as you can see from Figure 14-13. The macro allows the usual parameter variations, but the most useful one is the request for an updated result in HL,
lxi h,table
strlook string,+Hupdate
When register HL isn't updated, the function's only result is the setting of the Zero flag indicating whether a match was found. That may be the only result needed, but updating HL allows easy translation of the unknown string.
STRLOOK macro ?str,?tab
+
+
extrn +STLOK
call +STLOK
+
endm
name 'STRLOK'
extrn +STCMP
public +STLOK
+STLOK:
push b
mov b,m ; B gets the count of entries
push b ; (save that)
Loop:
inx h ; HL-+first/next entry-address
mov c,m ; address low byte
inx h
push h ; save half-way table pointer
mov h,m
mov l,c ; HL-+entry string
push d ; save comparison string
call +STCMP ; compare em
pop d ; recover comparison string
jrz Match ; (we have a hit)
pop h ; recover -+middle of this address
djnz Loop ; continue if more to do
; We have no match, and HL-+middle of last address in the
; table. Increment it, and return A=FF, Z false.
inx h
pop b ; discard saved count
ori 255 ; A=FF, Z false
pop b
ret
; We have a match. HL-+NUL at end of matching string. Set
; up A=index of matching entry and return Z true
Match:
mov a,b ; remaining loop count
pop b ; BC=garbage (stacked HL)
pop b ; B=original count
sub b ; A = -(entry index)
cma ! inr a ; complement that
cmp a ; force Z true
pop b
ret
end
Figure 14-13. The implementation of the table-lookup function.
The function always returns HL pointing to the terminal null of some string. If the search failed, it is the default null at the end of the table; if it succeeded, it is the null at the end of the matching entry. Incrementing the register then yields a pointer to whatever constant data might follow this null. The idea is to make that be the value of the matched string. If there is a default value, it may be assembled immediately after the strtable macro. When that's done, the success of the search is irrelevant; HL will always address something useful whether the input string was matched or not.
Here are some possibilities for the value of a string. In the emit program the value was a single byte, the character named by a command keyword. But it could have been a number signifying some action the program should take, or it might be the address of an external function to be called, or it might be a filespec string, the name, perhaps, of a file of menu or help text.
Or it might be the address of another table in which the following keyword should be looked up. For my own use I wrote a program that set the parameters of a serial port. It interpreted a command line like this:
A+protocol dtr high, rts low, bits 7, parity even
The command tokens were interpreted in pairs. A master table decoded the leading word of a pair and sent the program to a second table that listed the words that could follow each one. A match to "parity," for instance, directed the program to a table that decoded the words "even," "odd" and "none," while a match to "bits" led to a table that contained only the entries "7" and "8."
The functions we've seen so far ignore the contents of a string. The only byte-value they recognize is the terminating null; they aren't perturbed if the string contains control characters or non-ASCII values. Of course it is the contents of a string that we really care about, and they will usually be ASCII bytes amounting to words, numbers, and delimiters.
There is an endless variety of ways in which a string, considered as meaningful text, could be parsed, and any application that handles text will have to have its own special-purpose string parsing functions. However, the toolkit contains several functions for extracting numbers and two that address the isolation of words.
The strskip function takes care of a problem that arises often: advancing over whitespace characters to get to the next interesting byte. Like strend, its only purpose is to increment the string-pointer, so it, too, can accept only the +Dupdate parameter form. When it has advanced to a byte that is neither a blank or a tab, it returns that byte in register A for further inspection. Its simple implementation is shown in Figure 14-14.
STRSKIP macro ?str
if not nul ?str
+unrel %?str
if +Dupdate
extrn +STSKP
call +STSKP
else
+++ operand must be '+Dupdate'
endif
else
+++ operand required as '+Dupdate'
endif
endm
name 'STRSKP'
public +STSKP
+STSKP:
Loop:
ldax d
cpi AsciiBlank
jz step
cpi AsciiTAB
rnz
step: inx d
jmp Loop
Figure 14-14. The implementation of strskip.
After you've found a non-space, you usually want to isolate the text unit it heads for further processing. "Further processing" might mean looking it up in a table; for that, the text unit must be contained in a string of its own.
The straptxt function (Figure 14-15) is the simplest kind of unit-isolater possible. It takes characters from a source string and appends them to a target string until it reaches a delimiter (as defined by the delim? function). In other words, it copies a "token" in the same sense as the command-tail routines. Don't think of it as a way of isolating a "word"; it doesn't recognize English punctuation. Since it does recognize the comma as a delimiter, it could be used to dissect a list of items delimited by commas -- but each item might contain any other sort of special character.
STRAPTXT macro ?str,?txt
+opwu ?str,D,<target string>
+opwu ?txt,H,<source text>
extrn +STTXT
call +STTXT
+bakem <H,D>
endm
name 'STRTXT'
extrn +CKDLM
public +STTXT
+STTXT:
call +STEND ; get to end of string
Loop:
mov a,m ; is the next text byte
call +CKDLM ; ..a delimiter?
jz Done ; (yes, stop)
stax d ; no, copy it
inx d
inx h
jmp Loop
Done:
xchg
mvi m,0 ; install a new NUL
xchg
ret
Figure 14-15. The macro and module of straptxt.
It was clear from the beginning of the toolbox's design that, if it was to support the integer and character data types, it must also have some way to convert between them. The string data type was the proper middle ground. Any integer value can be represented as a sequence of digit characters, and what is a string but a sequence of characters? Therefore all numeric-conversion functions could use strings as either input or output.
It was while I was designing these routines that I devised a system of abbreviations for the names of all the conversion functions. Each one is named with two abbreviations, the type of its input first and its output second. The abbreviations are
Thus the routine that takes decimal digits from a string and yields a signed word is named stradsw; it means "from a string, take ASCII digits to make a signed word."
Let's examine the input functions, the ones that take a string of digits and return a binary number. All three input conversion routines follow the same pattern. They advance register DE over any whitespace (blank or tab) characters to a nonwhite byte. Beginning with that byte, they convert consecutive digit characters to a binary value in register HL. When they reach a nondigit, they return with that character in register A and the converted number in HL.
The routines are not protective; they lack the safeguards that you would expect in a high-level language. They might find no digits at all (the first nonwhite byte might be a nondigit, might even be the terminating null) in which case they simply return a zero result. To avoid mistakes from this cause, a careful programmer would use a character test to verify the presence of a digit before calling them.
Worse, the input routines make no tests for overflow. If they process a number that won't fit in a 16-bit word, they just lose the most significant bits of the result. This is not a problem so long as they process only numbers that were produced by another program. But when the numeric string comes from the user, there is a chance of a serious failure of communication -- the program may act on a number different from the one the user entered.
It would be possible (although not simple) to correct this flaw. An error signal would have to be defined that the conversion routines could return. The routines would have to be modified to spot impending overflow before it occurred, returning their binary result to that point and the error signal. One possible signal would be to return the Carry flag set and in register A the digit character that, had it been converted, would have caused overflow. Then one could write, for instance,
stradbw +D
jc error
That is not the case with the present routines, however. They are adequate for most uses as they stand, but you should keep their limits in mind.
The hex-input routine is the simplest, since it is so easy to convert hexadecimal digits to binary. After adjusting for the break between the digits 9 and A, it's just a matter of isolating the lower four bits and inserting them into the result. The code is shown in Figure 14-16.
STRAXBW macro ?str
+
extrn +STGXW
call +STGXW
+
endm
name 'STRGXW'
extrn +CKHEX
public +STGXW
+STGXW:
call +STSKP ; get over any blanks/tabs
lxi h,0 ; initialize result
Loop:
ldax d
call +CKHEX ; see if hex, and make uppercase if so
rnz ; not hex, time to stop
cpi 'A' ; separate 0..9 from A..F
jc isnum ; (is numeric digit)
sui 'A'-'9'-1 ; make A..F contiguous with digits
isnum: ani 0fh ; isolate binary value
dad h
dad h
dad h
dad h ; shift HL left by 4 bits
ora l
mov l,a ; and install new digit
inx d
jmp Loop
Figure 14-16. The ASCII-hex-to-binary-word function, straxbw.
Conversion of decimal digits to binary is only a little more difficult. The partial result must be multiplied by 10, not 16, to make room for the new digit's value. That value must be added into the result; it can't simply be inserted with a logical or. Aside from these differences, the code in Figure 14-17 is a clear parallel to that in Figure 14-16.
STRADBW macro ?str
+
extrn +STGBW
call +STGBW
+
endm
name 'STRGBW'
extrn +STSKP
public +STGBW
+STGBW:
call +STSKP ; get past whitespace
push b ; save work register
lxi h,0 ; clear cumulative result
Loop:
ldax d
cpi '9'+1
jnc done ; (greater than 9)
cpi '0'
jc done ; (less than 0)
sui '0' ; reduce to binary-coded decimal
mov b,h ! mov c,l ; copy the partial result
dad h
dad h ; result times 4
dad b ; result times 5
dad h ; result times 10
mov c,a
mvi b,0 ; BC=000d
dad b ; add in new digit
inx d
jmp Loop
done: pop b
ret
Figure 14-17. The ASCII-decimal-to-unsigned-binary function, stradbw.
As with arithmetic, so with input: once the unsigned function exists, the signed function is a simple cover over it. The stradsw function is displayed in Figure 14-18. It skips whitespace (for consistency with the other two functions) and saves what may be a sign character. After stradbw has performed the conversion, stradsw checks the sign character and, if it was minus, complements the result before returning.
name 'STRGSW'
extrn +CPLBW
public +STGSW
+STGSW:
call +STSKP ; skip any whitespace
push b ; save work register
ldax d
cpi '+' ; plus sign?
jz gotsign
cpi '-' ; or a minus?
jnz convert ; (no -- assume digit)
gotsign:
inx d ; step over +/- sign
convert:
mov b,a ; save sign(?) byte
call +STGBW ; convert following digits
mov c,a ; save byte that stopped scan
mov a,b ; recover sign(?)
cpi '-' ; if it was a minus,
cz +CPLBW ; ..complement the result
mov a,c ; reset A as for conversion
pop b
ret
Figure 14-18. The ASCII-decimal-to-signed-binary function, stradsw.
One advantage flows from the mindless simplicity of these routines -- they aren't fussy about input format. Stradsw will convert the string
- 000000000001
just as readily as it will a simple -1.
The numeric input conversions are only for binary words; there is no stradbb function to convert digits to a byte value. That's because the chances of overflow would be much greater. When a user's input is converted to a word, most too-large numbers can be trapped by testing the most significant byte of the converted word.
Output conversions (from binary to character) are another matter. A binary value can have only so many digits; there's no chance of output overflow. And we use integers of different precisions for definite reasons, so there should be output conversion routines for each precision.
Accordingly the toolkit contains output conversions for binary to decimal and binary to hexadecimal, each in versions for bytes, words, and longwords. The hexadecimal conversions are straightforward, but the decimal conversions were complicated by a useful extra feature.
Conversion of binary to hexadecimal characters is probably one of the first programming puzzles any assembly programmer tackles. Didn't you write a hex dump as one of your first assembly programs? The conversion isn't difficult, and once you have the code to convert a single byte, conversion of numbers of any size is just a matter of converting one byte after another.
That's the basis of the module shown in Figure 14-19. The only unusual thing in it is the conversion of one four-bit group to a character. That is done with one of the slickest and most cryptic Z80 code sequences I've ever encountered. The comments make a stab at explaining it.
STRBBAX macro ?str,?byte
+
+opca ?byte,constant,true
extrn +STPBX
call +STPBX
+
endm
STRBWAX macro ?str,?wrd
+
+opwr ?wrd,H,constant,true
extrn +STPWX
call +STPWX
+
endm
STRLWAX macro ?str,?lw
+
+,true
extrn +STPLX
call +STPLX
+
endm
name 'STRHEX'
extrn +STEND
; +string
public +STPBX
+STPBX:
push psw ; save caller's A
call +STEND ; get to end of string
call PutTwo ; add the two digits
; come here to finish up from all 3 routines
Exit: xra a
stax d ; terminate the string
pop psw
ret
; +string
public +STPBX
+STPWX:
push psw
call +STEND
mov a,h
call PutTwo ; append the high byte,
mov a,l
call PutTwo ; and the low byte
jr Exit
; +string
; A longword is stored with the least-significant byte at the
; first address, so we have to start with the fourth byte and
; work backwards. Then we have to advance HL by hand so that
; the +Hupdate notation will work as expected.
public +STPLX
+STPLX:
push psw
call +STEND
push b
lxi b,4
dad b ; HL points past the fourth byte
mov b,c ; B = loop count of 4
Loop:
dcx h ; point to next lower byte
mov a,m
call PutTwo ; convert it
djnz Loop
; here, HL is back to byte 0 of longword and BC=0004 again
dad b ; advance past longword
pop b
jr Exit
; PutTwo(A,DE): write 2 hex digits at DE++
PutTwo:
push psw ; save input byte
call hexleft ; get left digit
stax d ; ..and store it
inx d
pop psw ; value again
call hexright; get right digit
stax d ; ..and store it
inx d
ret
; The following cryptic code is taken from a column by W. Barden
; in the August, 1981 MICROCOMPUTING. The table on the right
; shows contents of A, Carry, and Auxiliary Carry during it.
hexleft:
rar ! rar ! rar ! rar
hexright: ; when 0..9: when A..F:
; ; A= Cy AxCy A= Cy AxCy
ani 0fh ; 00-09 0 0 0A-0F 0 0
adi 90h ; 90-99 0 0 9A-9F 0 1
daa ; 90-99 0 0 00-06 1 0
aci 40h ; D0-D9 0 0 41-47 0 0
daa ; 30-39 1 0 41-47 0 0
ret
Figure 14-19. The three macros and single module that implement binary-to-hex conversion.
Among the integer functions, a longword in storage is addressed by register BC. In the interface to strlwax, and in all the other functions that take a longword as input, the source longword is addressed by register HL. This inconsistency between the two groups of functions is a pity, and not absolutely necessary. In the integer functions, register BC is the only one free to point to a longword (DE and HL must contain the other longword). In all other functions, HL is free for the purpose. Using it instead of BC permits the use of the update notation +Hupdate. That can be useful; it is possible to have a table of longwords and to process them all against a function, with the function call advancing the pointer automatically. Ironically, in this routine it works out that HL is not naturally incremented to the end of the input word as part of the processing; it has to be advanced there artificially.
I studied the binary-to-decimal conversions for some time and wrote several trial routines. Eventually two things became clear. All three conversions (from byte, word, and longword) would convert first to binary-coded decimal (BCD), and only thence to decimal characters. Second, it would be very useful if the word and longword conversion functions would take a Pascal-like field-size parameter. This parameter, as in Pascal, would specify the minimum width of the converted number. If conversion generated more digits it would produce all of them, but if it generated fewer it would fill out the field on the left with blanks. The field-size parameter makes it very easy to produce columnar displays -- it is quite difficult to produce even columns when the length of a converted number is unknown.
With those requirements in mind it became clear that the conversion from BCD to character and the handling of the field size could be done in a common module. The conversion modules would be responsible for converting their particular size of binary number to BCD. They would pass the BCD bytes and the field size to the common module and it would generate the character output.
The common routine would share several parameters with several other modules, so I established a common data area in which these items could be passed. This common area is shown in Figure 14-20. Imagine it as being included in all the modules that follow.
common /+10WRK/
fieldsize ds 1 ; requested field width
signbyte ds 1 ; appropriate sign character
bcdcount ds 1 ; number of bcd BYTES (digits/2)
stringadr ds 2 ; address of string to append on
bcd ds 5 ; room for 10 bcd digits
Figure 14-20. The definition of the common storage shared by the decimal-output functions.
The common routine is shown in Figure 14-21. It receives the values noted in Figure 14-20. The most important is the array of BCD digits. If a byte is being converted, there will be three digits in two bytes. For a word there will be five, held in three bytes. When a longword is being converted, there may be as many as ten BCD digits. The field-size value may be zero; zero is the default and causes the field to be exactly as large as required. On the other hand, the requested field size may be as large as 255; the conversion routines don't care. When we look at the file-output analogues of these routines we will find a case where the field size could cause a problem.
name 'STRPND'
dseg
ascii ds 11 ; 10-digit number plus sign
cseg
extrn +STEND
public +STPND
+STPND:
; Start by noting the count of bcd bytes (in B) and the count
; of raw ascii digits -- twice the number of bytes -- in C.
lda bcdcount
mov b,a
add a
mov c,a
; Unpack the bcd digits to ascii ones, working backwards thru
; the bcd and ascii areas, from least-significant to most.
; The Z80 instruction "RRD (HL)" allows us to move successive
; bcd digits into the low-order nybble of reg A.
lxi d,ascii+10 ; low-order ascii digit
lxi h,bcd+4 ; low-order bcd byte
mvi a,'0' ; set high nybble of a digit
L001:
rrd m ; low digit into A
stax d ! dcx d ; ..stored
rrd m ; high digit to A
stax d ! dcx d ; ..stored
; one more "rrd" here would restore the bcd field
dcx h ; back up to next bcd byte
djnz L001
inx d ; DE+last-stored digit
xchg ; make that HL
; HL+the leftmost of [C] digits. Scan off the leading zeros
; but if the number is all-zero don't blank the last one.
mov b,c
dcr b ; (don't blank last byte)
mvi a,'0' ; A = comparand '0'
L002:
cmp m ; still zero?
jrnz X002 ; (no, stop)
mvi m,AsciiBlank ; yes, blank it
inx h
djnz L002
X002: inr b ; correct count of digits
; HL+the leftmost of [B] significant digits. Back up once
; more and install the sign.
dcx h
lda signbyte
mov m,a
inr b ; count the sign
; HL+the leftmost of [B] necessary characters. Get ready to
; append them to the string.
lded stringadr
call +nul at end of string
mov c,b
mvi b,0 ; BC=000n, length of number
; If the field-size is less than or equal to the actual size
; we will append just the number. If it is greater, we have
; to append some padding blanks first.
lda fieldsize
sub c ; A=fieldsize less number size
jrc X003 ; (number bigger than field)
jrz X003 ; (number equals field)
mov b,a ; B=count of padding bytes
mvi a,AsciiBlank ; A=pad character
L003:
stax d
inx d
djnz L003
X003:
; Ok, the padding is on, BC=000n the length of the number,
; DE+first byte of number.
; Attach the number to the string and tack on a new NUL.
ldir ; leaves DE pointing to
xra a ; byte after last one
stax d ; moved: where nul goes
ret
Figure 14-21. STRPND, the common last step of decimal conversion.
The required field is one larger than the number of digits. Every converted number will be preceded by a sign character, blank for a positive number and a hyphen for a negative one. This wasn't a comfortable decision to make. There is a precedent in the action of most BASIC and Pascal implementations. But there are arguments in favor of treating the sign character as optional, producing one only when it is nonblank (i.e. a minus).
The central loop in Figure 14-21 is the conversion of BCD digits to decimal characters. It uses the Z80's rrd instruction; it was designed for exactly this use.
The implementation of strbbad, the byte-to-decimal conversion function, is shown in Figure 14-22. This function does not take an explicit field size, largely because both it and the number to be converted would, by the macro parameter conventions, have to be passed in register A. That didn't seem like much of a restriction. The display of a byte value is likely to be a casual part of a message, not part of a columnar table, and if control of the field width is essential, the byte can be loaded into register HL for output with word conversion.
name 'STRPBB'
extrn +STPND
public +STPBB
+STPBB:
push psw
push b
push h
mov h,a ; save the byte to convert
mvi a,0
sta fieldsize ; set default fieldsize
mvi a,AsciiBlank
sta signbyte ; set sign character
mvi a,2
sta bcdcount ; we build 2 bytes of bcd
sded stringadr ; save address of string
mvi b,8 ; 8 bits to convert
lxi d,0 ; carry bcd digits in DE
Loop:
dad h ; next binary digit to carry
mov a,e
adc a ; double and add new bit
daa ; keep it bcd
mov e,a
mov a,d ; propogate decimal carry
adc a ; ..to next digit
daa
mov d,a
djnz Loop ; repeat for all bits
lxi h,bcd+4 ; HL+least significant bcd byte
mov m,e ; store BCD in proper order
dcx h ; ..for STRPND
mov m,d
call +STPND ; finish the job
pop h
pop b
pop psw
ret
Figure 14-22. The implementation of strbbad, conversion of a byte to decimal.
The method of converting binary to BCD is interesting. At first sight the code may seem opaque. As you begin to grasp it, it will seem as tricky and inscrutable as the hex conversion in Figure 14-19. It is neither. In fact, this code is merely the reverse of the simple decimal-to-binary algorithm shown in Figure 14-17.
That routine gets from decimal to binary by multiplying a binary product by ten, then adding the value of the next decimal digit. Just so, this routine gets from binary to decimal by multiplying a decimal product by two, then adding the value of the next binary digit. There is an exact parallel, but it is disguised by the instructions used.
In Figure 14-22, the decimal (actually BCD) product is multiplied by two, and the value of the binary digit is added to it, all in a single adc a instruction. That adds register A to itself plus the carry flag, which contains the next binary digit. The following daa instruction keeps the result in BCD form. The developing product occupies two bytes, so any carry out of the lower byte is propogated to the higher byte by the same process.
The conversion of a word to BCD is almost exactly the same as the conversion of a byte. The only difference is that there are five digits in the BCD product rather than three. The implementation of the strbwad and strswad functions is shown in Figure 14-23. As usual, the routine for signed words is simply a cover on the unsigned version: it can treat a positive number as unsigned; for a negative one it must ensure a minus sign character in the display and then convert the absolute value of the number.
STRBWAD macro ?str,?wrd,?len
+
+opwr ?wrd,H,constant,true
+opca ?len,fieldsize,true
extrn +STPBW
call +STPBW
+
endm
name 'STRPBW'
extrn +CPLBW
; +STPSW(A,DE,HL): convert signed word to decimal --
; if HL positive, treat as unsigned
; if HL negative, convert absolute value with minus sign
public +STPSW
+STPSW:
push psw
push b
push h
sta fieldsize ; unload the fieldsize now
mov a,h ! ora a ; check the sign..
jp X002 ; (positive, treat as unsigned)
call +CPLBW ; complement the binary value
mvi a,'-' ; and use minus sign
jr X003 ; (join common code)
public +STPBW
+STPBW:
push psw
push b
push h
sta fieldsize ; set fieldsize
X002: mvi a,AsciiBlank
X003: sta signbyte ; set sign character
mvi a,3
sta bcdcount ; we make 3 bytes of bcd
sded stringadr ; save string address
mvi b,16 ; 16 bits to convert
lxi d,0
mov c,d ; carry bcd product in C,D,E
Loop:
dad h ; next bit to carry
mov a,e! adc a! daa! mov e,a ; double bcd number, adding bit
mov a,d! adc a! daa! mov d,a
mov a,c! adc a! daa! mov c,a
djnz Loop
lxi h,bcd+4 ; low-order bcd byte
mov m,e ! dcx h
mov m,d ! dcx h
mov m,c ; all 3 stored
call +STPND ; convert to ascii and append
pop h
pop b
pop psw
ret
Figure 14-23. The functions that convert signed and unsigned words to decimal (the strswad macro is almost identical to strbwad).
I chose to convert a longword using the same process carried to extremes. The maximum (unsigned) value of a 32-bit word is decimal 4,294,967,295 -- ten digits. The BCD algorithm will convert it, but as implemented it takes nearly 9,000 machine cycles, or more than two milliseconds of CPU time. Aside from reading a file, it's the slowest operation in the toolkit. Even so, a program that displayed a stream of maximal longwords could still produce output at nearly 5000 digits (500, ten-digit numbers) a second.
In the code (Figure 14-24) you will notice two points at which the assembler's rept command has been used to generate a sequence of identical instructions. These sequences could have been written as loops, but then they would have had the overhead of loop-control jumps. "Unrolling" the loops spends 29 bytes of object code to gain a small amount of time.
If a longword never contained more than 28 significant bits, it could be converted by a simpler method. The maximum 28-bit number is decimal 268,435,456. If that is divided by 10,000 (using divlwbw), both the quotient and remainder fit in a 16-bit word. The remainder is the binary value of the four low-order decimal digits, and the quotient, the five high-order digits. These words could then be converted to decimal and their digits concatenated. Although that method might come out faster, it would be complicated. Besides, it wouldn't be right to put an arbitrary limit on the precision of a longword.
STRLWAD macro ?str,?lw,?len
+
+,true
+opca ?len,fieldsize,true
extrn +STPLW
call +STPLW
+
endm
name 'STRPLW'
extrn +STPND
public +STPLW
+STPLW
push psw
push b
push h
sta fieldsize ; set fieldsize
mvi a,AsciiBlank
sta signbyte ; set sign character
mvi a,5
sta bcdcount ; we make 5 bcd bytes
sded stringadr ; save string address
; Get a copy of the longword -- we have to shift it bit by
; bit, which would ruin the input copy.
lxi b,4
lxi d,binary
ldir
; Clear the 5 bcd bytes to zero. There's 0000 in BC now.
mov h,b ! mov l,c
shld bcd
shld bcd+2
shld bcd+3
mvi b,32 ; 32 bits to convert
Loop:
; Shift the longword left one bit, the high-order bit going to
; the carry flag. The Z80 instruction "RL (HL)" allows doing
; that directly in storage. The REPT macro is used to unroll
; what could be a loop for speed at the cost of storage.
lxi h,binary
rept 4
ralr m
inx h
endm
; Double the 10-digit bcd number, adding the bit now in carry.
; The bcd number is stored most-significant byte first.
lxi h,bcd+4
rept 5
mov a,m
adc a
daa
mov m,a
dcx h
endm
djnz Loop
call +STPND ; finish the job
pop h
pop b
pop psw
ret
Figure 14-24. The implementation of strlwad.
The file is the fourth data type that the toolkit implements; it's an abstract representation of the CP/M file system. Its design aimed at providing a simpler, more general way to do input and output than CP/M permits, while still permitting any file operation that CP/M can do. It will take three chapters to describe how it was done. In this one we will concentrate on how files are declared and how input and output are done. In the following two we will see how CP/M operations are used to implement file operations. Because of its bulk, only sample sections of the code will be shown.
An abstract file is represented in storage as a cluster of data items. These items are organized as a data structure, the File Control Record or FCR. An FCR is initially assembled by the filedef macro; thereafter it is the primary input to any file operation.
All toolkit functions receive the address of an FCR in register DE, but most of them immediately load that address into Z80 index register IX so that they can access its fields directly. The FCR is defined by a set of equates, each relating a name to an offset in the FCR and thus to a displacement from register IX. This definition is held in a macro library, fcr.lib. Its contents are shown in Figure 15-1.
FcrFcb equ 00h ; the CP/M FCB is first
FcrDrive equ 00h ; drive code
FcrName equ 01h ; filename, 8 bytes
FcrType equ 09h ; filetype, 3 bytes
FcrExtent equ 0Ch ; extent number in filespec
FcrS1 equ 0Dh ; Bdos: bytes in last record
FcrS2 equ 0Eh ; Bdos: extent number overflow
FcrCount equ 0Fh ; Bdos: count of records
FcrDatamap equ 10h ; Bdos: map of allocated data
FcrCurrec equ 20h ; current record in extent
FcrRRA equ 21h ; relative record address
; (end of FCB) The flags are set at file-open time
FcrFlags equ 24h ; flag byte:
FcrNotEof equ Bit7 ; 1=input ok / not eof yet
FcrOutput equ Bit6 ; 1=output ok
FcrLastCR equ Bit5 ; 1=LF trap for text input
FcrDisk equ Bit4 ; 1=is disk / not device
; these bits apply only to disk files
FcrBaktype equ Bit3 ; 1=workfile, rename at close
FcrDirty equ Bit2 ; 1=buffer needs writing
FcrNoPosn equ Bit1 ; 1=FCB file position wrong
; these bits apply only to device files
FcrCon equ Bit2
FcrLst equ Bit1
FcrAux equ Bit0
; Error codes are stored here prior to an abort
FcrRetcode equ 25h
; These words are used for buffer management
FcrBufsize equ 26h ; size of buffer (word)
FcrBufadr equ 28h ; address of buffer (word)
FcrBufptr equ 2Ah ; offset of next byte (word)
FcrBufeod equ 2Ch ; length of valid data
FcrReclen equ 2Eh ; direct files - record length
; For a device file, bytes 30-31 hold Bdos service numbers
; and bytes 32-3F are reserved
FcrBdosIn equ 30h ; Bdos number for byte in
FcrBdosOut equ 31h ; Bdos number for byte out
; For a disk file: byte 30 stores the byte used to fill the
; last 128-byte record of the file,
FcrFillByte equ 30h
; bytes 31-33 hold the desired type of an output file built
; as "name.$$$"
FcrOtype equ 31h
; bytes 34-3B hold the file password and byte 3C is used for
; the password mode when a file is made. Bytes 3D-3F reserved.
FcrPassword equ 34h
FcrPMmake equ 3Ch
FcrLength equ 40h ; 64 bytes total
Figure 15-1. The definition of a File Control Record (fcr.lib).
All file operations revolve around the FCR. Most file functions open by loading its address into IX with these instructions.
push d
xtix
The address of the given FCR is put on the stack, then swapped with the contents of IX. That preserves the caller's IX and loads IX with the address of the FCR. Then the function can do things like
ldx c,FcrBdosIn
to load a byte from the FCR into register C, or
bitx FcrDisk,FcrFlags
jz isdevice
to test a flag-bit, or
ldbwx d,FcrBufAdr
to load a word from the FCR into register DE. (The synthetic instruction ldbwx was described in chapter 11.)
When a file function has done its work, it restores IX and DE with the inverse operation of
xtix
pop d
That restores the entry value of IX, stacks the address of the FCR, and pops that address back into register DE.
The first field of the FCR is a CP/M File Control Block (FCB), a 35-byte structure that is passed to the BDOS for any CP/M file operation. Without the toolkit or something like it, a program that works with files would have to prepare and manipulate an FCB for each file. One aim of the toolkit's design was to remove all knowledge of the FCB from application programs. That was achieved except for three operations. There are no toolkit functions to erase a file, to rename one, or to do a global directory search. For those operations your code must still manipulate the FCB directly and issue its own BDOS calls. However, you may use the FCB contained in an FCR for such work. Then you may still apply toolkit functions like fassign to it.
The single most important field of the FCR is the Flags byte. Its bits reflect the present status of the file. Their meanings are such that a value of binary 0 means "don't," so that an uninitialized FCR permits no effective operations.
The NotEof bit is the one most often tested. It is set to 1 when a file is in a state that permits input. This is the source of the convention that Zero true after an input function means end of file -- the Zero flag can be set by testing NotEof on the way out of a function. NotEof is 0 in an unopened file, in a file opened to a device like LST: that doesn't permit input, and in a disk file that is has been read to its end or positioned over nonexistent data.
The Output bit is set to 1 when a file permits output. It is 0 in an unopened file, in a file that stands for a device like RDR: that can't do output, and in disk file that can't be written to.
The Disk bit is 1 in a file that represents a disk file, 0 in one that stands for a device. The Disk bit also determines the format of the remainder of the FCR. When it is 0, the remaining flag bits specify which of CP/M's three devices this is, and the rest of the FCR only holds the BDOS service request numbers that are used for input and output to that device. When Disk is 1, the file is a disk file, the other flag bits stand for conditions of a disk file, and the rest of the FCR has fields used in opening and managing disk files.
The LastCr bit is used during ASCII byte input to ensure that the input functions present a line-end byte (CR) before they present end of file. It is set to 1 when the file is opened, whenever a CR is read with fgetchar, and when the file is repositioned with fseek. If it is 1 when fgetchar sees end of file, that function returns its eof signal at once. If not, it returns a phony CR first to close the last line.
Any open file owns a buffer, a block of storage in which data are collected before transfer to or from the file. The only device to make use of the buffer is CON:; it uses the file buffer to read an edited line from the keyboard during an fgetstr operation. Other kinds of device file, and CON: files under other operations, make no use of the buffer. However, buffer management is a crucially important part of operations on a disk file.
Four words in the FCR govern the management of the buffer. Bufsize specifies the size of the buffer. It is assembled into the FCR from the first parameter of the filedef macro. The macro, as we will see, ensures that Bufsize is a multiple of 128 (the CP/M record size) and that it is less than 32 Kb (so there are no more than 255 records of 128 bytes in it). Bufadr holds the buffer's address after one has been acquired (the buffer is allocated dynamically when a file is first opened).
Bufptr holds the offset into the buffer of the next byte to be read or written. During output, if Bufptr comes to equal Bufsize, the buffer is full and must be dumped to disk before output can proceed.
Bufeod contains the count of valid data bytes in the buffer. It is always a multiple of 128. During input, if Bufptr comes to equal Bufeod, the buffer is empty and must be loaded with new data before input can continue. During output, Bufeod is maintained as the next multiple of 128 greater than or equal to Bufptr. When the buffer is written to disk, Bufeod/128 records are written.
The filedef macro is designed to assemble an FCR with minimum effort. Its rather complex code is shown in Figure 15-2. It opens with a set of nested if statements to check the buffer size and ensure that it is a multiple of 128. Then it assembles the FCR with a default filespec and that buffer size. Finally it tests its four optional parameters -- the four parts of a filespec -- and, when one is present, sends the assembler back to assemble it into the proper field.
FILEDEF macro ?size,?drive,?name,?type,?pass
local here,size,there,drive
if not nul ?size
if ?size lt 128
+++ buffer size set to 128
size set 128
else
if ?size gt 07F80h
+++ buffer size is limited to 32,640
size set 32640
else
size set (?size+127) and 07F80h
endif
endif
else
size set 128
+++ buffer size assumed as 128
endif
here equ $
db 0 ;; drivecode
db ' ' ;; filename
db ' ' ;; filetype
db 0,0,0,0
dw 0,0,0,0,0,0,0,0 ;; the fcb datamap
db 0,0,0,0 ;; cr, record address
db 0,0 ;; flags, retcode
dw size ;; buffer size
dw 0,0,0 ;; bufadr, -ptr, -eod
dw 128 ;; direct reclen
ds 4 ;; bytes 30-33 set by open
db ' ' ;; bytes 34-3B=blank passwd
ds 4 ;; reserved
there equ $
if not nul ?drive
drive set '&?drive'
if (drive ge 'A') and (drive le 'P')
org here
db drive-'A'+1
else
+++ drive must be single letter between A and P
exitm
endif
endif
if not nul ?name
org here+1
db '&?name'
endif
if not nul ?type
org here+9
db '&?type'
endif
if not nul ?pass
org here+38h
db '&?pass'
endif
org there
endm
Figure 15-2. The code of the filedef macro.
An FCR assembled by filedef isn't ready for use. Usually a filespec must be installed in it by fassign. A buffer must be allocated to it, the FCB must be initialized by CP/M, and the flags must be set. These things are done by the file-open functions such as freset. We'll look at them in the next chapter. A program may attempt I/O to an unopened file, but the zeros in the NotEof and Output bits will prevent any action.
I wanted a program to be able to do all of its input and output through abstract files. But if filedef were the only way to build an FCR, all files would have to be opened before use. That seemed needlessly restrictive for device files, especially console files. It ought to be possible to give a static declaration of a console, print, or auxiliary device and use the file at once.
That's the purpose of the confile macro and its friends. The code of confile is shown in Figure 15-3. As you can see, it assembles an FCR with a 128-byte buffer and a filespec of CON:. It also assembles space for that buffer. It moves back into the filedef to assemble the flags permitting input and output and the contents of Bufadr. In short, it does what freset would do, but does it at assembly time. At the cost of an extra 128 bytes in the data segment, a program may do console input and output without opening the file.
CONFILE macro
local here,there
here set $
filedef 128,,CON:
there set $
org here+24h;; flags
db 11000100b ;; input, output, device, con
org here+28h;; bufadr
dw there
org here+30h;; bdos ops
db 1,2 ;; ..input, output
org there
ds 128 ;; buffer
endm
Figure 15-3. The confile macro assembles a filedef and a buffer for console operations.
When a console file is used only for output, no buffer is needed. Nor is one needed for any other device. The msgfile macro (Figure 15-4) assembles an output-only console file, ready to use. The lstfile and auxfile macros are similar. Since they assemble no buffers, they don't inflate the size of the program's data segment.
MSGFILE macro
local here,there
here set $
filedef 128,,CON:
there set $
org here+24h;; flags
db 01000100b ;; output, device, con
org here+30h;; bdos ops
db 1,2 ;; ..input, output
org there
endm
Figure 15-4. The msgfile macro assembles a filedef for console output. The lstfile and auxfile macros are similar.
Two of the file functions are implemented as macros that test bits in the FCR flag byte. The frdonly? macro generates an in-line test of the Output flag, while the fdevice? macro generates a test of the Disk flag. The macros have the names they do since they end up setting the Zero flag true when the file is read-only or a device, respectively. The code of these macros is shown in Figure 15-5.
+bitst macro ?file,?bit
+opwr ?file,D,file,true
push h
lxi h,36
dad d ;; HL-+FcrFlags
mov a,m
ani ?bit
pop h
+
endm
FRDONLY? macro ?file
+bitst ?file,20h
endm
FDEVICE? macro ?file
+bitst ?file,40h
endm
Figure 15-5. The macro-only functions that test FCR flag-bits.
The toolkit contains thirteen file-output functions, but they all come down to the same thing: write one or more bytes to a file. There are just three toolkit modules that do that. One writes a single byte, the second a block of bytes, and the third a string. The names and organization of these modules, and the macros that call them, are shown in Figure 15-6.
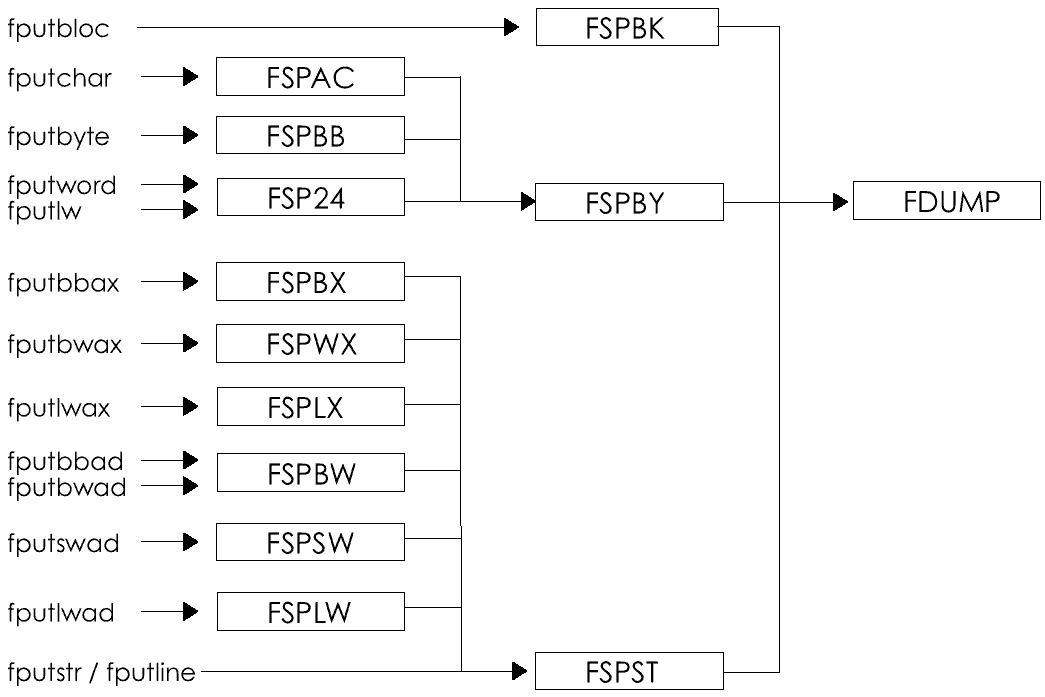
Figure 15-6. The relationship of output macros and modules. All output comes down to module fdump.
The module that writes a single byte is fspby (for sequential put of a byte); its code is shown in Figure 15-7. It is an internal subroutine of the output functions. When it receives control, register IX has already been set to address the FCR.
name 'FSPBY'
extrn +BDOS
public +FSPBY
+FSPBY:
push h
push d
push psw
bitx FcrOutput,FcrFlags ; output allowed?
jrz exit ; (no)
bitx FcrDisk,FcrFlags ; disk, or device?
jrz isdevice ; (device)
; The buffer-pointer has the offset to the next output byte. If
; it isn't less than the buffer size we have to dump the buffer.
; That resets Bufptr to zero.
ldbwx d,FcrBufptr
ldbwx h,FcrBufsize
ora a
dsbc d ; flags := (HL := size-ptr)
jnz roomenuf ; (ptr is less, carry on)
call +FDUMP ; dump and advance buffer
xchg ; DE=new bufptr of zero
; the new byte may now go at Buffer[DE=Bufptr]
roomenuf:
pop psw ; recover byte to write
push psw ; ..but save caller's flags
ldbwx h,FcrBufadr
dad d ; HL-+Buffer[Bufptr]
mov m,a ; deposit byte in buffer
inx d ; increment the bufptr
stbwx d,FcrBufptr ; ..and store it
bsetx FcrDirty,FcrFlags ; buffer is dirty now
; If Bufptr has gotten beyond Bufeod, that byte started a new
; record. In that case we have to fill out the rest of the
; record with fill bytes and advance Bufeod to its end.
ldbwx h,FcrBufeod
ora a
dsbc d ; bufeod - bufptr
cc +FRFIL ; fill record if eod less
exit: pop psw
pop d
pop h
ret
; the file represents an output device. Write the byte by
; calling the Bdos for the appropriate service.
isdevice:
push b
mov e,a ; byte to be written
ldx c,FcrBdosOut ; Bdos output request number
call +BDOS ; ..writes the byte
pop b
jr exit
Figure 15-7. Internal subroutine fspby writes one byte to any file.
Its first test is, does this file allow output? If not, it exits at once without doing anything. This ensures that it won't try to write into the nonexistent buffer of an unopened file. (It also gives a 50-50 chance that, if the program passed garbage instead of an FCR, nothing bad will happen.)
The next test separates device and disk files. Follow the branch to the label isdevice at the end of the module. Output to a CP/M device is a matter of putting the correct BDOS service number in register C, the byte in register E, and calling the BDOS. The call to the BDOS could be made in the usual CP/M way, by calling address 5h. Instead, it is made by way of the label +BDOS that is defined in every main program by the prolog macro (as we saw in chapter 11). That ensures that the index registers will be preserved over the BDOS call.
Now read through the steps of writing to a disk file. The first step is to make sure that there is room for a byte in the file's buffer. If there is not, a routine called fdump will write the present buffer to disk and reset the Bufptr and Bufeod values to zero. We will examine fdump in chapter 17.
Once it knows there is room in the buffer, the module deposits the byte there. It increments Bufptr, and sets the flag that says the buffer contains modified data.
Finally, it tests to see if Bufptr has overrun Bufeod. If it has, the byte just written is the first of a new record of 128 bytes. The routine named frfil has the job of filling out that new record and setting Bufeod to the next 128-byte boundary. That ensures that the buffer can be written to disk at any time, whether or not it is full, with a full complement of valid records.
It is possible to write faster CP/M disk-output routines. This one consumes about 440 machine cycles for each of the 127 bytes out of 128 that start neither a record nor a new buffer. Its maximum data-transfer rate is thus well under 10 kilobytes per second even before the overhead of disk output is accounted for. This is the penalty that must be paid for generality. The logical tests are necessary if all functions are to be supported; the buffer size and pointer must be kept as words if buffers of any size are to be allowed; and so forth.
Now let's see how the internal subroutine is used. When a program uses the fputbyte macro, control passes to its supporting module, fspbb. Both are shown in Figure 15-8. The module is nothing more than an interface to the code in Figure 15-7.
FPUTBYTE macro ?file,?byte
+opwr ?file,D,file,true
+opca ?byte,constant,true
extrn +FSPBB
call +FSPBB
+
endm
name 'FSPBB'
extrn +FSPBY
public +FSPBB
+FSPBB:
push d
xtix
call +FSPBY
xtix
pop d
ret
Figure 15-8. The implementation of the fputbyte function.
A slightly more complicated interface is required to write an ASCII byte. That function is called fputchar. Its macro is nearly identical to fputbyte's; the module's code is shown in Figure 15-9. Fputchar is a text, or ASCII, operation. When you treat a file as text, the toolkit collapses the CR-LF byte pair that end a line into a single CR byte, and expands it again on output. Thus the implementation of fputchar checks to see if it has written a CR; if so, it adds a linefeed.
name 'FSPAC'
extrn +FSPBY
public +FSPAC
+FSPAC:
push d
xtix
call +FSPBY
cpi AsciiCR
jnz exit
push psw
mvi a,AsciiLF
call +FSPBY
pop psw
exit: xtix
pop d
ret
Figure 15-9. The implementation of fputchar must expand a CR byte into the CR-LF pair.
It takes a long time, in machine terms, to write a single byte. The fputblok function was added to the toolkit to provide a faster means of output. It is not as convenient or as flexible as other output functions, but when the application permits its use, it is much faster.
The parameters of the fputblok function were deliberately arranged to mimic the operands of the Z80's ldir macro: register BC contains a count, register DE addresses the destination (a file), and register HL addresses the source (a block of bytes). It is, in effect, a block-move to a file.
The implementation of fputblok appears in Figure 15-10. The portion that writes a block to a device file has been omitted; it simply calls the BDOS as many times as specified by register BC.
name 'FSPBK'
extrn +BDOS
public +FSPBK
+FSPBK:
push psw ; save psw
push b ; ..and BC
push d
xtix ; base the FCR
bitx FcrOutput,FcrFlags ; can it do output?
jz exit ; nah, ferget it
mov a,b ! ora c ; is the count + 0?
jz exit ; no, don't write 65KB
bitx FcrDisk,FcrFlags ; is it a disk?
jnz isdisk ; yes, yes, get on with it
; For device output we just do repetitive Bdos output calls.
devloop:
(omitted for brevity)
; In disk output we have four values to juggle:
; the count of bytes remaining to be written
; the address of the next source byte
; the address of the next buffer byte
; the count of free bytes left in the buffer.
; That is one more word than we have registers for, but not to
; worry. Thanks to the XTHL instruction, we can keep a word
; on top of the stack and have it nearly as accessible. What
; we will now set up is
; BC=count to go
; DE-+next buffer byte
; HL-+next source byte
; top of stack = count left in buffer
; In the loop, the last two values will alternate positions
; as each is needed in HL.
isdisk:
push h ; save initial source addr
ldbwx d,FcrBufptr
ldbwx h,FcrBufsize
ora a
dsbc d ; HL=space left in buffer
xthl ; stack that, HL-+source
push h ; re-save source address
ldbwx h,FcrBufadr
dad d
xchg ; DE-+next buffer byte
pop h ; HL-+next source byte
Loop:
xthl ; HL=space left in buffer
mov a,h ! ora l ; is it zero?
jnz roomenuf ; (no)
; We have filled the file buffer and have to dump it. Before
; doing so we have to set things up the way they would be after
; as many calls to FSPBY: FcrDirty true and FcrBufeod equal to
; the size of the buffer. After the dump, we have to reset our
; target to the buffer's address and our count to its size.
ldbwx h,FcrBufsize ; HL=space in buffer later
stbwx h,FcrBufeod ; ..and data in buffer now
bsetx FcrDirty,FcrFlags ; buffer is (probly) dirty
call +FDUMP
ldbwx d,FcrBufadr ; DE-+next buffer byte
roomenuf:
dcx h ; count down one buffer byte
xthl ; stack it, HL-+source byte
ldi ; copy from H to D reducing B
jpe Loop ; continue while BC+0
; The data have been moved. Now we have to reconstruct the
; proper value of FcrBufptr and FcrBufeod. We also mark the
; buffer dirty, since we definitely changed it since it was
; last written.
pop d ; DE=space left (and stk clear)
push h ; save updated source addr
ldbwx h,FcrBufsize
ora a
dsbc d ; size - unused gives pointer
stbwx h,FcrBufptr
xchg
ldbwx h,FcrBufeod ; check: did we write past eod?
dsbc d
cc +FRFIL ; if so, fill out new record
bsetx FcrDirty,FcrFlags
; Restore the registers and exit.
pop h ; HL = updated source address
exit:
xtix
pop d
pop b
pop psw
ret
Figure 15-10. The implementation of fputblok is complicated in the name of speed.
The disk-output portion of the module is the second most complicated assembly code in the entire toolkit. The bulk of it is occupied with setting up the machine registers before, and cleaning up the FCR after, its central loop. When it finally gets into that loop, it moves bytes at a rate of 88 machine cycles each (ignoring the times when the buffer fills up), five times the speed of one-byte output. The larger the file buffer, and the larger the block it is asked to write on each call, the closer its true average speed will approach this ideal.
The fputblok function is limited to writing binary data; it pays no attention to the content of the data. There is one more opportunity to accelerate output: the string. The fputstr function is given a block of data to write. The block's length isn't known in advance, but its end is marked by a null byte. The implementation of fputstr takes advantage of this to speed up the transfer.
One way to implement a fast string transfer would be to take the length of the string with strlen, then use fputblok to write it as a block. However, a string is supposed to contain ASCII bytes, so fputstr is an ASCII transfer. Although unlikely, it is not impossible that the string will contain CR bytes, and they must be expanded to CR-LF pairs. That precludes using fputblok. Still, string output is a common operation, and it deserves a fast implementation.
The implementation is shown in Figure 15-11. Like Figure 15-10, it opens with tests for output permission and null input. Then it splits device and disk output. The device support is not shown; it merely calls the BDOS for each byte in the string.
name 'FSPST'
extrn +BDOS
public +FSPST
+FSPST:
push psw
push b
push d
xtix
bitx FcrOutput,FcrFlags ; can it do output?
jz exit ; (no)
mov a,m
ora a ; is the string null?
jz exit ; (yes)
bitx FcrDisk,FcrFlags ; is it a disk?
jrnz isdisk ; yes, yes, move it.
; For a device, we just make repetitive calls on the Bdos.
devloop:
(omitted for brevity)
; For disk output the process is similar to that of +FSPBK
; except that, since the string is delimited, we don't have to
; worry about counting data bytes -- only buffer bytes. We will
; keep the count of buffer space in BC and the buffer address
; in DE. When the buffer fills up, we have to call +FDUMP and
; reconstruct those two values.
isdisk:
push h ; save string addr a mo.
ldbwx d,FcrBufptr ; count of bytes now in buffer
ldbwx h,FcrBufsize ; total space in buffer
dsbc d ; HL=space left in buffer
mov b,h ! mov c,l ; put that in BC
ldbwx h,FcrBufadr
dad d ; HL-+next byte in buffer
xchg ; put that in DE
pop h ; HL-+string
diskloop:
call checkbfr ; make sure we have room
mov a,m ; pick the byte up
stax d ! inx d ! dcx b ; and store it
cpi AsciiCR ; was it a CR?
jnz disknotlf ; (no, continue)
call checkbfr ; ensure room for LF
mvi a,AsciiLF
stax d ! inx d ! dcx b ; and put one in
disknotlf:
inx h ; now the next byte
mov a,m ! ora a ; might be the end
jnz diskloop ; (no, continue)
; Adjust the file buffer-pointer to account for what we did.
push h ; save updated string-ptr
ldbwx h,FcrBufSize ; buffer size..
dsbc b ; less buffer space remaining
stbwx h,FcrBufptr ; is new Bufptr (carry clear)
xchg ; save it in DE
ldbwx h,FcrBufeod ; if we wrote past eod,
dsbc d ; (if bufptr + bufeod)
cc +FRFIL ; ..fill out new record
pop h ; recover string-ptr
bsetx FcrDirty,FcrFlags ; buffer now dirty
exit:
xtix
pop d
pop b
pop psw
ret
; This subroutine tests the buffer and, if it is full, dumps
; it and resets BC (room left) and DE (next output byte).
; It's a subroutine because it may have to be done twice for
; a byte (CR and again for LF).
checkbfr:
mov a,b ! ora c ; have we filled the buffer?
rnz ; (no)
ldbwx b,FcrBufsize ; yes, set data quantity for
stbwx b,FcrBufeod ; the buffer-dumper
bsetx FcrDirty,FcrFlags ; ensure buffer marked
call +FDUMP ; clear the buffer
ldbwx d,FcrBufadr ; BC=size of bfr, DE-+1st byte
ret
Figure 15-11. The implementation of fputstr also sacrifices clarity to speed.
The disk output code was derived from that of Figure 15-10, but the need to check for CR bytes complicated matters. The amount of space in the buffer had to be checked twice within the loop, so the test was moved to a subroutine. The same necessity made it awkward to use the ldi instruction. Even so, the central loop moves most bytes in about 110 machine cycles.
The complexity of this code is justified by its frequency of use. Not only is fputstr a commonly-used output function in its own right, it is also used by many of the derived output functions we'll examine next.
The remaining output functions take a binary value, convert it to ASCII characters, and write the characters. They have names that echo the string conversion functions, and for good reason -- they take the same parameters and do the same jobs, but with files, not strings, as the destination of their output.
Let the fputbwad function stand for all of them. Its implementation is shown in Figure 15-12. It condenses the operation of strbwad (convert a word to decimal) and fputstr into a single function. The common area it uses for building its string is a scratch area of 128 bytes that is used by several file functions. Since it is only 128 bytes long, the module must guard against a numeric field-width greater than 127. The strbwad function will convert a number into a field as wide as 255 bytes, but the file function restricts it to 127.
name 'FSPBW'
common /fswork/
; common work area for file operations
workstr ds 128 ; room for 127-byte string
cseg
extrn +FSPST
public +FSPBW
+FSPBW:
push h ; preserve HL for exit
push d ; preserve file address
push h ; save HL for conversion
cpi 128 ; ensure field-width will fit our
jc lenok ; work-string -- no fields over 127
mvi a,127
lenok: lxi h,workstr
mvi m,0 ; make null string
xchg ; DE-+null string
pop h ; HL=word to convert
call +STPBW ; convert word to string
pop d ; DE-+file
lxi h,workstr ; HL-+string to write
call +FSPST ; write it
pop h ; restore entry HL
ret
Figure 15-12. The implementation of fputbwad fronts for strbwad and fputstr.
The toolkit contains nine functions that read data, but they all come down to the same thing: read one or more bytes from a file. As with output, there are just three modules that do that. One reads a single byte, one a block of bytes, and one a string. The organization of macros and modules is shown in Figure 15-13.
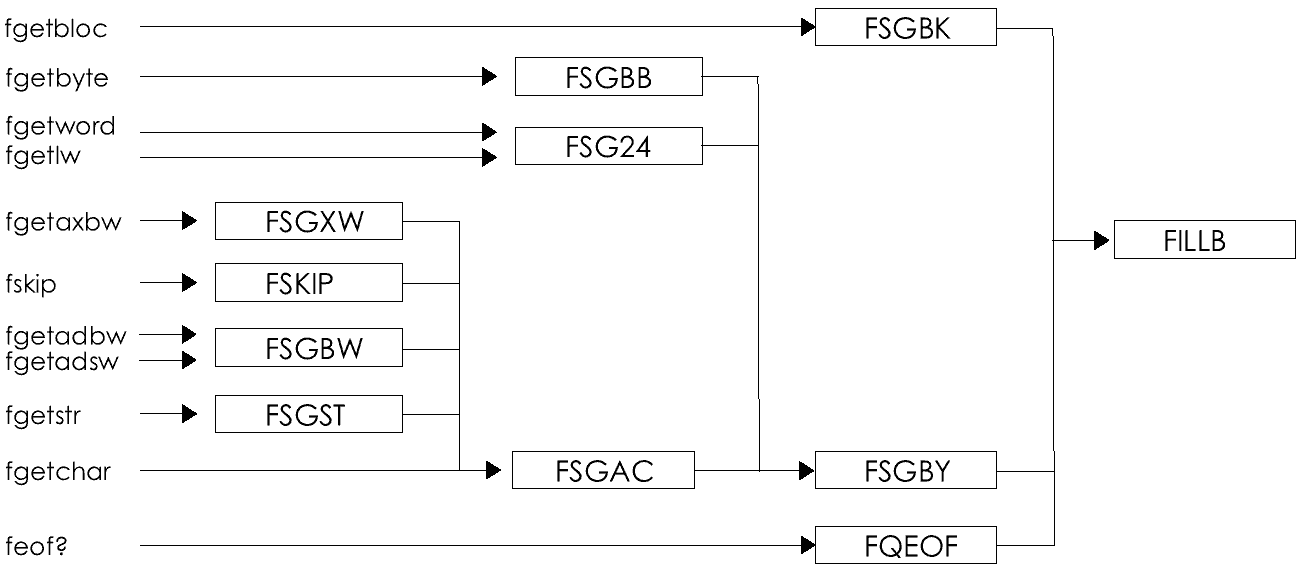
Figure 15-13. The organization of input macros and modules. It all comes down to fillb.
The module that reads a single byte is fsgby (for sequential get of a byte); its code is shown in Figure 15-14. It is an internal subroutine; when it is called, the address of an FCR has already been loaded into register IX. Compare its code to Figure 15-7. Both the similarities and the differences are revealing.
name 'FSGBY'
extrn +BDOS
public +FSGBY
+FSGBY:
bitx FcrNotEof,FcrFlags ; is there any input data?
rz ; (no, quit)
push d
push h
bitx FcrDisk,FcrFlags ; disk, or device?
jrz isdevice
; A disk file. Load up the buffer pointer into DE. If that is
; not less than the size of valid data, we have load the buffer.
ldbwx d,FcrBufptr
ldbwx h,FcrBufeod
ora a
dsbc d ; flags := (HL := data left)
jnz havedata
call +FILLB ; fills buffer, resets bufptr
xchg ; (DE=new bufptr of zero)
bitx FcrNotEof,FcrFlags ; now end of file?
jrz exit ; (yes, quit)
; The byte we need is Buffer[Bufptr]. Compute its address and
; move it. Then increment the buffer pointer.
havedata:
ldbwx h,FcrBufadr
dad d ; HL-+ Buffer[Bufptr]
mov a,m ; got the byte
inx d
stbwx d,FcrBufptr ; save incremented pointer
; for either device or disk files, set Z false (by testing the
; NotEof bit) and exit.
exit: pop h
pop d
bitx FcrNotEof,FcrFlags
ret
; This is a device file. Get one byte by calling the Bdos with
; the appropriate function code. NB: output-only devices have
; NotEof false, so they never get this far.
isdevice:
push b
ldx c,FcrBdosIn ; appropriate input request
call +BDOS ; ..gets a byte
pop b
cpi AsciiCR ; got a CR?
jnz exit ; (no, all done)
bitx FcrCon,FcrFlags ; from the keyboard?
jz exit ; (no, all done)
push psw ; yes, save gotten byte
push b ; ..and other regs
mvi c,2 ; (BdosType)
mvi e,AsciiLF ; ..and echo LF for the CR
call +BDOS
pop b
pop psw ; recover gotten byte
jmp exit ; (and exit)
Figure 15-14. The internal subroutine that returns the next byte from a file.
Like its output counterpart, fsgby begins by testing its file to see if its operation is possible. However, this module (like all input modules) is specified to return the Zero flag true if (and only if) no data remains. It tests the NotEof flag. That sets Zero true if the file can't do input for any reason, and allows an instant return with Zero set appropriately. If the file isn't open, or is incapable of input, or is a disk file that has been read to physical end of file, any attempt to read will result in this return.
The module then separates disk and device files. Follow the branch to the label isdevice at the end of the code. Getting a byte from a device is a matter of calling the BDOS with the appropriate service request number.
When I first tested this code with the CON: device, I discovered that when the BDOS reads a CR from the console, it only echoes that byte to the screen -- it doesn't echo a linefeed to match it. If a program used fgetbyte to read from the console, the operator would see all input lines overtyped on the same screen line. The obvious solution was to tell the programmer to write a linefeed after reading a CR from the console. But the programmer can't know; the filespec CON: can be assigned to any file. The toolkit has to take care of it, and this is the place it is done.
Now follow the disk-input path through the module. It is similar to Figure 15-7, but where that code uses Bufsize as a limit, this uses Bufeod. Bufeod is set to the amount of valid data now in the buffer. That may be less than the size of the buffer when the last load of data in the file doesn't fill the buffer.
If Bufptr is equal to Bufeod, it is time to get a fresh load of data from the disk. The routine fillb has that job; it reads data into the buffer and resets Bufptr and Bufeod. We will examine it in chapter 17. For now it is enough to say that it is the routine that will actually discover physical end of file, and will signal it by setting the NotEof flag false (zero). This module ends by setting the Zero flag from that flag bit just before it restores the registers.
In designing the toolkit, I paid special attention to input from text files. The needs of application programs and the conventions of CP/M combine to create a complicated set of requirements. I decided that, when reading ASCII text,
The first requirement, a single byte to stand for end of line, simplifies text processing immensely. The only question is, which byte should that be? The choice lies between the carriage return (CR) and the linefeed (LF). In AT&T's popular UNIX operating system, the standard line-end byte is linefeed (LF). Thanks to Microsoft BASIC, however, LF is an ambiguous byte in CP/M files. Microsoft's BASIC writes program source files in which the LF appears within text lines (it means "break the line on the screen but don't end the source line"). Only CR is an unambiguous line-end signal in a CP/M file. Furthermore, the console keyboard returns only one byte at end of line, usually the CR (do you ever press the linefeed key to mean end of line?).
The second feature, that a non-empty file will always end in a complete line, simplifies the logic of processing text files. It guarantees that end of file can only be detected immediately following end of line. It is very rare for a text file to end in an unterminated line, but it does happen. Programs that don't allow for it will almost always crash when it happens. I wanted the toolkit to provide the protection.
The third requirement also simplifies a program's logic. A CP/M text file may have valid data right up to physical end of file, or it may end with a control-Z character prior to the last byte. I wanted the toolkit to compress these two indications into one, the Zero flag. The toolkit would also have to make sure that, if the program tried to read past the logical end of file signal, it would get repeated EOF signals and not garbage data.
A program that doesn't want all this protection is free to use the fgetbyte function. Its trivial code appears in Figure 15-15. As a simple interface to the code of Figure 15-14 it allows reading anything. The only value it adds is that it ensures a null byte in register A when there is not data.
name 'FSGBB'
extrn +FSGBY
public +FSGBB
+FSGBB:
push d ; stack -+FCR
xtix ; save IX, IX-+FCR
call +FSGBY
xtix ; restore IX, stack -+FCR
pop d ; restore DE
rnz ; if not eof, exit w/ Z false
xra a ; when eof, force A=NUL
ret
Figure 15-15. The fgetbyte function is simply an interface to Figure 15-14.
Programs that want simplicity in text processing will use fgetchar, the ASCII input routine. Its implementation, shown in Figure 15-16, is not so simple. It could be easier to read than it is; I folded and squeezed the code to make it as fast as possible for the normal case while accounting for all the pathological ones. The normal case is a byte that is neither a CR nor an end of file signal. For such bytes, the execution path through Figure 15-16 is just 13 instructions long (plus the code in Figure 15-14). Follow it and see.
name 'FSGAC'
extrn +FSGBY
conbit equ 1 shl FcrCon
conmask equ (1 shl FcrDisk)+conbit
public +FSGAC
+FSGAC:
push d
xtix
; Try to get the next byte. If there is one, go examine it.
call +FSGBY ; next physical byte
jnz NotEofYet
; There wasn't one. Create a ^Z byte for our caller, and go
; check for a properly-terminated Ascii file.
mvi a,CpmEof ; make logical eof signal
jmp checklastcr
; There was a next byte. If it is logical end of file, we
; must decrement the file buffer pointer so that repeated
; calls will not overrun a single ^Z.
NotEofYet:
cpi CpmEof ; logical eof?
jnz NotEof ; (not yet)
call backptr ; back up Bufptr
; Logical or physical eof has been seen. If the previous
; byte was a CR, then this is a well-made Ascii file; we can
; exit with the logical eof byte in A.
checklastcr:
bitx FcrLastCR,FcrFlags ; last byte a CR?
jnz exit ; (yes)
; This supposedly-Ascii file ends with an incomplete line.
; Fake a CR and return it. We'll see logical or physical
; eof again next time around.
mvi a,AsciiCR ; fake a CR to end file
bsetx FcrLastCR,FcrFlags
jmp exit
; We are not at end of file, either logical or physical. Clear
; the LastCR flag and, if this really isn't a CR, exit. (It's
; faster to do it that way, since CRs are a minority.)
NotEof:
bresx FcrLastCr,FcrFlags
cpi AsciiCR
jnz exit
; We have read a CR. Note that, in case end of file follows it.
; If this file is the keyboard, the CR comes alone. For others,
; the next byte is 99.9% surely a linefeed, so read it and if it
; is, discard it. Should it prove not to be a LF, back up the
; buffer pointer so we will get it next time -- unless this CR
; was exactly the last byte of the file, in which case don't.
bsetx FcrLastCR,FcrFlags
ldx a,FcrFlags
ani conmask ; isolate Disk, Con
cpi conbit ; if not-Disk and Con
jrz noway ; ..no LF will follow
call +FSGBY ; else get the next byte
jrz noway ; (CR was physical last of file)
cpi AsciiLF ; was next byte LF (bet it is)
noway: mvi a,AsciiCR ; (restore present CR)
cnz backptr ; if not, restore it
; Restore the registers and set Z to reflect end of file.
exit: xtix
pop d
cpi CpmEof
ret
; The backing up the buffer pointer, needed twice above, is
; here in a subroutine to save 7 bytes (whoopee)
backptr:
ldbwx d,FcrBufptr
dcx d
stbwx d,FcrBufptr
ret
Figure 15-16. The code behind fgetchar is complicated by the many rules of ASCII input.
There are three special cases to deal with. The first is the CR byte. When one appears, the module must do two things: discard the LF that probably (but not certainly!) follows it, and set the LastCR flag so that, if end of file appears on the next call, it will know that the file ended in a complete line. A complicating factor is that, if the file is really the console device, there won't be a following LF. The test for the console is that the Disk flag is false and the Con flag is true. Both bits must be checked; note the way this is done in one instruction.
The second case is physical end of file, signalled by fsgby's returning Zero true. This is easily converted into a logical end of file.
The third special case is the logical end of file, including converted physical end of file. Here the module must check that the previous line was properly terminated. If it was not (if LastCR is not true), the module generates a phony CR for the program to read. It will receive the end of file signal next time it calls.
As with output, the code for reading a single byte is relatively slow. The fgetblok function was added to provide a speedy way to read a block of data. Its code is too long to show here. The module is a close parallel to Figure 15-10; it uses the registers in a similar way, including the trick of keeping one variable on the stack for access with the xthl instruction and the use of ldi to transfer each byte.
Also like the output functions, there is a special input module to read a string of bytes from a file. For input, a string is equated to a text line; that is, to read a string is to read up to the next line-end and format the result as a string. This function is also too lengthy to display in full, but we will look at one unusual part of it.
The fgetstr code opens by checking for several mistakes. It is passed a limiting count in register BC. If that count is zero, nothing can be done. If it is only 1, nothing can be returned but a null string. The same is true if NotEof is false. After these possibilities have been eliminated the module get down to business. It splits the file into two cases: the console, and all other files. Unfortunately, I couldn't come up with a counterpart to the fast string-output routine shown in Figure 15-11. The complexities of ASCII input are such that the only practical thing to do for either a disk or the AUX device was to loop, calling Figure 15-16 until it returned end of file or end of line or until the count was exhausted.
Something special was in store for the case of line input from the console, however. It was my plan to implement this special case using CP/M's line-input service. This BDOS function lets the operator type a line using all the normal editing control characters. It would be a perfect match to the toolkit function for reading a line, and to provide this BDOS feature as a natural extension of file input would be very elegant. I felt very clever to have thought of it.
Or did, until I sat down to write the code. Although the feature is just as useful as I thought it would be, it turned out to be quite tedious to implement. The code is shown in Figure 15-17.
CON:
; We have to tell the Bdos how many bytes to read. The maximum
; is 255. We want to tell it the lesser of: the string-size,
; the file's buffer-size, and 255.
push b ; save string count
push h ; save string address
ldbwx h,FcrBufsize
dcx h ; allow for 2 bytes of
dcx h ; Bdos parameters
push h ; save buffer size
ora a ; (clear carry)
dsbc b ; HL = bufsize - string size
pop h ; (recover buffer size)
jrc useHL ; bufsize + count, use bufsize
mov h,b ! mov l,c ; count += bufsize, use count
useHL:
mov a,h ! ora a ; if result + 255,
jrz underFF ; (isn't)
mvi l,255 ; use just 255.
underFF:
; Ok, we have in L the number of bytes we can let the Bdos
; read for us. Prepare a Bdos line buffer in the file buffer.
ldbwx d,FcrBufadr ; DE-+file buffer
mov a,l
stax d ; set max size for Bdos
push d ; save buffer address
; Read an edited line and, when we get control back, echo
; a CR and LF to the console.
mvi c,BdosLineIn
call +BDOS ; read edited line
lxi d,crlf
mvi c,BdosString
call +BDOS ; write cr, lf
; The buffer contains (length) (count received) data...
; Our job now is to copy that to the string space. However,
; to be true to our definition of an Ascii file, we have to
; examine each byte for CpmEof. If one appears, we have to
; break off copying at that point.
pop h ; HL-+buffer
pop d ; DE-+string space
inx h ; HL-+count of received bytes
mov a,m ! ora a ; guard against null line
jrz nulline ; (yes, just a return)
mov b,a ; set loop-limit
mvi c,0 ; initial count of bytes moved
inx h ; HL-+first data byte
copy:
mov a,m ! inx h
cpi CpmEof ; look for eof in typed data
jrz hiteof ; ..and break off if found
stax d ! inx d ; store gotten byte
inr c ; count byte moved
djnz copy ; and repeat till done
nulline:
mvi a,AsciiCR ; fake the ending return
hiteof:
pop h ; HL=size of string space
mvi b,0 ; BC=count of bytes received
ora a
dsbc b ; HL=residual count
mov b,h ! mov c,l ; BC=residual count
xchg ; HL-+byte after the last one
ret ; all done
Figure 15-17. It was a major task to implement edited line input as feature of fgetstr.
The first problem it faces is that it must deal with three storage limits. CP/M won't read a line longer than 255 bytes. The module must build the CP/M line buffer within the file's buffer space, which might be 128 bytes, or 256, or more. And the output must fit in the string space the program provided. Its length is in register BC and might be anything from 2 to 65,535. The minimum of these three lengths must be selected and passed to CP/M as the first byte of the line buffer.
After CP/M has completed its work the module's has only begun. CP/M will have ended the input operation when the user typed either a CR or an LF, but it will have echoed only whichever byte it got. The module makes sure the cursor has been properly returned by writing both a CR and an LF to the console.
Then it has to copy the received line -- which may have zero length -- to the caller's string space. But the user might have typed a control-Z. If so, it will usually be the first byte of the input, but it doesn't have to be. The code must inspect every byte and break the string off short if a control-Z turns up. Finally, the actual count must be set and, since this function is specified to return in register A the byte that stopped the input, the ending CR that CP/M didn't give us must be prepared -- provided no control-Z was found.
Regardless of the method it uses for input, fgetstr ends by setting the LastCr flag true if the terminating byte was a CR. All told it was the most difficult function to design and code. Fortunately it has proven both reliable and useful.
The toolkit contains three input functions that convert from character to binary. They bear names consistent with their string counterparts: fgetadbw, fgetadsw, and fgetaxbw. However, they do not call on those string functions. Instead, they read a byte at a time using fgetchar and perform the conversion from character to binary as they go.
The fgetaxbw function is representative. Its code appears in Figure 15-18. Its logic is a close parallel to that of straxbw, with ASCII file input replacing the input string and the code of fskip replacing that of strskip.
name 'FSGXW'
extrn +CKHEX
public +FSGXW
+FSGXW:
call +FSKIP ; skip whitespace, return 1st nonwhite
lxi h,0 ; initialize result
rz ; quit with that, if eof.
Loop:
call +CKHEX ; see if hex, and make uppercase if so
jnz exit ; not hex, time to stop
cpi 'A' ; separate 0..9 from A..F
jc isnum ; (is numeric digit)
sui 'A'-'9'-1 ; make A..F contiguous with digits
isnum: ani 0fh ; isolate binary value
dad h
dad h
dad h
dad h ; shift HL left by 4 bits
ora l
mov l,a ; and install new digit
call +FSGAC ; read next digit (?)
jnz Loop ; ..and continue if not eof
exit: cpi CpmEof ; set Z true if end of file
ret
Figure 15-18. The code behind fgetaxbw is typical of the functions that do input with conversion.
A file is defined by a single data structure, the FCR, and all file operations are based on easy access to the FCR they were passed. It would be simply impossible to organize code this way without the Z80's index registers. With it, it becomes possible to write a variety of input and output functions, some flexible and others fast.
It would have been possible to funnel all output through the single module fspby. Block- and string-output modules were added only for speed; still all disk output does funnel down to one function, fdump. In the same way, all input could have funnelled through fsgby, but a block-input module was added for speed and a string-input one to obtain the special function of edited console input. Again, all the disk-input operations eventually come down to one function, fillb.
In the concluding chapter we will make the remarkable discovery that fillb and fdump are different names for the same thing! Before that we must look at how an FCR is prepared and how special control functions are done
We have seen how input and output are done. But the file must be opened before they can be allowed, and when output is finished, the file must be closed. These are the main topics of this chapter. We will also look at directory search and the setting of file attributes.
Let us begin with operations on filespecs. One of the most tedious things about working directly with CP/M's File Control Blocks is the installation of filespecs in them. The natural form of a filespec is text, with its parts run together and punctuated. In the FCB the parts are set in fixed-length fields with no punctuation (and a password is kept altogether apart from the FCB).
If you limit a command to just two operands, both filespecs, CP/M will prepare those filespecs as FCBs in low storage. That's no help with other arrangements of operands, nor with filespecs that come from the keyboard or a file.
I wanted to be able to treat a filespec as a simple string, to assign it to a file with a single operation, to reconstruct the filespec from a file again, and finally to be able to set or retrieve individual parts of a filespec. I knew from experience that these abilities would make working with files much easier. Since command operands were saved as strings, since strings could be read from files, and since messages could be constructed from strings, it seemed likely that reducing filespecs to strings as well would produce a synergistic effect that went beyond the sum of its parts. And so it has proved.
Just two functions were needed. The first is the now-familiar fassign. It takes a file, a string, and pattern of four bits; it returns the file updated with new filespec parts according to the bit pattern. Normally the bit pattern is 01111b, meaning that all four parts are to be set up. The fassign macro, shown in Figure 16-1, sets this as the default.
FASSIGN macro ?file,?string,?default,?parts
+opwr ?file,D,file,true
+opwu ?string,H,string
if not nul ?default
+,true
else
+opwr 0,B,,true
endif
if not nul ?parts
+,false
else
mvi a,01111b ;; do all parts of spec
endif
extrn +FASGN
call +FASGN
+
endm
Figure 16-1. The fassign macro prepares register arguments for its module.
The function has one other feature, the assignment of the missing parts of a filespec from a default. The default filespec is provided by a previously-assigned file. The macro sets a default signal of zero if none is named.
The assembly code that implements fassign is lengthy but not particular clever, complicated, or interesting, so it is not shown here. It opens by using strskip to get past any whitespace in the string. Then it selects from a series of subroutines using code like this:
mov c,a ; save bitmap in c
rarr c ; next bit to carry
cc dodrive ; assign drive if wanted
rarr c
cc doname ; assign name if wanted
and so forth. Each subroutine takes its part of a filespec from the string and puts it in the FCR, advancing the string pointer. Each stops copying when it reaches a filespec delimiter (as defined by the fdelim? function) and fills its field with spaces. The routines for filename and filetype also cope with asterisks -- filling the rest of the field with question marks -- and with question marks themselves. When these appear, a flag is set so that the function can return "?" in register A.
Each routine ends by checking to see if it has reached a filespec delimiter in the input string. If it has not, its part was too long, and it declares an error. All scanning breaks off, and the function returns its error signal: "!" in register A and the Zero flag true.
At the end, the default file is processed by copying its filespec fields into the target FCR where necessary. This is done only when several conditions are met. It is skipped if there is no default file, of course. It is also skipped if there were any errors or if the input bit-map was not 01111b. And it is skipped if the fourth byte of the output filename is a colon. This strange condition was added because without it, a valid device filespec like LST: could be converted into an invalid disk filespec like B:LST:.DOC.
The CP/M Plus operating system supports a similar function as a BDOS call. The toolkit would have needed its own assignment function just to support CP/M 2.2, but the version it contains goes well beyond the CP/M Plus operation. That doesn't return any indication of an ambiguous filespec (essential to avoid errors), nor does it support assignment of only a part of a filespec (very useful for forcing a certain filetype). And it puts the password in a part of the FCB where it will be wiped out when the file is opened, whereas the toolkit needs the password later in some cases.
The fgetspec function is the inverse of fassign, converting the fixed format of an assigned filespec back to text form, adding the punctuation, and appending it to a string. Like fassign it takes a bit pattern and returns only the indicated parts; thus a program can extract only the drivecode, or only the filetype, as a string. Also like fassign its lengthy code is not interesting enough to show here. The only special case it must be aware of is the possibility that the letters of a filespec might contain attribute bits. When an FCB is processed by the BDOS, either to open it or as the result of a directory search, the most significant bits of certain filespec letters can be set to 1 to indicate the attributes of the file. The fgetspec function is careful to clear these so that its output string is valid ASCII.
However, these file attributes are sometimes important. The read-only attribute is an important input to the file-open routines, as we'll see, but there are six others. Since the toolkit aimed to remove knowledge of the FCB's structure from application programs, it had to provide some CP/M-independent way of getting and setting these bits.
That way is implemented as the fgetattr and fsetattr functions. The first collects all file attributes into a single byte, the second takes a byte and distributes its bits into a file as attributes. The bits are defined in environ.lib as shown in Figure 16-2.
FileAttF1 equ 40h ; bits for encoding a file
FileAttF2 equ 20h ; attribute mask in a
FileAttF3 equ 10h ; single byte -- four user
FileAttF4 equ 08h ; attributes from filename
FileAttRO equ 04h ; and three attributes in
FileAttSY equ 02h ; the filetype.
FileAttAR equ 01h
Figure 16-2. The attributes of a file, as encoded into a single byte.
This encoding allows you to examine all the attribute bits at once, or to set them all at once with a single operation. For example, a file could be made read-only with only three statements:
fgetattr file
ori FileAttRO
fsetattr file
Of course, fgetattr can only work when the attribute bits have been set in the FCB by a CP/M operation. Opening a file sets them, and they are present in the files returned by the directory search functions.
The fputattr function has two tasks. It must first distribute the bits into the filespec bytes of the FCB. Then it must issue the BDOS service request to set those attributes in the disk directory.
Under CP/M Plus, setting the attributes of a password-protected file requires a password. Before calling the BDOS, fputattr points to the password field of the FCR in hopes that the correct password is there. It will be, if the file was assigned by fassign from a string that contained the password. But it might or might not be, if the filespec was assigned by the directory-search operations. This is only the first of many password problems we will encounter.
Since we've mentioned it, let's look at the directory search functions. They are designed so as to translate a basic CP/M operation into the terms of the file abstract type. In the BDOS's operation, the input is an FCB. The BDOS searches a disk directory for the first or next file that matches. If one is found, it returns a 128-byte record from the directory. This contains four directory entries; the number of the matching entry, from 0 to 3, is returned in register A.
To make this valuable function available through the toolkit, I specified that the search would take an argument FCR and return an updated target FCR. Within the search routine the FCB at the head of the argument file becomes the input to the BDOS. The matching directory entry is copied into the target file's FCB (directory entries are laid out exactly like FCBs). This removes all the mess of dealing with CP/M to the domain of the toolkit. The input is an abstract file (which may have been set up with fassign), as is the output, so it may at once be put to use with freset or fgetattr. This sort of "orthogonality" of design came to seem more important and useful as the toolkit grew, and I revised modules several times to increase it.
Enough discussion; it's time we read some more code. The implementation of the directory-search functions appears in Figure 16-3. Notice how it carries forward the file password of the argument into the target. The password doesn't participate in the search; it is only copied in the hope that the correct password for the target was initially assigned to the argument.
name 'FDIRS'
common /FSWORK/
; work area shared with the decimal-output modules
workstr ds 128 ; used as buffer for file search
dseg
arg dw 0 ; save -+argument FCR
targ dw 0 ; save -+target FCR
cseg
extrn +BDOS
public +FDIR2
; The only difference between the two entries is in the number
; of the Bdos service request they issue.
+FDIR1:
push b ; save work register
mvi c,BdosSrch1 ; set service number
jr mutual
+FDIR2:
push b
mvi c,BdosSrchn
mutual:
push b ; save Bdos number for later
shld targ ; save -+target FCR
xchg
shld arg ; and -+argument FCR
; For this module's specified purposes we can't allow the
; global directory search, which returns every kind of entry
; including the disk label, password records, and timestamp
; records as well as filespecs from all user numbers.
mov a,m
cpi '?' ; drivecode of "?" is global
jrnz okspec
mvi m,0 ; force it to default drive
; We want only one directory entry for each matching file,
; therefore we set a zero in the extent number of the argument
; file control block.
okspec: lxi d,FcrExtent
dad h ; HL-+argument extent number
mvi m,0 ; make it zero
; Make our common work area the file buffer -- that's where
; the Bdos will return a block of four directory entries.
lxi d,workstr
mvi c,BdosSetBuffer
call +BDOS
; Try for a match. The Bdos returns A=FFh if there is none.
pop b ; C=search first or search next
lded arg ; DE-+argument fcb
call +BDOS
; If there was no match, set Z true and exit
inr a
jz exit
dcr a
; There was a match, and A = 0/1/2/3 depending on which of the
; four directory entries in the block matched. Convert that
; into an offset of 0/32/64/96 bytes and get HL pointing to
; the correct directory entry.
add a ; *2
add a ; *4
add a ; *8
add a ; *16
add a ; *32
lxi h,workstr
call +ADDAH
; Point DE to the target FCR and copy in the filespec from
; the received directory entry. The relevant bytes are the
; filename and filetype -- we copy the user code as well
; because it's simpler, but we'll fix that in a minute.
lded targ
lxi b,12 ; drive/usernum, filename, filetype
ldir
; Clean up the target FCR so it can be opened without error:
; copy the drivecode and password from the search FCR,
; and zero the flags.
lded arg ; restore DE-+argument FCR
lhld targ
ldax d
mov m,a ; set the drivecode
lxi b,FcrFlags
dad b
mvi m,0 ; zero the flags
lxi b,FcrPassword-FcrFlags
dad b
xchg ; DE-+target password
lxi b,FcrPassword
dad ; HL-+argument password
lxi b,8
ldir ; copy password
; Force the Z flag false to reflect our success -- the high
; byte of the target FCR address has to be nonzero.
mov a,h ! ora a
exit: lded arg
lhld targ
pop b
ret
Figure 16-3. The implementation of fdirbegn and fdircont.
None of the preceding functions require a file to have been opened. Input and output operations do, however. It's time we examined this important operation. (My idea of its importance is exaggerated; I once worked in a company where several people spent their whole careers working on "Open, Close, and End of Volume Support." Be glad we can cover it in part of a chapter.)
The toolkit contains four different open functions. They are
If we were writing an operating system, these functions would set up a file so that only the stated actions could be done to it -- a file opened with freset couldn't be written, one opened with fappend wouldn't allow direct access, and so on. But we aren't creating an OS, we are hanging chintz curtains around an existing one. CP/M is not fussy about what you do with a disk file once it's open. You may write a byte, read the next, seek to another point and read or write again. All this is true of the toolkit file operations as well. The you use a certain open function is taken by the toolkit as merely a hint, not a promise, of the use you plan for a file.
Acting on that hint, the open functions apply different requirements on the files they open. These are summarized in Table 16-1.
The three functions that indicate a firm intention to do output will not tolerate a read-only disk file; they abort the program with
File error on (filespec) -- read only
when the file is read-only and with
File error on (filespec) -- password error
if the file has a write-level password that wasn't given to the program. The sequential-input open allows device files, but returns end of file from those that won't do input. The sequential-output opens accept devices that can do output, but abort with the "read only" message for those that can't. The fupdate function, whose use implies actions that are only meaningful on a disk, aborts with
File error on (filespec) -- not found
if it is asked to open a device file.
All these restrictions can be circumvented by the use of freset. It permits any sort of file. Once it has been used, the frdonly? and fdevice? functions may be used to check those conditions. And there is nothing to stop you from doing either output or direct-access operations on a file opened with freset. In fact, a function like fupdate ought only to be used if you want its restrictions imposed.
The most basic sort of open is done by freset. Let's examine its code and that of the subroutines it calls. The main module is shown in Figure 16-4. The comments in it do a fair job of explaining what it does. Most of its work is carried on by subroutines that it owns in common with other open modules. The simple subroutine fbufr, for instance, zeroes Bufptr and Bufeod, then dynamically allocates a file buffer unless the FCR already owns one.
name 'FOPNI'
extrn +FILLB
public +FOPNI
+FOPNI:
push b
push h
push d
xtix ; IX-+FCR
; First off, get a buffer for the file if it doesn't have one.
call +FBUFR
; See if the file is really a device. If so, we are done.
call +FOPNC
bitx FcrDisk,FcrFlags
jrz exit
; It isn't a device, so let's try to open it as a disk file. If
; we can't, return Z true (instant eof).
mvi a,FilePMread ; want only to read it
call +FOPNE
bitx FcrNotEof,FcrFlags
jrz exit
; The file exists and is open to CP/M, at least for input (it
; may be writeable as well, but we don't check that). Fill the
; buffer with the first load of data from disk, setting Bufptr
; and Bufeod -- and maybe finding end of file if it's empty.
call +FILLB
; Exit, setting the Z flag FALSE if the file is capable of
; input (a device file might not be, and a disk file might
; have had no data in it).
exit:
bitx FcrNotEof,FcrFlags
xtix
pop d
pop h
pop b
ret
Figure 16-4. The implementation of freset.
One of these routines is the source of a doubtful point in the file design. When freset returns Zero true there is no way for a program to discover whether it did so because the file didn't exist, or because it did but had no data in it. The two conditions are merged (as they are by the Pascal function after which this one was modelled). The source of the ambiguity can be seen in Figure 16-4. The subroutine fopne tries to open an existing disk file. It reports failure by setting NotEof false. When the file exists, fillb is called to load the buffer. It sets NotEof false if there is no data. Both conditions are shown by the one bit, and it is copied to the Zero flag when this module exits.
Any file may be assigned the name of a CP/M logical device instead of the name of a disk file. The toolkit will make that device file act as much as possible like a disk file, so for most things the program needn't know or care which it is. This process begins in the fopnc subroutine (Figure 16-5). Its job is to find out if the file names a device and, if it does, to complete the open and set the Disk flag false.
name 'FOPNC'
dseg
; These equates are used to assemble static FcrFlags bytes.
xCon equ 1 shl FcrCon
xAux equ 1 shl FcrAux
xLst equ 1 shl FcrLst
xLCR equ 1 shl FcrLastCR
xOut equ 1 shl FcrOutput
xInp equ 1 shl FcrNotEof
; These equates are the BDOS service numbers for device I/O
ICon equ 1
Ocon equ 2
IAux equ 3
OAux equ 4
OLst equ 5
colon: strconst ': ' ; comparand for e.g. CON:
devtab: strtable 9 ; lookup table for device names
; In the table entries, each string is followed by a flag byte
; and two Bdos request numbers. The entries are ordered by
; approximate frequency of use.
strentry 'CON' ; CON can do input, output
db xCon+xOut+xInp+xLCR,ICon,OCon
strentry 'LST' ; LST is only output
db xLst+xOut,0,OLst
strentry 'AUX' ; AUX is in or out
db xAux+xOut+xInp+xLCR,IAux,OAux
strentry 'RDR' ; RDR is the old name for AXI
db xAux+xInp+xLCR,IAux,0
strentry 'PUN' ; PUT is the old name for AXO
db xAux+xOut,0,OAux
strentry 'AXI' ; AXI is input only
db xAux+xInp+xLCR,IAux,0
strentry 'AXO' ; AXO is output only
db xAux+xOut,0,OAux
strentry 'KBD' ; KBD is console-input only
db xCon+xInp+xLCR,ICon,0
strentry 'CRT' ; CRT is console-output only
db xCon+xOut,0,OCon
cseg
extrn +STLOK
public +FOPNC
+FOPNC:
push psw
push h
push d
; clear the flags, current record, and extent bytes.
xra a
stx a,FcrExtent
stx a,FcrCurrec
stx a,FcrFlags
; To be a device, the FCB must have a default (zero) drivecode.
; We treat a filespec like "B:CON:" as a disk file.
cmpx Fcrdrive
jnz isdisk
; For a device, the "filenametyp" bytes look like "XXX:bbbbbbb"
; Since FcrExtent is zero, we can check for the colon and seven
; blanks with one string comparison.
pushix
pop d
lxi h,FcrName+3
dad d
xchg ; DE-+":bbbbbbb" if present
lxi h,colon ; HL-+comparand string
call +STCMP
jnz isdisk
; Now to check the XXX part. We will replace the colon with
; a NUL, then use a string table-search to look for the name.
; On a successful lookup, HL points to the NUL at the end of the
; matching entry, where we have assembled the proper FcrFlags
; bits and BDOS I/O service numbers.
mvix 0,FcrName+3
pushix
pop d
inx d ; DE-+"XXX",0
lxi h,DevTab ; HL-+lookup table
call +STLOK
mvix ':',FcrName+3 ; restore colon first
jnz isdisk ; (no match, not a device)
; The filespec is that of a device. Set it up for use.
inx h ! mov a,m ; A = flags
stx a,FcrFlags
inx h ! mov a,m ; A = Bdos input number
stx a,FcrBdosIn
inx h ! mov a,m ; A = Bdos output number
stx a,FcrBdosOut
jr exit
; The filespec is not valid for a device, ergo it will be
; treated as a disk. Set that flag and return.
isdisk:
bsetx FcrDisk,FcrFlags
exit:
pop d
pop h
pop psw
ret
Figure 16-5. The internal subroutine that attempts to open a file as a device.
The code of fopnc is included here because it is a perfect example of the use of a string lookup table to translate words to numbers. After verifying that the filespec has the general form of a device name -- there is no drivecode, no type, and the filename is four bytes long ending in a colon -- the code converts the first four bytes of the filename field into a string. That string is used as the argument in a table search. If the search succeeds, it leaves register HL pointing at the three bytes needed to complete the open: the proper setting of the flags and the two BDOS service request numbers needed to do byte input and output for that device.
When fopnc sets the Disk flag to report that a file cannot be a device, the next step is to see if it names an existing disk file. This is handled in the subroutine fopne (for open Existing file; these 5-letter names are irksome).
It is here that the filespec is first shown to the BDOS. Read the code (Figure 16-6) twice, first assuming a CP/M 2.2 system, then again assuming CP/M Plus. Under CP/M 2.2, the first BDOS operation will be an attempt to open the file. In the second case it will be a request to return the file's password mode (of which more in a moment). Whichever, this will be the first time that the File Control Block in the FCR has been presented to CP/M. If the drivecode is invalid, it is here that CP/M will terminate the program with a disk-select error. And it is here that, if the file doesn't exist, CP/M will return FFh. If that's the case, there is nothing more to be done but to exit, leaving NotEof false (the Disk flag might be turned off too, but isn't).
name 'FOPNE'
extrn +BDOS
if CpmLevel gt 22h
extrn +FPASS
endif
dseg
Pmode db 0 ; desired password mode
cseg
public +FOPNE
+FOPNE:
push psw
push b
push d
push h
; Save the password-modes of interest
sta Pmode
if CpmLevel gt 22h ; CP/M PLUS ONLY...
; Ask the Bdos to return the file's password mode. If the file
; doesn't exist, it returns A=FFh. If the drivecode is invalid
; or the filespec is ambiguous, we will be cancelled with a
; "CP/M Error" message right here.
pushix
pop d ; DE-+file control block
mvi c,BdosFileInfo
call +BDOS
; If the file doesn't exist, we can exit right now.
inr a ; A=FF goes to A=00
jz exit ; (no such file, all done)
bsetx FcrNotEof,FcrFlags ; note it does exist
; The file exists, and its level of password protection is now
; in FcrExtent. We AND that with the byte we were given. If
; the result is nonzero, we require a password for this file.
lda Pmode
andx FcrExtent
jrz nopassprobs
; We do need a password. If the first byte of FcrPassword is
; blank, we don't have one. +FPASS will get one for us.
mvi a,AsciiBlank
cmpx FcrPassword
cz +FPASS
; Now we have a password (or don't need one), so we can try to
; open the file. First point the Bdos at our password field.
nopassprobs:
pushix
pop h
lxi d,FcrPassword
dad d
xchg ; DE-+password field
mvi c,BdosSetBuffer
call +BDOS
endif ; CP/M PLUS PASSWORD PREPARATION
; In CP/M Plus we have eliminated most of the errors that could
; occur on the open (if the password is wrong and the file
; is protected at the read level, that would crash us). In CP/M
; 2.2 we don't know anything yet.
pushix
pop d
mvi c,BdosOpen
call +BDOS
if CpmLevel lt 30h ; IN CP/M 2.2, DOES THE FILE EXIST?
inr a ; A=FFh goes to 00h
jz exit ; file doesn't exist, all done
bsetx FcrNotEof,FcrFlags ; note it does exist
endif
; Now the file is open we can find out if it is read-only. That
; could be true for 3 reasons. (1) If it has been set read-only
; then attribute t1' is on -- in either version of CP/M.
bitx Bit7,FcrType
jrnz readonly
; (2) if it is a system file, stored under user 0, opened from a
; different user number, attribute f8' is on (CP/M Plus only).
bitx Bit7,FcrName+7
jrnz readonly
; (3) if it has a write-level password and we presented the
; wrong (or no) password, attribute f7' is on. That may not
; be an error -- our caller may intend only to read.
bitx Bit7,FcrName+6
jrnz readonly
; Writing is permitted on this file. Note that altho the file
; can be written, it could still have a delete-level password
; that we didn't match, which would prevent erase/renaming.
bsetx FcrOutput,FcrFlags
jmp exit
; The file is read-only for some reason. If our caller intended
; to write or delete it (as signalled by the byte passed) then
; we want to abort right now.
readonly:
lda Pmode ; caller plans to..
ani FilePMwrite+FilePMdelete ; ..write or delete?
jz exit ; (no, only plans reading)
; Our caller means to write, and the file won't allow it. Abort
; the program with an appropriate file error message.
mvi a,3+11 ; assume extended error code of r/o
bitx Bit7,FcrName+6
jrz aborting; (yes, "read-only file")
mvi a,7+11 ; set error code for "password error"
aborting:
stx a,FcrRetcode ; set fake Bdos return code
jmp +FABTX ; ..and abort the program
; The file doesn't exist, or exists and is amenable to actions
; the caller wants to do. FcrFlags are set appropriately,
; except for FcrLastCr which should be initially on in since
; eof on the very first read should be reported immediately.
exit: bsetx FcrLastCr,FcrFlags
pop h
pop d
pop b
pop psw
ret
Figure 16-6. The elaborate logic of opening an existing disk file.
When the file does exist, its read-only status can be discovered. A file may be read-only from only one cause in CP/M 2.2. If the stat command has been used to set it read-only, the read-only attribute will be visible in the FCB. Two other causes are reported by CP/M Plus, using other attributes.
This code takes two inputs. One is a file; the other is a bit-mask that specifies the caller's intention of reading, writing, and/or erasing the file. The bits are the same ones used by CP/M Plus to signal a file's level of password protection. Their first use is to test whether a file password will be needed to do what the program intends doing. If one is, and none was assigned to the file, the fpass subroutine will prompt the user to enter one.
Their second use applies to either DOS. If the file is read-only, and if the caller's input indicates an intention to write to it, the program is at once aborted with a "file error -- read only" message. Thus when fopne returns, its caller may be sure that the file exists, has a valid drivecode, and may be used in the way intended. Furthermore, the Disk and Output flags are set correctly.
No need for fappend's function came up in the example programs in Part I of this book. It begins much like freset, with calls to fbufr to assign a buffer and fopnc to check for a device file. If the file proves to be a writable device, the open is complete. A device is always ready for output at its end!
Next comes a call to fopne to open a disk file. If this fails (if no file exists), the module calls another subroutine, fmake, to create new disk file. This routine, whose code appears in Figure 16-7, creates a new file. If the FCR has an assigned password, it tries to apply it to the new file at the read level (the most restrictive). This will have no effect under CP/M 2.2, nor indeed under CP/M Plus unless password protection is enabled for the output disk.
name 'FMAKE'
extrn +BDOS
public +FMAKE
+FMAKE:
push psw
push b
push d
push h
; If a password has been assigned, set file attribute bit f6'
; and set the buffer address to the password data. This will
; have no effect in CP/M 2.2.
ldx a,FcrPassword
cpi AsciiBlank ; any password given?
jrz nopass
mvix FilePMread,FcrPMmake ; yes, set level
bsetx Bit7,FcrName+5 ; and set attribute f6'
pushix
pop h
lxi d,FcrPassword
dad d
xchg ; DE-+password+mode
mvi c,BdosSetbuffer ; point Bdos to our password
call +BDOS
; Make the new file and set its flags to indicate it exists,
; has no data, and can do output.
nopass: pushix
pop d ; DE-+fcb
mvi c,BdosMake
call +BDOS ; create the file
mvix +,FcrFlags
bresx Bit7,FcrName+5 ; clear make-pass attribute
pop h
pop d
pop b
pop psw
ret
Figure 16-7. The fmake subroutine creates a new output file.
One peculiar bit of code in Figure 16-7 deserves comment. The FCR flags are initialized with this line.
mvix +,FcrFlags
The first operand is an expression for a byte constant to be put into the flags byte. The flag bits are defined as bit numbers, while what is needed here is a sum of bit patterns. The expression
1 shl FcrDisk
produces a byte with a 1-bit at the FcrDisk bit number. Adding two of these produces an 8-bit pattern with Disk and Output true (and by implication NotEof false, as is correct for an empty file). The whole expression had to be enclosed in angle brackets before rmac would pass it into the mvix macro as a single macro parameter.
But we digress. When fappend has found an existing disk file, it must carry out its true purpose of preparing it for output at its end. Now arises the problem, where is the end of a CP/M file? A file consists of 128-byte records. Do its contents end with the 128th byte of the last one? Or do they perhaps end with one of the other 127 bytes of the last record? The only possible answer is "it depends." It depends on the logic of the program that wrote the file in the first place. The toolkit answers the question with a trick that may or may not work. The code to implement this part of fappend is shown in Figure 16-8.
; The file exists, is open, and is writable. Now we have to
; position ourselves to its end. The first step is to get
; the file size, equal to the relative record address of the
; last existing record plus one.
writable:
pushix
pop d ; DE-+FCB again..
mvi c,BdosFileSize
call +BDOS ; updates FcrRRA (and saves DE)
; We want the last record itself, so we have to decrement the
; 3-byte number the BDOS set for us.
lxi h,FcrRRA
dad d ; HL-+low byte of number
mov a,m ! sui 1 ; 1 from low byte
mov m,a ! inx h
mov a,m ! sbi 0 ; carry from middle byte
mov m,a ! inx h
mov a,m ! sbi 0 ; carry from high byte
mov m,a
; Now we can read that last 128-byte record into the buffer.
; Such a direct read sets the FCB so that a later sequential
; write will go to the same record.
push d
if CpmLevel gt 22h ; under CP/M Plus we have to
mvi e,1
mvi c,BdosSetMulti ; set multi-record count to 1
call +BDOS
endif ; under all systems we have to
ldbwx d,FcrBufadr
mvi c,BdosSetBuffer
call BdosJump ; set buffer address
pop d
; on this read, only two returns are reasonably possible,
; 0=success, and 10=media change. The latter is so unlikely
; I think we can ignore it.
mvi c,BdosDirRead
call +BDOS ; read last record
; The last record is in the buffer. Now we have to set the
; buffer pointer to address the byte after the last good one
; in that record. There's two ways to do it.
ldbwx h,FcrBufadr ; HL-+data to scan
lxi b,128 ; count of bytes to check
ldx a,FcrFillByte
cpi CpmEof ; Ascii file, ending in ^Z?
jrnz binary ; (no, binary file)
; This is an Ascii file, or at least we aren't told otherwise.
; Now, some programs fill all unused bytes in the last record
; with ^Zs, while others make do with just one, leaving garbage
; after it. And of course the last record might be exactly full
; and have no ^Z in it at all. So we will scan left to right
; and stop at the first ^Z we see or at the end of the record.
; The Z80 CPIR instruction fits our needs precisely.
cpir ; if no hit at all,
jrnz nohit ; ..BC reduced to zero
inr c ; else reduced by 1 extra
nohit: mvi a,128
sub c ; A := # bytes preceding ^Z
stx a,FcrBufptr
jr exit
; This is a non-Ascii file, so we will assume that its last
; record was filled to the end with the fillbyte value. We
; want to scan right to left for the rightmost byte that is
; NOT equal to the fill value. The Z80 instruction CPD will
; do it, with some effort.
binary:
dad b ; HL-+byte following record
dcx h ; HL-+last byte of record
binloop:
cpd ; Z:=(A == *HL), HL--, BC--
jrnz hitx ; (found a non-fill byte)
jpo binloop ; (BC not down to zero)
jr nohitx ; (BC=0000, no hit)
hitx: inr c ; BC was reduced too far
nohitx: stx c,FcrBufptr
Figure 16-8. The portion of fappend that tries to find the end of an existing file.
The three output-open macros all take a second parameter, a byte constant that is to be used to fill out the last record of a file. Most often it is allowed to default; the default value is control-Z. It is this byte value that is used to fill out each new output record when BufEod is advanced during output. That ensures that the last record of an output file will be padded with the designated fill byte -- again, usually control-Z.
When designing fappend, I crossed my fingers and hoped that this would always have been the case. A text file, I decreed, ends with the byte preceding the leftmost control-Z in its last record. (Specifically the leftmost one because most programs do as the toolkit does -- fill the last record with control-Z -- although some programs end a file with only a single control-Z.) In a text file, the control-Z is a constant. If the given fill byte was control-Z, fappend would assume that the file was a text file and place its "end" preceding the leftmost control-Z.
If the fill byte was anything else, fappend would make two assumptions. It would assume the file was not a text file, and that the last record was filled out with that byte. Therefore the file's end would be found by scanning backwards through the last record, looking for the rightmost byte that was not the fill byte.
These rules should work most of the time. There will undoubtedly be cases in which there is no proper fill byte; all bytes of the last record are meaningful regardless of their value. Such files should not be opened with fappend (freset followed by fsize and fseek can be used instead).
The fupdate function is not an essential one; as noted, it amounts to a combination of the freset, fdevice?, and frdonly? functions, with appropriate abort messages issued for all but writable disk files. The concepts behind it, that is, the idea of performing direct-access input and output, are fascinating. We will have to face them in the next chapter, where the need to support direct access will first complicate, then simplify, the management of the disk buffer.
The frewrite function is the most common output open, and the one with the most elaborate implementation. As explained in Part I, it is designed to replace an existing file in such a way that the same file may be used for input and output simultaneously.
The frewrite module begins normally enough. It gets a buffer for the file. It applies fopnc to check for a device file; if one is reported there is nothing more to do.
Then it calls fopne, passing all three permission bits -- read, write, and erase -- for if this file exists, it will eventually have to be erased. When fopne reports the file doesn't exist, a call to fmake creates it and the job is done.
That leaves the case of an existing, writable disk file. What the module does next is best expressed in its code, visible in Figure 16-9. Most of the work is left for close-time.
; "Filename.typ" does exist, so we will create our output as
; "filename.$$$" instead. Save the desired filetype for close
; time and move in the dollarsigns.
doesexist:
ldx a,FcrType
stx a,FcrOtype
ldx a,FcrType+1
stx a,FcrOtype+1
ldx a,FcrType+2
stx a,FcrOtype+2
mvix '$',FcrType
mvix '$',FcrType+1
mvix '$',FcrType+2
; Now erase any existing "name.$$$" file. We already know
; (from the success of +FOPNE) that the filename is unambiguous.
; If "name.$$$" does exist and is r/o or password-protected, or
; if the disk is r/o, we will crash right here.
pushix
pop d
mvi c,BdosErase
call +BDOS
; That done, we can make "name.$$$." FMAKE would apply a
; password to the file, but we don't want that here, since
; (a) it would give us two passwords to juggle at close time and
; (b) if we crash later, we'd leave behind a protected scratch
; file. So we'll do the make from here.
pushix
pop d
mvi c,BdosMake
call +BDOS
; The scratch file has been created and is ready for output.
; Record its status in the FCR flags.
nf equ (1 shl FcrOutput)+(1 shl FcrDisk)+(1 shl FcrBaktype)
mvix nf,FcrFlags ; disk output at end
exit:
Figure 16-9. The portion of frewrite that prepares an existing file for replacement later.
After a disk file has been modified, it must be closed. To CP/M, a close request is a request to make sure that the disk directory reflects any new space that may have been allocated to the file during output. But that BDOS operation is only part of the fclose function.
Most of the code that implements fclose appears in Figure 16-10. Its overall aim is to set up the FCR so that the file can be reopened and used again, with or without an intervening assignment. For device files, it suffices to stuff a zero into the flags byte, preventing further operations on the file. For a disk file it is necessary to perform the BDOS operation.
name 'FCLOS'
extrn +BDOS
public +FCLOS
+FCLOS:
push psw
push b
push h
push d
xtix
; Separate disk and device files
bitx FcrDisk,FcrFlags
jz exit ; all the work done at the end
; Disk files: start by writing any modified data to disk.
call +FDOUT
; Close all disk files, because with seeking allowed, we
; can't tell what may have been modified.
pushix
pop d
mvi c,BdosClose
call +BDOS
; If the file was opened input, append, or update, or was a new
; output file, that's all we have to do.
bitx FcrBakType,FcrFlags
jz exit
; We've just closed an output file under its scratch name of
; "name.$$$," and there does exist a previous file "name.typ"
; which we have to erase. To do so, put back the correct type
; in the FCR.
call fixtype
; Before the erase we set up the one password we know, the one
; in the FCR. If the file is protected at the read or writer
; level, this will be the correct password (+FOPNE verified it)
; If the file is protected only at the delete level, it may
; have been given wrong and we won't know until we crash on
; this erase.
pushix
pop d
lxi h,FcrPassword
dad d
xchg ; DE-+the given password
mvi c,BdosSetbuffer
call +BDOS
pushix
pop d
mvi c,BdosErase ; now try the erase
call +BDOS
; Ok, any existing file "name.typ" is gone. In order to rename
; the new one from "name.$$$" to "name.typ" we have to put the
; desired name in the FCB+16 and put the $$$ back in the type.
pushix
pop d ; DE-+FCB+0
lxi h,FcrDatamap
dad d ; HL-+FCB+16
xchg ; (reverse the above)
lxi b,12 ; length to move
ldir ; "name.typ" to FCB+16
mvix '$',FcrType ; put back the darn dollars
mvix '$',FcrType+1
mvix '$',Fcrtype+2 ; "name.$$$" to FCB+0
pushix
pop d ; DE-+FCB
mvi c,BdosRename
call +BDOS
; Fix the type one more time, so that the FCR can be reopened.
call fixtype
if CpmLevel gt 22h ; UNDER CP/M PLUS...
; We have but one thing left to do: if a password was given as
; part of the filespec, we have to apply it to the new file
; (we didn't do it when we made the file).
mvi a,AsciiBlank
cmpx FcrPassword ; was one given?
jrz exit ; (no, forget it)
; We have a choice of protection levels, but (in the absence of
; other information, and we have none) the only safe thing to
; do from a security standpoint is to set the read level, the
; most restrictive. The set-password (write XFCB) function
; wants the new password at the buffer-address plus 8.
pushix
pop d
lxi h,FcrPassword-8
dad d
xchg ; (DE+8)-+given password
mvi c,BdosSetBuffer
call +BDOS
mvix FilePMread+1,FcrExtent ; assign at read level
pushix
pop d
mvi c,BdosPutXFCB
call +BDOS
endif ; continue for both systems...
; Clear the FcrFlags to prevent further I/O until an open is
; done again.
exit: mvix 0,FcrFlags ; eof, no output, etc.
Figure 16-10. The essential parts of fclose.
There's no reliable way for fclose to tell whether or not an output function was used, so it performs the CP/M close for all files. If the file hasn't been altered, no harm will result. For all but files opened with frewrite, and even for those when there wasn't an existing file, that completes the operation.
That leaves files that frewrite opened under the scratch filetype of $$$. It is only now that the existing version of the file can be erased. Erasure is easy; it is only necessary to restore the original filetype from its hiding place in FcrOType and to issue a BDOS service request. But here arises the last and least preventable of the password difficulties.
Routine fopne (Figure 16-6) was given a bit-mask that indicated erasure was planned. It will have asked CP/M for the file's password mode. If the file had a password of any level, fopne will have made sure there was a password of some sort stored in the FCR. Furthermore, if the file was protected at the read or write level, fopne would have found out if it was not correct (an incorrect read-level password would cause CP/M to abort the open request; an incorrect write-level password would have caused fopne to see a read-only file and abort the program).
However, if the existing file is protected only at the delete level, the validity of the password has never been tested. The presence of an invalid delete password won't interfere with opening a file, nor will it make CP/M mark the file read-only. The only way to test it is to try to erase the file -- which fclose is about to do. It points to the given password, crosses its fingers, and issues the erase request. If the password is invalid, the program will be terminated by CP/M now, on the verge of its success -- a case of the operation being a success but for the demise of the patient.
When the erasure works -- it always will under CP/M 2.2 and usually will under CP/M Plus -- it remains to rename the scratch file to its intended filetype and, under CP/M Plus, to apply the password to it.
Perhaps these elaborate procedures seem clear enough now (I hope I've explained them well enough that they do). Be assured that they did not spring forth full-grown in their present form. On the contrary, the design of the open and close mechanisms was the stiffest piece of intellectual exercise I have had in some time. The toughest part of a tough puzzle was designing workable support of CP/M Plus passwords. Although passwords are part of Concurrent CP/M and of MP/M, the toolkit is, to the best of my knowledge, the first general-purpose software to achieve this.
With these auxiliary functions settled, we can now turn to the innermost secrets of the file operations: direct access and buffer management
In the previous two chapters we have seen how files are opened and how data is read from and written to their buffers. At that level, the actual input and output seemed simple. During output, if the buffer fills up, write it to disk. During input, if the buffer becomes empty, read some more data.
It would be that simple if we allowed only sequential input or only sequential output to any one file. The CP/M file system permits much more. When the toolkit functions were revised to allow the full scope of CP/M file operations, the management of a file's buffer became much more complicated. In this chapter we will see how direct-access functions work, and how disk input and output must be handled to permit them.
Sequential output to a new file is simple under CP/M. You prepare an FCB to describe the file and get CP/M to initialize it with a BDOS service. The BDOS sets the FCB so that it describes the first record of the file. Each time you ask the BDOS to write to that file, it updates the FCB so that it describes the next record. Thus each write request extends the file.
The only information the BDOS has regarding the destination of data is contained in the FCB. This file position information tells it where in the file the next-written data should go. So long as only sequential writes are done, the position information in the FCB will step smoothly through the file, each write going to the next record.
The first version of the toolkit assumed that when a file was opened with frewrite, only output would be done to it. When that is the case, output is easy. The frewrite function always creates a new file. When it does so, CP/M initializes the FCB so that a disk write using that FCB will add data to the file.
A disk write is not done at once, of course. The output functions just let data accumulate in the buffer until it becomes full. Then, as you may recall, they call a function named fdump. It writes all the buffered data to disk and resets the Bufptr and Bufeod variables to show an empty buffer. Afterward, output may proceed.
The original target of a call to fdump was the code that now has the name fbout. Its code is shown in Figure 17-1.
name 'FBOUT'
extrn +BDOS
if CpmLevel eq 22h
extrn +ADHLA
endif
public +FBOUT
+FBOUT:
push psw
push b
push d
push h
; Bufeod is a count of active bytes in the buffer, and is
; maintained at a multiple of 128 by all file routines. Figure
; out how many 128-byte records we have to write (Bufeod bits
; 15..7). If that turns out to be zero, we shouldn't have
; been called, but that's ok.
ldx a,FcrBufeod ; low byte of count..
ral ; ..high bit to carry
ldx a,FcrBufeod+1 ; high byte of count..
ral ; shifted left, plus carry
ora a ; is count zero?
jrz exit ; if so, skip the write
if CpmLevel gt 22h ; HOW WE DO IT IN CP/M PLUS...
; Set the count of buffered records as the CP/M Plus
; multi-record count.
mov e,a
mvi c,BdosSetMulti
call +BDOS
; Set the buffer as the CP/M data transfer address.
ldbwx d,FcrBufadr
mvi c,BdosSetBuffer
call +BDOS
; Now we can do the write.
pushix
pop d ; DE-+FCB
mvi c,BdosWrite
call +BDOS
else ; HOW WE DO IT IN CP/M 2.2...
; Save the count of records as a loop-count. Set up HL-+data
; and DE-+FCB.
mov b,a
ldbwx h,FcrBufadr
pushix
pop d
; Loop writing each 128-byte record.
Wloop:
xchg ; DE-+FCB
mvi c,BdosSetBuffer
push h
call +BDOS ; (saves BC,DE)
pop h
xchg ; DE-+data
mvi c,BdosWrite
push h
call +BDOS
pop h
ora a ; did the write work?
jrnz exit ; (no, quit with A=retcode)
mvi a,128
call +ADHLA ; advance data pointer
djnz Wloop
xra a ; did them all ok
endif ; END OF CP/M 2.2 WRITE
; Save the Bdos's return code, and if it is "success," reset
; the dirty bit and exit.
exit:
stx a,FcrRetcode
ora a
jrnz error
bresx FcrDirty,FcrFlags
pop h
pop d
pop b
pop psw
ret
; Four errors are possible. Two (media change and bad FCB,
; both unique to CP/M Plus) are disasters during output.
error: cpi 03h ; 01=no directory, 02=no data space
jnc +FABTX ; higher than 2, just die
; The other two errors (no directory or no data space) mean that
; some of the present buffer-load did not make it to disk and
; won't ever. That too calls for aborting the program, but in
; we should close the file in hopes of preserving the data that
; was written previously. The error 01h, no directory space,
; is reported as 05h after a direct-access write, and that's
; how our error-message handler expects it.
cpi 01h
jrnz close
mvix 05h,FcrRetcode
close: pushix
pop d
mvi c,BdosClose
call +BDOS
jmp +FABTX
Figure 17-1. Internal subroutine fbout writes data to disk using CP/M sequential output.
That code will append the buffer's contents to the file, provided that the FCB is correctly positioned -- as will be the case when nothing but output has been done. Observe that Figure 17-1 has two ways of performing the output. Under CP/M Plus the BDOS can write multiple 128-byte records in one operation. With CP/M 2.2 the implicit loop must be made explicit. The two kinds of disk-full errors are treated separately, although both end up terminating the program with a "file error" message.
The fappend function opens an existing file and sets things up so that additional output will go to the end of the file. Its real task is to get the correct file position into the FCB. When an existing file is first opened by the BDOS, its FCB is set up so that output (or input) will access the first record of the file. Fappend uses CP/M direct-access services to re-aim the FCB so that it will point to the last record of the file. Then it reads that last record into the front of the file buffer.
These actions reconstruct the situation that would have existed had the file just been written from its start to that point. When fappend is finished, the file's last record is in the buffer and the FCB is positioned to write that record of the file. In other words, the file is ready to be written with the code of Figure 17-1. So long as only output is done, that condition will remain true.
The code in Figure 17-1 assumes that the file's FCB is positioned to write the record that stands at the head of the file buffer. I named this state of a file the sequential output condition, or SOC.
A use of frewrite establishes the SOC. We can diagram it as shown in Figure 17-2(a). Output functions add data to the buffer, but do no disk output, until the buffer is full (Figure 17-2(b)). Then the code of fbout is executed; it writes the buffer to the file (Figure 17-2(c)). Afterward, the SOC still holds -- the FCB is still positioned to write the (nonexistent) record at the head of the buffer.
When the file is closed, there may be data left in the buffer (Figure 17-2(d)). Provided that the SOC still holds, one more call to fbout will finish the file. The situation shown in Figure 17-2(d) is also produced by a call to fappend.
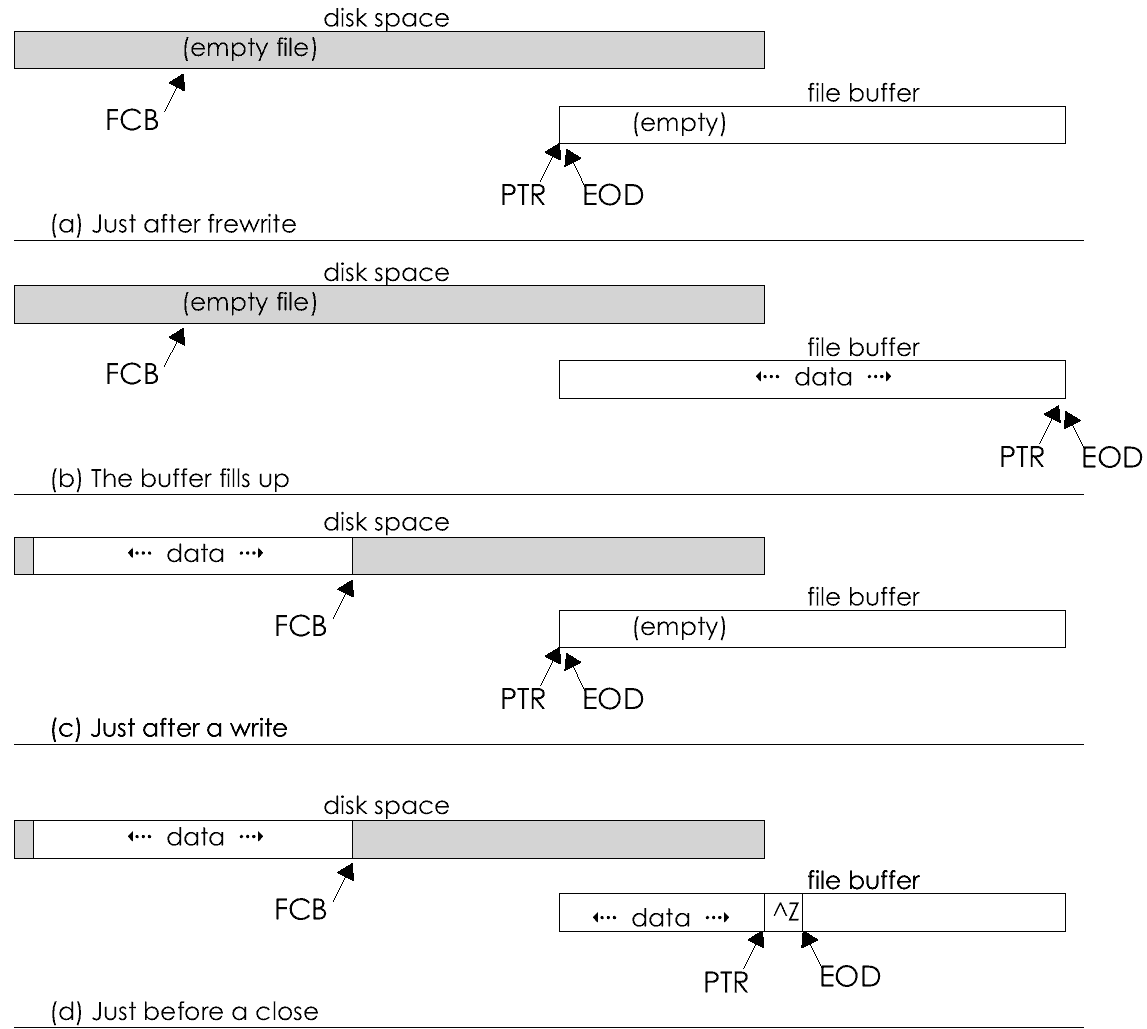
Figure 17-2. The relationship of buffer to disk file while the Sequential Output Condition holds.
When only sequential input is done, disk input is easy. The file is opened with a BDOS service. The BDOS initializes the FCB so that it describes the first record of the file. Then the freset function calls a routine named fillb (fill buffer). It reads records from the file until the buffer is full, then sets Bufptr to the first byte and Bufeod to the size of the data received.
As we saw in chapter 15, the input functions take data from the buffer and advance Bufptr. Eventually it equals Bufeod, indicating that no more data remains. The fillb routine is called to read more records; then input may continue. The original bearer of the name fillb was the code that appears in Figure 17-3.
name 'FBINP'
extrn +BDOS
if CpmLevel gt 22h ; we could get killing errors
extrn +FABTX
else ; in 2.2 we need to add A to HL
extrn +ADHLA
endif
public +FBINP
+FBINP:
push psw
push b
push d
push h
; Figure out how many records will fit in the buffer: bits 15..7
; of the buffersize.
ldx a,FcrBufsize
ral ; bit 7 to carry
ldx a,FcrBufsize+1 ; bits 16..8 in A
ral ; bits 15..7 in A
if CpmLevel gt 22h ; HOW WE DO IT IN CP/M PLUS....
; Set the CP/M Plus multi-record count.
mov e,a ; count of records to read
mvi c,BdosSetMulti
call +BDOS
; Set the buffer address for the read.
ldbwx d,FcrBufadr ; DE-+buffer
mvi c,BdosSetBuffer
call +BDOS
; Attempt a read of that many records. Count of records
; gotten is returned in register L.
pushix
pop d ; DE-+file control block
mvi c,BdosRead
call +BDOS
else ; HOW WE DO IT IN CP/M 2.2...
; Save the count of possible records and set it as a loop count.
stx a,BufEod
mov b,a
; Set up the addresses of the buffer and the FCB.
pushix
pop d ; DE-+FCB
ldbwx h,FcrBufadr ; HL-+data
; Read [B] records into the buffer or until physical eof.
Rloop:
xchg ; DE-+fcb
mvi c,BdosSetBuffer
push h
call +BDOS ; (preserves BC, DE)
pop h
xchg ; DE-+data
mvi c,BdosRead
push h
call +BDOS
pop h
ora a ; did we get that one?
jrnz RloopZ ; (no, stop)
mvi a,128
call +ADHLA ; yes, advance bufptr
djnz Rloop ; ..and continue
; B was decremented for each record received. Set H=count of
; records received as CP/M Plus would have done.
RloopZ: ldx a,BufEod ; original count
sub b ; less residual count
mov h,a ; ..into H
mov a,b ; A=00 if not eof, else A+00
endif ; BACK TO COMMON CODE, INPUT COUNT IN H, RETCODE IN A
if CpmLevel gt 22h ; need to save retcode in CP/M 3
; Save the Bdos's return code
stx a,FcrRetcode
endif
; If we had no error, then we filled the buffer and Bufeod
; should equal Bufsize. Assume that's going to be the case.
ldbwx b,FcrBufsize
ora a
jrz seteod
if CpmLevel gt 22h ; must check error code in CP/M 3
; We had an error. If it was 9/bad fcb or 10/media change,
; abort with a file error message.
cpi 01h ; if it isn't "unwritten data"
jnz +FABTX ; ..then abort.
endif
; We encountered physical end of file, so we didn't get all the
; records we asked for. If we got no records at all, mark true
; end of file in the FCR and make Bufeod=zero
mov a,h ; count of records moved
ora a ; was it zero?
jrnz gotsome ; (no)
bresx FcrNotEof,FcrFlags
mov b,a ! mov c,a ; make Bufeod equal zero
jr seteod
; We read some data. Compute how many bytes we got and set
; that as Bufeod: a 16-bit number whose bits 15..7 are the
; count of records. Note: carry is clear at this point.
gotsome:
rar ; A=bits 16..8, bit 7 to carry
mov b,a
mvi a,0
rar ; A=bits 7..0
mov c,a
; Set the new value of Bufeod
seteod: stbwx b,FcrBufeod
pop h
pop d
pop b
pop psw
ret
Figure 17-3. Internal subroutine fillb reads data from disk with CP/M sequential operations.
These actions may be diagrammed as shown in Figure 17-4. The situation just after the file has been opened is shown in Figure 17-4(a). The fillb routine is called immediately, and it establishes the condition shown in Figure 17-4(b).
This situation, with the FCB positioned to read the record that logically follows Bufeod, I call the sequential input condition, or SIC. A call to freset establishes it, and each call to fillb maintains it.
Near the end of the file, fillb may not be able to fill the buffer completely (Figure 17-4(c)). We can say that the SIC still holds; the FCB is positioned to read the record that follows Bufeod, even though there isn't one. The data doesn't fill the buffer, but the input routines use Bufeod, not the buffer's size, as their limit. If as little as one record was read, input may continue.
The next call to fillb will not be able to read any data at all, producing the situation shown in Figure 17-4(d). When this happens, fillb will set the NotEof flag false, and input will cease. The SIC may be said still to hold. We could also say that the sequential output condition is now true -- compare Figure 17-4(d) to Figure 17-2(a).
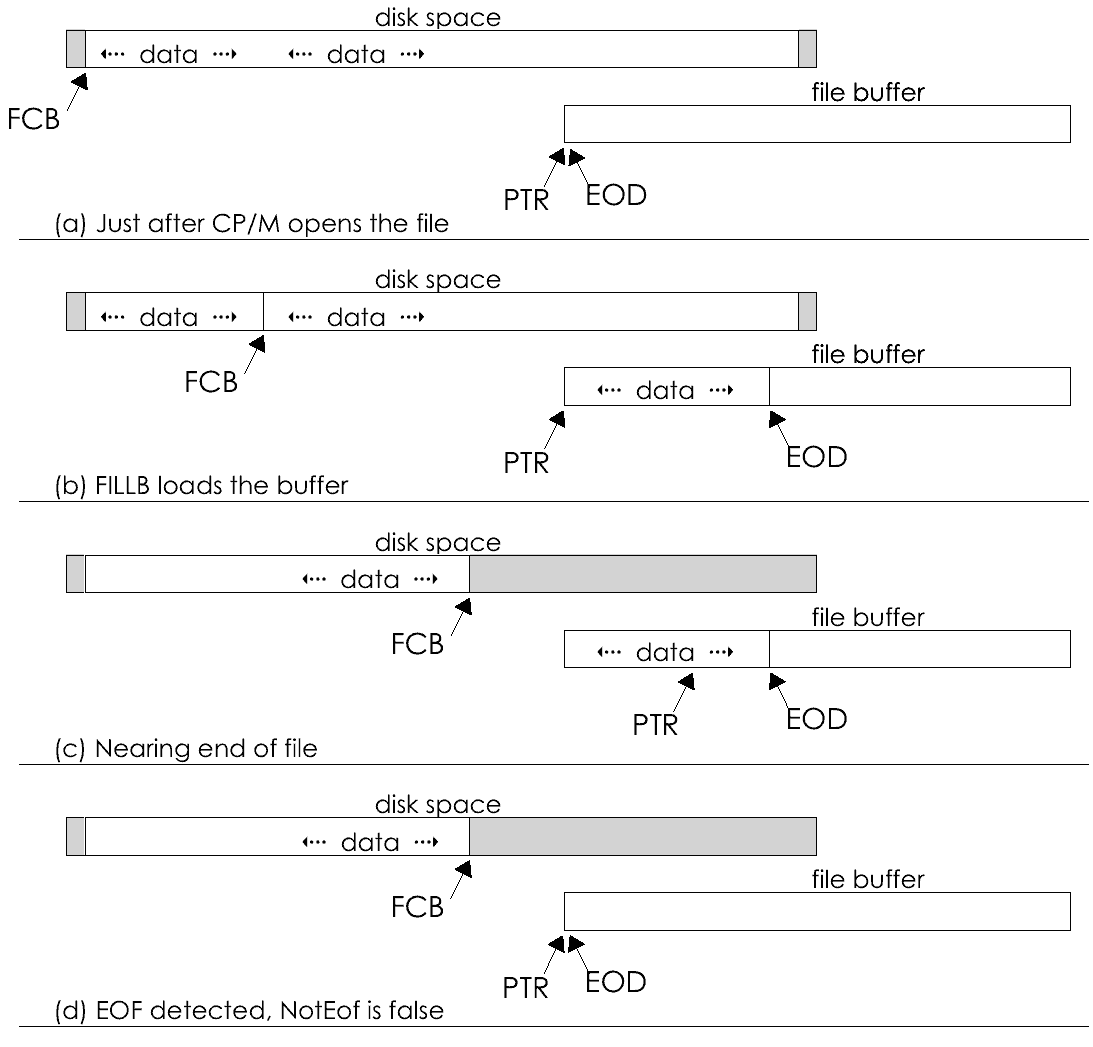
Figure 17-4. The relationship between FCB and buffer while the Sequential Input Condition holds.
CP/M provides direct-access read and write operations. Although these transfer data between disk and storage, their main effect is on the FCB's position information.
Direct access to a file is done in terms of a record number or, as I chose to call it, a relative record address (RRA). An RRA is the number of one of the 128-byte records in a file. The records are numbered from zero, so the RRA of the first record in a file is 00000h (five hex zeros).
The maximum number of records in a file depends on the version of CP/M. Under CP/M 2.2, a file may contain no more than 8 megabytes of data, or 65,536 records. The highest RRA is 0FFFFh. Under CP/M Plus a file may grow to 32 megabytes, or 262,144 records. Here the highest RRA is 03,FF,FFh, a three-byte value.
All that CP/M permits is reading or writing a particular 128-byte record (or group of adjacent records, in CP/M Plus). It allows access to no data unit smaller than the record. That isn't convenient when the file is divided into units of other sizes. The most general kind of file access is obtained when we can address any single byte in a file. Such a relative byte address, or RBA, must be 25 bits long. The RBA of the last byte in the largest CP/M Plus file is 01,FF,FF,FFh, a four-byte quantity. This was the motivation for putting so much support for longword arithmetic into the toolkit -- it is needed to manipulate RBAs.
I decided that the toolkit would support direct access in terms of RBAs. A single function, fseek, would take a file and an RBA stored as a longword. It would position the file so that the addressed byte was contained in the file's buffer, with Bufptr pointing to it.
After using fseek, any of the input or output functions could be applied. The byte could be read with fgetbyte (or fgetchar or fgetstr or fgetblok). Or it might be overwritten by fputbyte or any other output function. I imagined that most often, the sequence would be
fseek file,rba
fgetblok file,block,size
(modify the data in block)
fseek file,rba
fputblok file,block,size
with the effect of updating one logical record. That supposition would not be built in, however. Absolutely any combination of seeking, reading, and writing would be permitted. In particular, the records being accessed would not have to be of a fixed length.
It is often true that direct-access files are composed of fixed-length records, and that they are nowhere near eight or 32 megabytes in size. Most high-level languages require a direct-access file to have fixed-length records, and most of them limit the maximum number of logical records to a count that will fit in a 16-bit word. For convenience in these situations, I specified a second function, frecseek. It would take a logical record number (counting from 1, as BASIC does) and seek to the first byte of that record. Another function, freclen, would be used to set the record length for a file.
The frecseek function is no more than a front end for fseek, of course. It takes a file and a record number. It decrements the record number to make it origin-0; multiplies it by the record length stored in the FCR by freclen; and passes the resulting longword to fseek as an RBA.
A final convenience function, frewind, merely calls fseek with a longword of zero, so as to effect "rewinding" a file to its first byte.
All direct-access operations came down to fseek. How would it do its work? It had to end up with the correct portion of the file in the buffer; with Bufptr set to the offset of the desired byte; and with Bufeod set to the end of valid data. Once these things were accomplished, the input and output functions would be able to operate normally. Or would they? Well, let's assume they will and see what happens.
There is a close relation between an RBA and an RRA. The low seven bits of an RRA specify an offset into a 128-byte record. The other, more significant, bits are nothing less than the RRA of that record. In other words, shifting a relative byte address right seven times yields a relative record address, one that may be given to CP/M for a direct-access read.
But we don't want to read if we don't have to. The desired byte may already be present in the buffer. If it is, all fseek needs to do is to adjust Bufptr. That will improve performance. The logic of fseek begins to look like Figure 17-5. Study it carefully, and think about the implications for sequential input and output as they were described above.
Offset := low 7 bits of RBA
Target := RBA shifted right 7 bits
Low := RRA of first record in the buffer
High := RRA of last record in the buffer, plus 1
if ( Low + High ) then
Bufptr := Offset + 128 * (Target-Low)
else
if (buffer contains modified data) then
fdump
endif
position file to read the Target RRA
fillb
Bufptr := Offset
endif
Figure 17-5. A summary of the central logic of fseek.
The first problem faced by fseek is, what is the RRA of the first record in the buffer? There is a BDOS request to return the RRA of the record presently described by an FCB. But which record is that? If the sequential output condition holds, it is the record at the head of the buffer. If the sequential input condition holds, it is the record that follows Bufeod. When the SOC holds, fseek should set
Low := current FCB position
High := Low + Bufeod div 128
But when the SIC holds, it should set
High := current FCB position
Low := High - Bufeod div 128
It took me some time to work out that the NotEof flag reflected the sequential input condition. When NotEof was 1, the SIC held; when it was 0, the SOC held (with an exception, as we'll see). This interpretation of NotEof was valid for the first version of the file functions, which allowed only sequential operations. I decided to elevate that fortuitous result to the status of design principle, and ensure it would remain valid under direct access as well.
The next problem lay in the innocent statement,
if (buffer contains modified data) then
fdump
endif
If fseek was called once, it would be called many times. If output was done between two calls, then the buffer might well contain modified data. If so, it would be imperative to get that data onto the disk before loading the buffer from another location in the file. But could fdump be used? At that time, fdump was implemented as the code in Figure 17-1, which depends on the truth of the SOC. If it was called when the SIC held, it would write the buffer into the wrong place in the file (imagine writing the buffer under the condition shown in in Figure 17-4b).
In fact, the whole relationship between FCB and buffer became dubious when the full range of CP/M operations was allowed. Suppose a file exists. Opening it creates the SIC. But a seek to its last byte, followed by output, would (or should) create the SOC. A seek to its middle byte should recreate the SIC. But now suppose a buffer's-worth of data is written. The output function will call fdump, but the SIC will hold, not the SOC.
After pondering this riddle for some time, it finally dawned on me that I had made a false distinction. There really was no difference between the functions of fdump and fillb. Either one is called because it is time to advance the buffer, nothing else. To advance the buffer is to
That sequence of actions is appropriate regardless of whether the preceding actions were input or output.
I implemented this insight by creating a new module, fbadv, which performed the common function. Its code appears in Figure 17-6. Read the fillb/fdump portion of it first. This is the single operation of advancing the buffer, used regardless of whether the file is being used for input or output, sequentially or directly.
name 'FBADV'
extrn +FBINP
; If the buffer is dirty (has new data), make it clean. Do
; that with an update-write if we are in mid-file or if we
; have lost our FCB position by a seek to nonexistent data.
; In either case, DO NOT reset Bufptr or Bufeod. That's for
; our caller to do according to its circumstances.
upbits equ (1 shl FcrNotEof)+(1 shl FcrNoPosn)
public +FDOUT
+FDOUT:
bitx FcrDirty,FcrFlags
rz ; not dirty? do nothing.
push psw
ldx a,FcrFlags
ani upbits ; if NotEof or NoPosn
cnz +FBUPD ; ..do an update-write
cz +FBOUT ; ..else append-write
pop psw
ret
; Advance the buffer for sequential I/O. If it is dirty,
; write it (see above). Reset Bufptr to zero. If not at
; eof, read the next buffer-load of data.
public +FILLB
+FILLB:
+FDUMP:
call +FDOUT ; make sure the buffer is clean
xra a
stx a,FcrBufptr
stx a,FcrBufptr+1 ; Bufptr := 0
bitx FcrNotEof,FcrFlags ; if no more data in file,
jnz noteof
stx a,FcrBufeod ; make Bufeod := 0 too
stx a,FcrBufeod+1
ret ; and return Z true
noteof: ; else there may be more data
call +FBINP ; try to read it (sets Bufptr)
ret ; and return INP's Zero flag
Figure 17-6. The single routine that advances a file buffer for input or output.
The identical fillb/fdump code, after dumping the buffer if necessary, tests the NotEof flag. If that is true, then there is more data in the file and the SIC holds; fillb (Figure 17-3) can be called to read data and set Bufeod.
The separate but related routine in the same module, fdout, performs the job of getting a modified buffer to disk. Before we examine it we must finish looking at fseek.
When fseek positions the file at some RRA, it may encounter any of three conditions. First, there may prove to be data at that RRA. This is the normal condition, assumed in Figure 17-5. Then fseek may call fbinp (Figure 17-3) which will load the buffer and make the SIC true.
However, it is entirely possible to seek to a record of a file that doesn't exist. This can happen in two ways. The given RRA may fall in an existing "extent" of the file. It does, if CP/M can find a directory entry that describes the 16-kilobyte range of the file that should contain that RRA. Within that extent (whose data map CP/M copies into the FCB), the 1- or 2-kilobyte allocation block that ought to contain the desired record has never been allocated. Since there is no record, CP/M can't read it. The BDOS signals this condition by returning a code of meaning "reading unwritten data" in register A.
Alternatively, the requested RRA may fall into an extent that has never been allocated. In this case, CP/M cannot find even a directory entry to describe the data. The BDOS signals this with a code that means "reading unwritten extent."
There is a major difference between these two failing cases. In the first one, the BDOS does find a directory entry. Therefore it can update the FCB with correct position information. Afterward, a sequential write will put data into that position, creating a record where there was none before.
In the second case, since it finds no directory entry, CP/M does not update the FCB. It leaves it as it was, still pointing to whatever part of the file it used to. A sequential write then will not put data at the desired RRA; it will write into whatever record the FCB used to address. Personally, I think this is a design error in the BDOS. It is definitely an inconsistency that the toolkit should be able to hide from its users.
As seen by the toolkit functions, it is not an error to seek to a nonexistent RRA. It simply places the file in the sequential output condition at that RRA. If the BDOS reports "reading unwritten data," this is true in fact: as a result of the seek, the FCB is positioned to write the first record in the buffer, and fseek sets NotEof false. If the program attempts input, it will get an end of file signal; if it does output, fbout may safely write as if it were working on a new file. It all works out very neatly.
Not so when reading an "unwritten extent." Then the FCB's position data bears no relation to the buffered data at all; neither the SIC nor the SOC holds. I added the NoPosn flag to the FCR to signal this dangerous condition. When fseek discovers the case, it sets NotEof false (there is no input data to be had and the SIC doesn't hold) and NoPosn true (the SOC doesn't hold either). And it leaves the desired RRA in the FCR. The calling program, when it finds there is no data to be had, might simply quit, or it might seek to another position. But if it does output, the RRA can be used to position the FCB.
The problem of writing the buffer when the SOC does not hold remains. To solve it, I created the fbupd module, a routine that performs an update-write of the buffer. In essence, fbupd forces the SOC to hold by repositioning the file. Then it may call fbout (Figure 17-1) safely. Afterward the SOC may or may not hold. It holds if that buffer-load was appended to the file; it does not if the buffer was written to mid-file. The NotEof flag continues to signal this fact.
The code of fbupd appears in Figure 17-7. It is called when output is to be done and one of two conditions is true. Either the NoPosn flag is set, in which case the RRA of the first record is ready to use, or else the SIC holds and the FCB must be backed up by the length of the buffer so the changed data can be written over its old version.
name 'FBUPD'
extrn +BDOS
public +FBUPD
+FBUPD:
push psw
push b
push d
push h
; If the SIC holds, the FCB position is valid and FcrRRA is not,
; so get it updated. Otherwise neither SIC nor SOC holds and we
; will use the RRA set by FSEEK.
bitx FcrNotEof,FcrFlags
jrz HaveRRA
call +FBRRA
; Now FcrRRA reflects the record that follows BufEod. We want
; to position the file at the record at the head of the buffer.
; Its RRA is the present RRA less Bufeod div 128. "Bufeod div
; 128" is just bits 15..7 of Bufeod.
pushix
pop h
lxi d,FcrRRA
dad d ; HL-+RRA (low, mid, high bytes)
ldx a,FcrBufeod
ral ; carry = Bufeod bit 7
ldx a,FcrBufeod+1
ral ; A = Bufeod bits 15..7
mov d,a ; save that in D
; Ad-hoc subtract of a byte from a 24-bit number: subtract
; from the low byte and propogate a possible carry.
mov a,m
sub d ; subtract from low byte
mov m,a
inx h
mov a,m
sbi 0 ; propogate the borrow
mov m,a
inx h
mov a,m
sbi 0 ; ..to the third byte
mov m,a
; Ok, FcrRRA addresses the 1st record in the buffer, so now we
; can re-aim the CP/M file position to that record -- i.e., make
; the Sequential Output Condition hold. We do it with a direct-
; access write of that first record.
haveRRA:ldbwx d,FcrBufAdr
mvi c,BdosSetBuffer
call +BDOS ; set buffer address
if CpmLevel gt 22h ; in CP/M Plus don't forget to
mvi e,1
mvi c,BdosSetMulti
call +BDOS ; ..set record count of 1
endif
pushix
pop d
mvi c,BdosDirWrite
call +BDOS ; write one record
bresx FcrNoPosn,FcrFlags ; FCB matches file now
; That set up the FCB such that the next sequential operation
; will go to the record now at BufAdr (the Sequential Output
; Condition) so it is valid to call +FBOUT to write the entire
; active contents of the buffer (and thereby establish the
; Sequential Input Condition).
bresx FcrNoPosn,FcrFlags ; FCB position valid now
call +FBOUT
pop h
pop d
pop b
pop psw
ret
Figure 17-7. The fbupd subroutine effects an update write of the buffer.
In this latter, more common, case, fbupd calls a subroutine fbrra. It uses a BDOS request to set the RRA that is implicit in the FCB's current position into the FCB where fbupd can get at it. Then fbupd subtracts the size of the buffer in records from that RRA to arrive at the RRA of the first buffered record.
In either case, the module may then position the FCB with a direct-access write of one record. That has two effects. First, if that part of the file didn't exist before, it does afterward: a directory entry will have been created if necessary, and that allocation block of the file will have been allocated to it. Second, the BDOS will set up the FCB with position information: a direct write sets up an FCB so that the same record will be written by a sequential write. In other words, the SOC now holds. Once it does, fbout may be called to finish the job by writing the entire buffer using sequential write calls.
Now return to Figure 17-6 and read the fdout subroutine it contains. It simply chooses between two ways of writing the buffer -- sequentially, if the SOC holds, or as a file update when it does not.
It may occur to you that this procedure can cause the first 128-byte record in the buffer to be written twice, once in the direct write and again when the entire buffer is written sequentially. That is an inevitable, time-wasting result of the way the CP/M BDOS implements direct output. However, the time wasted is not often large. Under CP/M Plus disk output is buffered by the BDOS so that physical disk output will only be done once. Under CP/M 2.2, when the vendor's BIOS is correctly designed, the second write will not cause an extra output, although it will sometimes cause a needless sector read.
When the host of changes instigated by direct access had finally been assimilated, the toolkit's buffer control code was a seamless, interlocking set of operations. While the analysis behind them -- the concepts of SIC, SOC, and advancing the buffer -- is not complicated, and the implementation -- based as it is on just two flags, NotEof and NoPosn -- is tight and elegant, the operations are so interdependent that it is nearly impossible to understand it in pieces. I fear it's a matter of grasping it all at once or not at all.
With the buffer-control logic in place, it was possible to produce the final version (of four) of fseek. Its code appears in Figure 17-8. Its logic follows closely to that shown in Figure 17-5. However, the arithmetic on longwords and 3-byte RRAs is done in unusual ways for speed.
name 'FSEEK'
extrn +RAMFL
dseg
ds 1 ; scratch byte
targRRA ds 3 ; target RRA, longword div 128
targptr ds 1 ; target byte, longword mod 128
ds 1
highRRA ds 3 ; RRA of record following Bufeod
ds 1
lowRRA ds 3 ; RRA of record at head of buffer
RBA000 db 0,0,0,0 ; RBA of head of file.
cseg
public +FRWND
+FRWND:
push h ; save caller's HL
lxi h,RBA000 ; point to first byte of file
call +FSEEK ; seek there
pop h
ret
public +FSEEK
+FSEEK:
push b
push h
push d
xtix
; If the file is a device, do nothing.
bitx FcrDisk,FcrFlags
jz exit
; Convert the longword into a Relative Record Address as TargRRA
; and a record offset within that record as targptr.
mov e,m ! inx h ; load it into BCDE
mov d,m ! inx h ; from least to most
mov c,m ! inx h ; significant.
mov b,m
mov a,e
ani 7fh ; (note: carry now clear)
sta targptr ; offset within 128-byte record
; "Longword div 128" is the high 3 bytes of longword times 2,
; in other words we shift it left once and drop the low byte.
ralr e
ralr d
ralr c
ralr b
sded targRRA-1 ; store low byte,
sbcd targRRA+1 ; ..middle, hi: targRRA=D,C,B
; Get the current Relative Record Address of the file:
; If FcrNoPosn is false, the FCB accurately reflects the status
; of the buffer vis-a-vis the file while FcrRRA is unknown. If
; FcrNoPosn is true, the FCB is ambiguous but the FcrRRA value
; is one this module set earlier and is correct.
bitx FcrNoPosn,FcrFlags
cz +FBRRA
ldx d,FcrRRA
ldx c,FcrRRA+1
ldx b,FcrRRA+2
; From it, we want to calculate the RRA of the first record in
; the buffer (lowRRA) and the RRA of the record that follows
; Bufeod (highRRA). The number of records in the buffer is
; bits 15..7 of Bufeod. Get that into A.
ldx a,FcrBufeod
ral
ldx a,FcrBufeod+1
ral
; If we are working at end of file, lowRRA should be the file
; position RRA, and highRRA should be that plus A.
bitx FcrNotEof,FcrFlags
jrnz midfile
sded lowRRA-1
sbcd lowRRA+1 ; lowRRA = D,C,B = RRA
add d ! mov d,a ; add #recs in buffer
mov a,c ! aci 0 ! mov c,a ; and propogate carry
mov a,b ! aci 0 ! mov b,a
sded highRRA-1 ; highRRA = RRA + Bufeod div 128
sbcd highRRA+1 ; ..into storage as D, C, B
jr either
; We are working within existing data, so highRRA should be the
; file-position RRA, and lowRRA should be that minus A.
midfile: sded highRRA-1
sbcd highRRA+1 ; highRRA = D,C,B = RRA
mov e,a
mov a,d ! sub e ! mov d,a
mov a,c ! sbi 0 ! mov c,a
mov a,b ! sbi 0 ! mov b,a
sded lowRRA-1 ; lowRRA = RRA - Bufeod div 128
sbcd lowRRA+1 ; ..as D, C, B
; Whew. Ok, if lowRRA + highRRA, the desired byte
; falls within the buffer and we don't need to do any I/O.
either: lxi h,lowRRA+2
lxi d,targRRA+2
call compRRA ; compare target :: low
jrc outside ; (lowRRA is greater)
lxi h,highRRA+2
lxi d,targRRA+2
call compRRA ; compare target :: high
jrnc outside ; (highRRA is not greater)
; ..and that is the case. What we do now is to calculate
; targRRA - lowRRA, yielding a count of records into the buffer.
; They can't differ by more than 127 (since we limit buffers
; to 32K) so we only have to subtract the low bytes (and we
; don't care about any borrow, as when LowRRA=01FC and TargRRA
; is, say, 0200, giving 04 and a carry -- 8/20/84)
lda targRRA
lxi h,lowRRA
sub m
; That count, times 128, plus targptr, is our new Bufptr. We
; set it and exit. We do NOT alter the NotEof or NoPosn bits
; since the situations they reflect haven't changed.
ora a ; (clear carry)
rar ; A = new bufptr bits 15..8
stx a,FcrBufptr+1 ; ..and new bit 7 in cy
mvi a,0
rar ; cy moves to A bit 7
lxi h,targptr
add m ; A = new bufptr bits 7..0
stx a,FcrBufptr
jmp exit
; Now then. It seems the desired RRA falls outside the present
; buffer. We will be reloading the buffer but before we do, if
; it has been modified, we have to write it to disk.
outside: call +FDOUT
; Right, the buffer is clean. Now set the target RRA and try
; to position the file to it by reading at that address.
lda targRRA
stx a,FcrRRA
lda targRRA+1
stx a,FcrRRA+1
lda targRRA+2
stx a,FcrRRA+2
call +FBAIM
; If FB-AIM returned zero in register A, there does exist file
; data at that RRA. Therefore we are positioned in mid-file,
; and the NotEof bit should reflect that. Also the FCB does
; now match the file condition, so FcrNoPosn should be off.
; Then we can load the buffer with a sequential read.
ora a
jrnz nodata
bsetx FcrNotEof,FcrFlags
bresx FcrNoPosn,FcrFlags
call +FBINP ; sequential read to fill buffer
jr setptr
; No data exists at the target RRA. We set NotEof false to
; prevent attempts to input nonexistent data. If no EXTENT
; exists at this RRA, set NoPosn true because the FCB no longer
; reflects the buffer position.
nodata: bresx FcrNotEof,FcrFlags
cpi 04h ; 01/no data, or 04/no extent?
jrc nullrec ; (no data, FCB ok)
bsetx FcrNoPosn,FcrFlags
; Since there's no file data, prepare a null record at the head
; of the buffer just so we can point Bufptr at something.
nullrec:lxi b,128 ; BC=length of 128
stbwx b,FcrBufeod ; so does Bufeod
ldbwx d,FcrBufadr ; DE-+buffer
ldx a,FcrFillByte ; A = fill byte
call +RAMFL ; fill first record
; The file has been positioned and the buffer set up so that
; the desired 128-byte record is first in it. Set the Bufptr.
; Also set the LastCR flag, since an ASCII get after a seek
; should reveal eof immediately.
setptr: lda targptr
stx a,FcrBufptr
mvix 0,FcrBufptr+1
bsetx FcrLastCR,FcrFlags
; Exit, setting Z from the NotEof flag.
exit: bitx FcrNotEof,FcrFlags
xtix
pop d
pop h
pop b
ret
; Here compare two RRAs. DE points to the most-significant byte
; of the first, HL to the msb of the second. Return the flags
; for the first inequality working from high back to low.
compRRA:ldax d ! dcx d
cmp m ! dcx h ; compare high bytes
rnz
ldax d ! dcx d
cmp m ! dcx h ; ..middle bytes
rnz
ldax d
cmp m ; ..low bytes
ret
Figure 17-8. The implementation of fseek.
The module carries a 3-byte RRA in registers B, C, and D in that order. It can then store one with the sequence
sded addr-1
sbcd addr+1
When words are deposited in storage, the least significant byte is put at the lower address. That pair of instructions puts the insignificant register E at location addr-1, and puts
In other words, it deposits the three-byte RRA in order from most significant byte to least. So long as the byte at addr-1 is free, it can be ignored. The code for arithmetic operations on 3-byte RRAs is lengthy but a good deal faster than if they were treated as longwords.
When it decides that it must reposition the file, the module does so by calling fbaim. That small module does a CP/M direct-access read of one record into a scratch buffer. A direct-access read has the side effect of setting the FCB position to the same record. When fseek calls fbinp, the same record will be read again, this time sequentially. There is no way to avoid this double read of one record. However, it is unlikely to cause an extra disk access, because the record will already be in the BIOS's sector buffer the second time.
Notice the module's actions when no data exists at the desired RRA. Besides setting the NotEof (and possibly NoPosn) flag, it must do something about setting up the buffer. It was called to seek to a particular byte, and the buffer must reflect that. It solves the matter by creating a null record -- 128 bytes of the fill byte that was designated when the file was opened -- and aiming the buffer pointer into that.
There are four more operations that relate to buffer control or direct access, and which haven't been mentioned.
The first is fnote, the function that returns the present file position. What it returns is a longword that represents the present RBA of the file. It computes the RBA as follows. It calls fbrra to get the current FCB position as an RRA. If the SIC holds, it subtracts the size of the buffer from that RRA, thus getting the RRA of the head of the buffer. That RRA, times 128, plus Bufptr, yields the current RBA of the file.
The fsize function brings another CP/M facility into the toolkit's vocabulary. It returns the size of the file as a longword, a count of bytes. It uses a BDOS service to get the size of the file in records and multiplies that by 128 to arrive at its result. Unfortunately, this answer is likely to be wrong by as much as 127, since there is no way to tell how many bytes of the last record of a file are meaningful. (The questionable algorithm used in fappend could be applied, but only when the file is opened -- it needn't be to use fsize -- and then only by reading the last record.)
The feof? function was implemented to provide a look-ahead check, a way to tell if end of file was just about to happen. If end of file has already been seen (NotEof false), it can report that at once. And for all device files it reports end of file at once, because to do anything else could lead a program to hang on a device input request that will never be satisfied. It seemed better to have a program end early than never to end at all.
When NotEof is true, the file might still be about to run out of data. The module tests Bufptr versus Bufeod; if they are equal it calls fbinp to reload the buffer. Afterward the NotEof bit has the real truth of pending end of file.
When many direct access updates are applied to a file it is sometimes a good idea to take periodic "checkpoints." To checkpoint a file is to force all new or modified data in storage to be copied to disk. This is especially important in CP/M, since each new 16 Kb extent of the file is not recorded in the disk directory until the file position moves outside it, which might well not occur until the file is closed. If a program writes 15 Kb into a new file and ends without closing the file, the file will appear to contain no data. Furthermore, under CP/M Plus a large number of updated disk sectors may be held in storage until the file is closed.
The fcheckpt function performs a checkpoint by closing the file. The BDOS's close service does not make the file inaccessible; it just asks the system to update the disk directory and flush its sector buffers. That's just what is wanted. Under CP/M Plus, the module sets a file attribute bit which tells the BDOS that the close is for checkpoint purposes. The same result is accomplished, but the BDOS retains a copy of all buffered disk sectors, rather than discarding them as it would otherwise do.
Before it calls for the BDOS service, fcheckpt must write the file buffer. It does so by calling fdout. It is for this use that fdout (in Figure 17-6) does not itself update the buffer pointer. That has to be done by its caller -- fdump or fseek -- because, when fcheckpt calls it, the file position is not to be changed. It must be the same after the checkpoint as before, so that output or input may continue from the same place.
Interestingly enough, fcheckpt must set NotEof true after it writes the buffer to disk, even if the file was being used for sequential output before the checkpoint. That's because, the present buffer having been written, the SIC holds at least until the next time the buffer is advanced.
The relationship among the modules discussed in this chapter is shown in Figure 17-9.
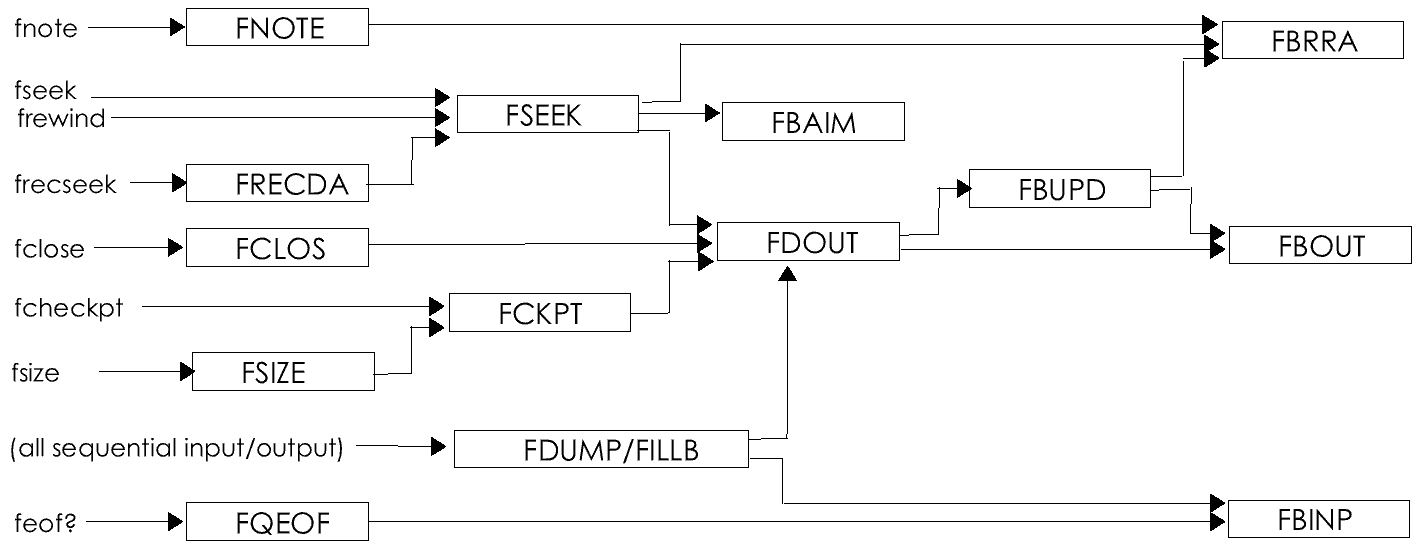
Figure 17-9. The calling relationships among the modules that are concerned with direct access and buffer management.
It is difficult to compress two month's hard thinking into a few thousand words and some listings. Here at the end of this discussion I am beset with the fear that at least some readers will have found the internals of the file functions to be incomprehensible. If so, I apologize for their complexity and for the inadequacy of my explanation. But be cheered by the thought that you do not have to understand how they work, only what they do. What they do is considerably simpler than the code that implements them. And use is what the toolkit is all about, after all
This appendix contains concise, formal documentation of the 121 functions in the Z80 toolkit. The functions are described in related groups. To access the description of any one function directly, look it up in the summary reference that appears on the inside covers of this volume. There you will find the page number on which it is described.
In addition, Part I of the book contains many discussions and examples of the use of toolkit functions, while Part II contains a lengthy discussion of their design goals and internal methods. If you want more information about a particular function than you can find here, look it up in the special index to function-names at the end of the volume.
The toolkit functions are invoked as assembler macros. The syntax of a macro's parameters is shown in symbolic form as italicized words, some with a hyphenated suffix; for example,
strput string-du,byte-a
The name of this macro is strput. It takes two parameters: the first describes a string and the second a byte. Each of these is an assembler expression. Besides ordinary assembler expressions -- numbers, names, and arithmetic combinations of those -- there are some special register names that can be used as macro operands. Here is the complete list of special register names and what they tell a macro to do:
The hyphenated suffixes on the symbolic names shown here indicate which special register names you may use at each position. In the strput macro, for instance, the suffix on string-du indicates you may use either +A. Here are some of the many ways the strput macro might be written:
strput astring+16,'C'+80h ; two expressions
strput message3,+A ; expression, reg. A
strput +D,AsciiCR ; reg. DE, expression
strput +A ; use DE and A, update DE
Most macro parameters are required. A few, however, may be omitted. When that is allowed, the parameter is shown in square brackets.
The following functions establish and control the program's environment.
Any assembly that uses the toolkit must include the macro library environ.lib. It defines all the toolkit macros and the symbolic constants they use.
It also defines symbolic constants for common storage locations, character values, and file attributes, all of which you may find useful. The complete list of symbolic constants appears in figure 11-1, page ???.
These macros set up the execution environment for a main program and for a subordinate module.
prolog
The prolog macro must be first executable statement in a main program's code section. It sets up a stack and initializes dynamic storage allocation. Then it calls the instruction that follows it with a call instruction so your program may end with a ret instruction. The macro also assembles code to support the abort and service macros.
entersub
The entersub macro should appear near the beginning of a subordinate module that will be linked with a program the contains prolog. It may be placed anywhere, as it contains no instructions. It simply defines as external names two items that are assembled in the prolog macro.
The abort macro allows termination of a program with a message.
abort [condition] [,address-d]
The condition is a jump-condition such as z or nc. It specifies the condition under which the program should be terminated. If that condition does not hold when the macro is executed, execution continues normally. If you omit condition, the termination is unconditional.
The address specifies a message string to be displayed at the console. If it is omitted, no message will be displayed. The message string must end with a dollar-sign, $, or garbage will be displayed.
Under CP/M Plus, program termination sets the Program Return Code to a value meaning "failure."
These functions give access to the CP/M command "tail" as a set of token-strings.
savetail
tailtokn number-a
The savetail function divides the command tail into tokens. A token is any sequence of characters delimited by spaces, tabs, or commas. Spaces, tabs, and commas are discarded and cannot be part of a token. Each token is saved as an independent string in storage that is allocated dynamically. The count of tokens, from zero to 63, is returned in register A.
The tailtokn function returns register DE pointing to the token whose number is given as number. This prepares DE to be used as input to string functions, for instance strcmp or strlook. The first token is number 1. If there is no number token, register DE is returned pointing to the null string.
The command tail as a whole remains in low storage; no toolkit function will destroy it. Its length is a byte at CpmTailLen and its contents are a string beginning at CpmTail.
This function tests if the operator has hit a key.
testcon
The macro sets the Zero flag true if the operator has not hit a key, false if a key has been hit. The pending keystroke is not read; read it with fgetchar, for example.
These functions permit filling, clearing, or copying of large blocks of storage.
fillblok target-du,count-b,byte-a
copyblok target-du,source-hu,count-b
The fillblok function fills count bytes beginning at address with the value of byte. Its most common use is to clear an area to zero, as in
fillblok +D,TableLength,0
The copyblok function assembles a Z80 instruction ldir to copy count bytes from the second address to the first address.
Even when its count parameter is given as +B, neither function alters register BC. This permits doing several copies or fills of the same length without reloading the count even when register H or D or both are being updated.
All storage from the end of the program to the start of the CP/M BDOS is set aside by prolog. These functions allow blocks of storage to be allocated dynamically.
space? count-b
The space? function returns in HL the amount of storage that would remain if count bytes were allocated. If less than count bytes are available now, HL is returned with zero and the Carry flag is set. It can be used to check the size of storage,
dseg
msg: strconst 'Size of storage is '
cseg
space? 0
fputstr user,msg
fputbwad user,+H,0
or to abort the program if no storage remains:
space? needed$size
abort c,no$room$msg
The dslow and dshigh functions allocate count bytes at the lowest or highest available address, respectively:
dslow count-b
dshigh count-b
Both return the address of the allocated block in HL. If count bytes aren't available, or if allocation has been locked, they abort the program with a message.
dslock
The dslock function prevents further use of dslow or dshigh, and returns the boundaries of presently-available storage (the low address in DE and the high address in HL). You may use the storage between those addresses in any way, for example to build a table whose size is not known at assembly time. Note: the savetail function and all file-open functions use dynamic storage allocation. Save the command tail and open all files before using dslock.
dsunlock low-d,high-h
The dsunlock function re-initializes dynamic storage allocation with new low and high boundaries. The first address is the new low boundary and the second, the high boundary. Use dsunlock to reenable dynamic allocation after it has been locked, or to confine storage allocation to a smaller area while you use a larger one for your own purposes.
The locking functions allow you to do your own allocation. For instance, you might get the current boundaries of storage with dslock, then build a table from the contents of a file at the lower end of storage. After building the table, when you know how much space remains, restart dynamic allocation by calling dsunlock, passing the byte after the end of the table as the new low limit and the old high limit as the high.
These functions operate on an ASCII character. In all cases, their parameter must be one of +H, meaning the byte in A, the byte addressed by DE, or the byte addressed by HL. In all cases, register A will contain the byte after the operation.
toupper adh
The toupper function makes a lowercase letter into an uppercase one. It has no effect on characters other than lowercase letters. It does not change a byte in storage, only in register A. That is, following
toupper +D
the byte addressed by DE will be unchanged, but register A will contain its uppercase form.
The other functions test a byte to see if it is a member of a certain set. They set the Zero flag true when the byte is a member of the set, false when it is not. The macro names and the sets they test for are:
None of these functions alter a byte in storage. Except for hdigit, none alter the byte in register A. The hdigit? test makes the letters a-f uppercase in register A when it finds them, so that if the tested byte is in fact a hex digit, it will be an uppercase one.
The following functions operate on binary integers. They are modelled on the Z80's existing arithmetic instructions, in that their input is either a constant or the contents of a register, and their output is always in a machine register.
Three lengths of binary integers are supported: the byte, the 16-bit word, and the 32-bit longword. Bytes are always unsigned, longwords are usually unsigned, while words may be treated as signed or unsigned. Integers and their uses are discussed at length in chapter 13.
These functions are used for arithmetic on small, unsigned numbers, primarily in the calculation of addresses.
addhla
addhl2a
The addhla function adds the contents of register A into HL. Use it to index a table of bytes. The addhl2a macro adds twice the contents of A into HL. Use it to index a table of words. Neither function sets meaningful flag values, so overflow cannot be detected.
mpy816 number-h,byte-a
The mpy816 function multiplies an unsigned 16-bit number by a byte and leaves the result in HL. Use it to calculate the offset of an entry within a table, given its index:
mpy816 +H,entry$length
lxi d,table
dad d ; HL->indexed entry
There is no protection against overflow; you must be sure that the result won't exceed 16 bits.
div816 number-h,byte-a
The div816 function divides an unsigned 16-bit number by a byte. It leaves the quotient in HL and the remainder in register A.
These functions do arithmetic on unsigned 16-bit words. They do not set meaningful flags.
divbw dividend-h,divisor-d
The divbw function divides the second number into the first. It returns the quotient in HL and the remainder in DE.
mpybw multiplicand-h,multiplier-d
The mpybw function multiplies two unsigned words, yielding a 32-bit longword in registers DEHL (most significant byte in register D). You can test to see if the result requires more than 16 bits:
mpybw +H,1325
mov a,d ! ora e
jz fits$in$a$word
These functions do arithmetic on signed 16-bit words. They do not set meaningful flags.
cplbw number-h
The cplbw function takes the two's complement of a number, leaving the result in HL.
cmpsw first-h,second-d
The cmpsw function compares two signed 16-bit numbers, leaving the machine flags set as for signed subtraction of the second from the first. That is, if the numbers are equal, the Zero flag will be true; if the second is greater (more positive), the Carry flag will be true.
divsw dividend-h,divisor-d
The divsw function divides the second number into the first. It returns the quotient in HL and the remainder in DE. The signs of quotient and remainder will be correct--the quotient negative if the signs of dividend and divisor were different, the remainder negative if the dividend was negative.
mpysw multiplicand-h,multiplier-d
The mpysw function multiplies two signed numbers, returning a 32-bit signed result in registers DEHL (most significant bits in register D). The result fits in a word if all the bits of DE and the high bit of H are all alike. Here is a subroutine that will return Zero true if the value of a signed longword fits in 16 bits or less.
mov a,h ; copy HL bit 15 to...
add a ; ..carry flag
mvi a,0 ; set A to 8 bits...
sbi 0 ; ..all-0 or all-1
cmp d ; check all bits in d
rnz ; return if any wrong
cmp e ; check all in e
ret ; Z true if all bits ok
These functions operate on 32-bit longwords. In all cases, the operand is contained in registers DEHL.
storelw address-b
loadlw address-b
The storelw function stores registers DEHL at an address. The loadlw function loads four bytes from an address into registers DEHL. Longwords in storage are laid out with their least significant byte at the lowest address, to conform with the conventional way of storing words. This "Intel order" is also used in software for the 8086; it has the advantage that, when you refer to the address of a longword in storage, you are referring at once to the longword, to its least significant word, and to its least significant byte.
srllw
slllw
The srllw and slllw functions shift registers DEHL right and left, respectively, by one bit. These are "logical" shifts, i.e. the bit shifted in is a zero. The bit shifted out ends up in the Carry flag.
cpllw
The cpllw function takes the two's complement of the longword in DEHL. It may be used to take the absolute value of a result returned by mpysw:
mpysw +D
mov a,d
ora a ; test sign
jp is$positive
cpllw ; neg., make absolute
These functions operate on 32-bit longwords. In all cases, one operand and the result are contained in registers DEHL, while the other operand is in storage.
addlw address-b
sublw address-b
The addlw function adds the longword at an address into registers DEHL. The sublw function subtracts the longword at an address from registers DEHL. Neither sets any meaningful flags.
cmplw address-b
The cmplw function performs an unsigned comparison between registers DEHL and the longword at an address. If the two are equal, the Zero flag is set; if the one in storage is larger, the Carry flag is set.
These functions operate on unsigned words and unsigned longwords, yielding a longword result. In all cases, the longword operand and the result are in registers DEHL.
addlwbw augend-b
sublwbw minuend-b
The addlwbw and sublwbw functions increment and decrement registers DEHL by the value of a number. They can be used, for instance, to adjust a file position by some amount. No meaningful flags are set.
divlwbw divisor-b
The divlwbw function divides a number into a longword, yielding a quotient in HL and a remainder in DE. It is possible for overflow to occur, but it will not be detected. For example, dividing 1,000,000 by 10 should yield a quotient of 100,000, but only the low 16 bits of the quotient will be retained in HL. You can test for overflow by comparing the divisor to the value in register DE before division; if the divisor is less, overflow will occur:
lxi b,divisor$value
xchg ; high word to HL
ora a ; clear carry
dsbc b ; compare divisor
abort nc,overflow$msg
dad b ; restore dividend
xchg ; ..to DE
divlwbw +B
The following functions are used to operate on strings of bytes. A string is a sequence of zero or more bytes followed by a byte containing binary zero (a null). The length of a string is the number of bytes that precede its ending null. The null string is a byte of zero alone. Normally a string contains only ASCII characters, although you may store non-ASCII byte values (other than binary zero of course) in a string if you want to. Strings and their uses are discussed at length in chapter 14.
In all the executable string operations, the first parameter is the address of a string. This address may be an assembler expression (typically a label), or +Dupdate. The last means that the input is the string addressed by DE, and DE is to be updated to address the null at the end of the string.
These macros generate static data definitions. They are normally used in the data segment of a module, although they may be used in the code segment or a common segment as well.
strspace count
The strspace macro reserves space for a string with a length of count data bytes plus a null byte, and assembles a null byte at the head of the space.
strconst constant [,count]
The strconst macro assembles a string with a constant value. The constant operand must be an assembler expression that is valid for the db statement. It may be a list of such expressions, enclosed in angle brackets:
hello: strconst <AsciiBEL,'Hi there!',AsciiCR>
When coding such a list, be aware that the assembler will change all pairs of apostrophes in it to single apostrophes.
The second operand of strconst forces it to reserve space for a string of count bytes regardless of the length of the constant. It is normally omitted; then exactly as much space is reserved as is needed to hold the constant string.
These functions are used to scan over strings.
strend +Dupdate
strskip +Dupdate
The strend function advances register DE to point to the ending null of a string. The strskip function advances register DE past blanks and tabs to a byte that is not a blank or tab. It returns in register A the byte that stopped the scan (it may be the ending null). Since the purpose of these functions is to advance a pointer over a string, the only permissible parameter is +Dupdate.
strlen string-du
The strlen function returns the length of a string in register HL. There is no limit to the length of a string, hence the result is a 16-bit unsigned word. If you require a string to be less than 256 bytes long, test register H for zero afterward.
These functions are used to modify the contents of strings.
strnull target-du
The strnull function stores a null in the first byte of a string, giving it zero length. Use it to clear any previous contents from a string.
strput target-du,byte-a
strappnd target-du,source-hu
The strput function appends a single byte to a string, while strappnd appends the entire second string to the end of the first one. Use these functions in combination with output conversion functions (below) to build up a complete line from constant and variable parts.
strcopy target-du,source-hu
The strcopy function copies the second string into the space occupied by the first, replacing it. It is exactly the same as
strnull first
strappnd first,second
that is, it makes the target be the null string, then append the source to it.
straptxt target-du,source-hu
The straptxt function takes bytes beginning at an address and appends them to a string. It stops appending when it encounters a space, comma, or control character. It returns the character that stopped the scan in register A. Use it to isolate a "token" from any sequence of text bytes and make it into an independent string.
strtake target-du,[source-hu],size-b[,byte-a]
The strtake function appends exactly size bytes to a target string, lengthening it by that much. If size is zero, it has no effect. Otherwise it takes the bytes it needs from the source string and, if more are required, it appends padding bytes byte until size bytes have been appended.
One use of strtake is to give a fixed length to a string of unknown length, truncating or padding it as necessary. When the source is omitted a null string is created and used as the source, so the output is just size padding bytes, like the BASIC function STRING$. If the padding byte is omitted, the default is the space character.
This function compares two strings.
strcmp first-du,second-hu
It returns Zero true and a null in register A when the strings are identical. When they are not, it returns the first unequal byte from the first string in register A, and Zero false. If the byte from the second string is greater, Carry will be true.
When register-update parameters are used, registers DE and/or HL are returned pointing to the unequal bytes.
These declarative macros define static tables of strings.
strtable count
strentry constant
The strtable macro reserves space for a string table of count entries. The entries of this table must be defined following this strtable statement and before the next one.
The strentry macro defines one string which is an entry of the last-defined string table. Its parameter, constant, follows the same rules as the parameter of strconst.
Table entries do not need to be adjacent to each other or to the strtable statement. If fewer entries are defined than specified by the count, the rest of the entries will default to the null string. If too many entries are defined, unpredictable results will follow. For best performance, define the most-used table entries first.
strlook string-du,table-hu
The strlook function is executable. It causes a search for string in the given table, returning Zero true if the string matches one of the table entries and false if it does not.
When table is given as +Hupdate, register HL is returned with the address of the null that terminates the matching table entry. If there was no matching entry, HL points to a null byte at the end of the strtable macro. Incrementing HL yields the address of the byte following that null, that is, the address of whatever was assembled immediately following the matching strentry--or whatever followed the strtable macro if no match was found. Thus if you assemble a translation value following each strentry, and a default translation value right after strtable, you can use the strlook function to translate a string into another value.
These functions take digit bytes from a string and convert them to binary words in register HL.
straxbw string-du
stradbw string-du
stradsw string-du
The straxbw function converts hexadecimal digits to an unsigned word. The stradbw converts decimal digits to an unsigned word. These functions operate in the same way: they scan over blanks and tabs; convert zero or more consecutive digit bytes until they reach a non-digit; and return that non-digit (which may be the ending null) in register A.
The stradsw function scans to a nonblank, nontab byte and inspects it. If it is a plus or a minus, the sign is noted and any blanks and tabs that may follow it are also skipped. Then the function converts digits up to a non-digit. If a minus sign was seen, it complements the converted binary word.
All three functions a result of zero if no digit is seen. There is no protection against overflow; if the converted number requires more bits than will fit, the more significant bits will be lost.
These functions take a binary byte and convert it to ASCII digits.
strbbax string-du,byte-a
strbbad string-du,byte-a
Both functions convert a byte (usually given as +A) to two digit characters, and append the digits to a string.
The strbbax function always appends two hexadecimal digit characters. The strbbad function produces 1-3 decimal digits with a leading space, for a total of 2-4 appended characters. If you need to control the number of output characters, move the byte to register HL and convert it with strbwad, below.
These functions take a binary word or longword and convert it to ASCII digits.
strbwax string-du,number-h
strlwax string-du,address-h
These functions convert a word or longword to hexadecimal digits. The strbwax function converts a number to four hexadecimal digits; strlwax converts the longword at an address to eight hexadecimal digits.
strbwad string-du,number-h,width-a
strswad string-du,number-h,width-a
strlwad string-du,address-h,width-a
These functions convert a signed word, unsigned word, or an unsigned longword at an address, to decimal digits. In each case the converted number begins with a one-byte sign, either a space for unsigned and positive numbers or a hyphen for a negative signed word. The sign is followed by at least one digit. Leading zeros are stripped. Not more than five digits can be produced from a word, and not more than ten from a longword.
The third parameter of these functions, width, is a number from 0 to 255 which specifies the minimum number of characters to be appended to the output string. If more digits are generated, they will be appended, but if fewer are generated, they will be padded on the left with spaces to make up the desired width. Thus the statement
strswad message,+H,0
will append a sign plus as many digits as are required to represent the contents of HL. On the other hand,
strswad message,+H,8
will always append eight characters, some of them being leading blanks. Use a field size of zero for free-form output, and a larger field size for columnar output.
The following functions operate on files. A file is defined by a control record that is assembled by the filedef macro. The first operand of all executable file macros is the address of a file control record, either as an expression or as +D. The file functions support the entire CP/M file system, including device I/O, with a consistent set of operations.
For more discussion of the operations of files, especially how the functions relate to CP/M operations, see chapters 15-17.
A file is assigned a file specification (filespec) that relates it to either a CP/M disk file or a CP/M character device. Since a filespec may be taken from user input, a program often can't tell in advance whether a given file will be a device or a disk file. To the greatest extent possible, files that represent devices behave just like files that represent CP/M disk files. The main difference is in the treatment of end of file. There is a definite, physical end to a disk file which can be reported by any input function that detects it. A device has no physical end of file indication, so an input function must always try to read from one when asked. If the program attempts to read a device when no more data is forthcoming, the program will hang.
A program distinguishes between ASCII files and binary files by the input and output functions it uses. (It is also free to mix these types of functions if that suits the application.) The binary I/O functions do not look at the contents of the data they transfer, and do not report end of file until the physical end of a file is reached. Because of that, the binary functions should never be applied to a device file.
The ASCII functions assume that the file contains only ASCII characters. As a result, they
With ASCII input functions, the physical signal at end of a disk file and the logical end of file signal, control-z, have equal weight. Once either has been seen, the file will return nothing but control-z bytes - or, if it is a disk file, until it is repositioned with a seek.
These functions also ensure that end of line (a CR) will be seen immediately prior to end of file, in a non-empty file. That is, the first input after a file is opened or repositioned may be Control-Z, but if it is not, the ASCII input functions guarantee that the file will contain only complete, CR-terminated, text lines.
These macros are declarative; they assemble into file control records. A file control record defines a file to the executable file functions. The macros are ordinarily used in the data segment and normally have a label.
filedef size [,dr] [,name] [,type] [,pass]
The filedef macro defines a file that may be used for any purpose, disk or device. Its first parameter, size, is required; it specifies the size of the file's buffer. It must be a multiple of 128, from 128 to 32640. A space of this size will be allocated dynamically the first time this file is opened. All files defined with filedef must be opened before they can be used for I/O.
In general, the larger the buffer the faster the I/O operations will be. However, there must be space for all the buffers of all the filedefs a program defines. A good choice of buffer size, especially for direct-access files, is the size of the largest disk sector used in your system, usually 512, 1024, or 2048 bytes. When a program's main work is to copy from one file to another, give one file a large buffer (16384 or so) and the other one a small buffer.
The remaining parameters of filedef specify a constant filespec. Use these to supply a filespec when you will not be assigning a filespec dynamically with fassign. The drv is a single letter specifying a disk drive; name and type are the filename and filetype; and pass is a CP/M Plus password.
confile
msgfile
lstfile
auxfile
The other macros define files dedicated to specific devices. These files do not need to be opened before use. The confile macro defines an input/output file dedicated to the CP/M console device; it assembles a 128-byte buffer for use with edited line input. The remaining macros (and other device files in general) do not require buffer space.
The msgfile macro defines an output-only file dedicated to the console; use it to define a destination for diagnostic messages. The lstfile macro defines an output-only file dedicated to the CP/M list device. The auxfile macro defines an input/output file dedicated to the CP/M auxiliary device (or reader/punch device, in CP/M 2.2).
These functions operate on a file to set or retrieve its filespec.
fassign file-d,string-hu [,file-b] [,byte-a]
fgetspec file-d,string-hu [,byte-a]
They translate between a filespec in its compact, punctuated format as a string (e.g. B:TEST.DAT or CON:), and its fixed-length unpunctuated form in a CP/M file control block.
Fassign scans a string and formats all or part of it into a file, while fgetspec retrieves the filespec, formats it in punctuated form, and appends it to a string.
When it scans a filespec string, fassign notes the presence of "wildcards" (asterisks or question marks) and notes any errors (invalid drive letter; name, type, or password too long). Upon return, register A contains
Furthermore, the Zero flag is true if an error was seen. Thus you may code
fassign myfile,thatstring
jz bad$spec
cpi '?'
jz ambig$spec
The optional third parameter of fassign is the address of another file, one previously set up with a filespec by fassign or by assembly of filedef. After successfully installing a complete filespec from the string, fassign checks for a missing drive, name, or type. If a part is missing, it is supplied by copying from the default file. Use this feature to implement the "utility convention," under which the missing parts of an output filespec are supplied from the input filespec (discussed at length in chapter 6).
The optional fourth parameter of fassign is a set of bits which may be used to direct the assignment of only part of a filespec. Use it to assign an overriding filetype or drive-letter after assigning a filespec taken from user input. The significant bits of the byte are
When the parameter is omitted, all four bits are passed. You may specify any combination of bits, but only the indicated parts of the filespec should be present in the string. Don't ask fassign to assign only a filetype from the string "B:NAME.TYP." It will not skip over the unwanted parts, so would attempt to assign the filetype "B:NAME" and report an error.
Fgetspec retrieves a filespec from a file control record, punctuates it, and appends it to a string. Typically you would use it to append a filespec to a message of some kind. Its optional third parameter is a set of bits like the fourth parameter of fassign; it allows you to extract only a part of a filespec. Bits 0, 1, and 2 call for extraction of the drive, filename, and filetype respectively. Bit 3 is ignored, since it would be a breach of security to retrieve a password. If the parameter is omitted, all parts of the filespec are retrieved.
These functions search the CP/M disk directory and return filespecs for further processing.
fdirbegn target-d,argfile-h
fdircont target-d,argfile-h
The functions are identical in operation. However, fdirbegn must be used first in any search sequence, while all following searches in that sequence until "no matching file" is reported must use fdircont. This reflects the design of the CP/M service the functions use.
The second parameter of each function is a file, set up with a filespec by fassign or by assembly of filedef. This is the "argument" filespec. The object of the search is to find all the existing files that match it.
The first parameter is also a file, the target file. It will be filled in with the filespec of a matching file, as if by fassign. The target's password will be copied from the argument file.
When no matching file is found, register A is returned with 0ffh; otherwise it contains a small number. The general form of a directory search loop is
fdirbegn target,argument
loop: inr a
jz done
call process ; do something with "target"
fdircont target,argument
jmp loop
done:
Although the target file is set up ready for use, you should not use it until the search sequence is complete. CP/M file operations (and hence most toolkit file operations) must be avoided during a search sequence, otherwise the sequence may miss files or start over from the beginning. The best method is to extract the discovered filespecs with fgetspec and store them in a table (as was done in the antput program, chapter 10).
Another use of fdirbegn is to verify that a user-supplied filespec actually exists as a disk file, or to initialize a file with attribute bits.
These functions set and retrieve the CP/M attributes of a disk file.
fgetattr file-d
fputattr file-d,byte-a
A CP/M file has seven "attributes." In a file control block, the attributes are bits distributed through the filename and filetype fields. The toolkit represents them with the bits of a single byte (see figure 11-1, page ???, for their symbolic names).
The fgetattr function collects the attribute bits from a file and returns them in register A. The file passed to fgetattr must contain a filespec initialized by CP/M, either through opening the file or from a directory search. A file initialized by fassign or assembly contains no attributes.
The fputattr function takes the bits of register A, distributes them into a file, and calls CP/M to assign those bits that file. As an example, here is how a user-specified file could be made read-only (omitting all checks for errors).
fgetstr user,spec
fassign argument,spec
fdirbegn target,argument
fgetattr target
ori FileAttRO
fputattr target,+A
This function returns the size of a file, in bytes, as a longword.
fsize file-d,address-hu
The size of a disk file, in bytes, is placed in storage as a longword. The file given may or may not be open and in use. If it is open, it is checkpointed (see fcheckpt, below) before its size is taken. The size of a device file is zero.
To see if the size is less than 65,535 bytes, load the longword with loadlw and test register DE for zero. Here is a subroutine that will get the size of a file into HL as a count of 128-byte records.
push d
fsize thefile,worklw
loadlw worklw
mov d,e
mov e,h
mov h,l
dad h
xchg
dadc h
pop d
ret
If a file contains more than 65,535 records (as it may in CP/M Plus), this routine will lose track of the most significant bits. For a CP/M Plus system where the hardware permits files over 8MB, test for DE exceeding 128 after loading the longword.
These functions open a file for input/output operations. All files declared with filedef must be opened before use. Files declared with confile, lstfile, etc., must not be opened; they are ready for use.
freset file-d
frewrite file-d [,byte-a]
fappend file-d [,byte-a]
fupdate file-d [,byte-a]
All take a file and prepare it for use with input, output, and file-position operations. If this is the first time the file has been opened, a buffer of the defined size is allocated dynamically. Then a check is made to see if the assigned filespec names a device. If it is not a device, the functions attempt to open a disk file, which may or may not exist. If a disk file exists, they check to see if it is read-only. The four functions differ mainly in how they handle these three conditions: a device file, a nonexistent file, and a read-only file.
Under CP/M Plus, all functions look to see if the file is protected by a password against the kind of use implied by the function used--reading for freset, writing for fappend or fupdate, replacement for frewrite. If the file is protected, and if no password was assigned to the file, the user is prompted to enter a password.
The optional second parameter of the frewrite, fappend, and fupdate functions specifies the value of a fill-byte to be used to pad out the last, 128-byte record of a disk file. If it is not specified, the default value is Control-Z, normal with text files.
The filespec assigned to a file determines if it is a device. A device filespec has no drive letter and no filetype. The device filenames are:
Any other filespec will be assumed to be a disk file.
The freset function prepares a file of any kind for input from its start. If it returns Zero true, there is no input to be had and any input requests will report end of file.
The freset function is also a general open to be used for all types of file use when your program is prepared to handle any combination of file circumstances. For example, use freset when you can tolerate read-only disk files and output-only devices (use the frdonly? macro to test for these cases after opening the file). Use it also when device files are acceptable (use fdevice? to separate device from disk files).
If freset returns Zero true, you can use fdirbegn to see if the file exists and is empty, or if it just doesn't exist.
The frewrite function prepares a file for output from its start. It will abort the program if the file represents a read-only disk file or an input-only device. Devices that allow output require no special handling. When the file doesn't exist, frewrite creates a new disk file.
When a disk file of the same name exists, frewrite prepares a new scratch file with the filetype of $$$. The existing file will be erased only when fclose is applied.
The fappend function prepares a file for output at its end. If the file is read-only or an input-only device, the program is aborted. Devices that allow output require no special handling. When the file doesn't exist, fappend creates a new disk file.
For an existing disk file, fappend positions the file at its end using the following rules. If the fill-byte is Control-Z, the file is positioned to write over the leftmost Control-Z in its last record. When the fill-byte is not Control-Z, the file is positioned to write over any contiguous, trailing bytes of that value in its last record. This rule handles ASCII files and most binary files. In a few cases, all bytes of a file's last record are significant. Then you must open the file with freset, take its size with fsize, and use that result as input to fseek to position the file.)
The fupdate function prepares a file for direct-access output. It aborts the program if the file represents a device, or if it is read-only. Otherwise it positions the file at its first byte and returns Zero true if the file is empty.
These functions test various conditions of an opened file.
frdonly? file-d
The frdonly? function sets Zero true if the file is a read-only disk file, an output-only device, or has not been opened. Use it after freset to find out if a file can be written.
fdevice? file-d
The fdevice? function sets Zero true if the file represents a device or has not been opened. Use it after freset of a file whose name was assigned from a command operand, to see if the command named a device not a disk file.
feof? file-d
The feof? function sets Zero true if the file contains no further data or if it has not been opened. If the file contains data, the function returns the next input byte in register A so that the program may test for logical end of file (Control-Z). However, the byte is not consumed; it will be returned by the next input request.
When applied to a device file, feof? always returns Zero true and a null in register A. This is because a device has no state of physical end of file; it may or may not be capable of returning more data, but the only safe thing for the function to do is to suppose that it will not.
This function ensures that all a file's data are on disk.
fcheckpt file-d
The fcheckpt function has no effect on a device file. For a disk file, it ensures that all buffered data is written to disk and that the disk directory reflects all new data allocations to the file. Use it to ensure that a direct-access file is complete after updating and before taking user input that may abort the program.
This function completes processing of a disk file.
fclose file-d
The fclose function has little effect on a device file or on a disk file to which no output has been done. For a new or modified disk file, it ensures that all buffered data has been written to disk and that the disk directory reflects the full size of the file.
If the file was opened by frewrite and there was an existing file, it is fclose that erases an existing file and renames the scratch file (type .$$$) which received the output.
After closing a file, further input attempts will return end of file, and further output or seek attempts will be ignored.
These functions return one or more bytes of binary data from a file. All return Zero true if physical end of file is true when they complete processing. This can't happen if the file is a device; for device files the functions will wait until they have received the number of bytes requested.
fgetbyte file-d
fgetword file-d
fgetlw file-d,address-hu
The fgetbyte function returns one byte in register A (a null if end of file is true when the function is called). The fgetword function returns two bytes in register HL. The fgetlw function returns four bytes into storage at an address. These two functions fill out the word or longword with nulls if end of file is seen.
fgetblok file-d,address-hu,count-b
The fgetblok function fills a block of storage starting at address with as many as count bytes. The function returns the count of bytes received in register BC; it will be equal to count unless end of file intervenes.
These function write one or more bytes of binary data to a file.
fputbyte file-d,byte-a
fputword file-d,number-h
fputlw file-d,address-hu
fputblok file-d,address-hu,count-b
The fputbyte function writes one byte, fputword writes a 16-bit word in low-byte, high-byte order, and fputlw writes a longword from an address in storage, least-significant byte first. The fputblok function writes count bytes starting at address.
These functions get one or more ASCII bytes from a file.
fgetchar file-d
fgetstr file-d,string-hu,count-b
The fgetchar function returns the next byte from the file in register A. It handles several special cases of text input.
If a CR byte is read from a disk file, the following LF byte is discarded. Thus the single CR byte represents the end of line condition.
If either physical end of file or a Control-Z input is seen, Control-Z is returned and the Zero flag is set true. Further attempts to read ASCII input will continue to return Control-Z and Zero true (unless the file is repositioned).
Once a data byte has been returned from a given file position, the function will ensure that a CR will be seen immediately prior to end of file. Thus the program will not have to deal with an improperly-terminated text line; if a file has data at all, it will contain complete lines. ASCII input will reveal end of file only following file-open, a seek, or the return of a CR.
The fgetstr function uses fgetchar to read a line of text and append it to a string. It reads until it sees a CR, or end of file, or until it has read count-1 bytes (one byte is needed for the ending null). The function returns the last byte read in register A; it may be Control-Z, or CR, or another byte if the count ran out before end of line.
The function returns the residual count in register BC; that is, the input count, less the bytes read, less one for the null. Note that this is the opposite of the binary input function fgetblok, which returns the count of bytes read. The reason for this inconsistency is that, while fgetblok is normally used to read records of a fixed size, fgetstr is more likely to be used to read as many strings as will fit in a given area. Since the count is reduced on each read, you can write a loop like this to fill a buffer with strings.
loop: fgetstr infile,+B
jz done ; stopped by eof
mov a,b ! ora c
jz done ; stopped for no more room
inx h ; step over null
mvi m,0 ; make null string
jmp loop ; read next line
done:
When applied to a file that represents the console, fgetstr has a special function: it uses the CP/M service for edited line input to read a line from the keyboard. This permits the operator to use the CP/M line-editing keys (Control-X, Backspace, and several others under CP/M Plus) to correct typing errors. In this use, the maximum length of an input line is determined by the size of the file buffer and by the count parameter. A file declared with confile has a 128-byte buffer, allowing the user to type up to 126 bytes. For a longer line, declare a file with filedef, giving it a 256-byte buffer and the filename CON:. After it has been opened, such a file allows the CP/M maximum input line of 254 bytes. However, the count sets the final limit on the length of line permitted; no more than count-2 bytes can be entered in any case.
These functions use fgetchar to read digit characters and convert them to binary.
fskip file-d
fgetaxbw file-d
fgetadbw file-d
fgetadsw file-d
The fskip function reads blanks and tabs until it finds a byte that is neither. It returns that byte in register A. It returns Zero true and Control-Z in A at end of file. Note that the byte returned, if not Control-Z, has been removed from the file and must be processed; it will not be returned by the next input request (in contrast to strskip, which can leave register DE pointing at the byte that stopped its scan).
The other functions skip to a nonblank, non-tab byte, then attempt to convert digit characters to a binary word. They return the binary result in register HL. They operate under exactly the same rules as the string-conversion functions straxbw, stradbw, and stradsw but with a file replacing the string; see the description of those functions.
These functions write one or more ASCII characters to a file.
fputchar file-d,byte-a
fputstr file-d,string-hu
fputline file-d,string-hu
The fputchar function writes a byte to a file. If the byte is CR, the function also writes a LF byte.
The fputstr function uses fputchar to write all the bytes of a string up to its ending null.
The fputline function uses fputstr to write a string, then uses fputchar to write an ending CR (and LF).
These functions take binary values, convert them to digit characters, and write them to a file.
fputbbax file-d,byte-a
fputbbad file-d,byte-a
fputbwax file-d,number-h
fputlwax file-d,address-hu
fputbwad file-d,number-h,byte-a
fputswad file-d,number-h,byte-a
fputlwad file-d,address-hu,byte-a
All functions apply a string conversion function to create a string of digit characters, then apply fputstr to write the string to the file. The parameters and the rules for conversion are exactly the same as used in the string functions, with a file replacing the output string. The only exception is that the field-size parameter given to fputbwad, fputswad, and fputlwad is limited to 127, whereas the string functions strbwad, strswad, and strlwad permit a field size of 255.
These functions are used to change the position of a file. Any disk file may be repositioned at any time. The file position is stated in terms of a Relative Byte Address (RBA). The RBA of the first byte in a file is zero. An RBA is a longword, since files may contain more than 8 million bytes in CP/M 2.2, or more than 33 million in CP/M Plus. The longword returned by fsize may be thought of as the RBA of the byte following the physical end of a file.
fseek file-d,address-hu
frewind file-d
The fseek function has no effect on a device file. For a disk file, it positions the file at the RBA given by the longword at address. If the file contains no data at that RBA, it returns Zero true. In that case, an input request will return end of file. The frewind function calls fseek with an RBA of zero, positioning the file at its first byte.
fnote file-d,address-hu
The fnote function returns the RBA of the next byte in the file as a longword at address. You can read a file sequentially, using fnote to record the RBAs of different points. Such a list of RBAs is an index, which can be used to seek to those points later.
freclen file-d,number-h
frecseek file-d,number-h
Sometimes it is more convenient to think of a file as a sequence of records of some fixed size. The freclen function sets a record size of number. (When a file is assembled, it contains a default record size of 128).
The frecseek function positions a file at the record specified by number. The first record in a file is record number 1 (not zero). The function does its work as follows: it decrements the record number by 1, then multiplies it by the record size set for the file. That yields the RBA of the desired record, which it passes to fseek.
Clearly, no more than 65,535 records (of the currently-set size) may be accomodated. You may think of a file as containing more records, but you will have to compute the RBA (multiply record number by record size) yourself
This table appeared printed on the inside of the front and back cover pages in the original book. It lists all the macro calls developed in this book in quick-reference form.
The syntax used to specify arguments (number-a, string-du and etc.) is described above under "Syntax Displays." Only registers listed in the first column are modified; all others are preserved over a macro call.
| Regs set | Function | Macro and Parameters |
| Programming Environment | ||
| SP | set up program | prolog |
| set up submodule | entersub | |
| A | save command tail | savetail |
| DE | retrieve command token | tailtokn number-a |
| flags | test keyboard | testcon |
| terminate program | abort [jmp-cond],message-d | |
| fill block of storage | fillblok address-du,count-b,byte-a | |
| copy block of storage | copyblok address-du,address-hu,count-b | |
| HL | allocate storage | dslow count-b |
| HL | allocate storage | dshigh count-b |
| HL | query free storage | space? count-b |
| DE,HL | lock storage allocation | dslock |
| set up storage allocation | dsunlock address-d,address-h | |
| Integer Arithmetic | ||
| HL | add A into HL | addhla |
| HL | add twice A into HL | addhl2a |
| HL | multiply A times HL | mpy816 number-h,number-a |
| HL,A | divide A into HL | div816 number-h,number-a |
| HL | complement word in HL | cplbw number-h |
| flags | compare signed words | cmpsw number-h,number-d |
| DE,HL | divide unsigned words | divbw number-h,number-d |
| DE,HL | divide signed words | divsw number-h,number-d |
| DEHL | multiply unsigned words | mpybw number-h,number-d |
| DEHL | multiply signed words | mpysw number-h,number-d |
| store longword | storelw address-b | |
| DEHL | load longword | loadlw address-b |
| DEHL | shift longword right | srllw |
| DEHL | shift longword left | slllw |
| DEHL | complement longword | cpllw |
| DEHL | add longwords | addlw address-b |
| DEHL | subtract longwords | sublw address-b |
| DEHL | compare longwords | cmplw address-b |
| DEHL | add word to longword | addlwbw number-b |
| DEHL | subtract word from longword | sublwbw number-b |
| DE,HL | divide word into longword | divlwbw number-b |
| String Operations | ||
| declare space for string | strspace count | |
| declare constant string | strconst literals[,count] | |
| declare table of strings | strtable count | |
| declare table entry | strentry literals | |
| make string null | strnull string-du | |
| advance to end of string | strend @Dupdate | |
| skip spaces, tabs | strskip @Dupdate | |
| HL | length of string | strlen string-du |
| append byte to string | strput string-du,byte-a | |
| append string to string | strappnd string-du,string-hu | |
| append data for length | strtake string-du,[string-hu],size-b,[byte-a] | |
| copy string to string | strcopy string-du,string-hu | |
| flags,A | compare strings | strcmp string-du,string-hl |
| A | append raw text to string | straptxt string-du,address-hu |
| flags | search for string in table | strlook string-du,address-hu |
| A,HL | hex. to unsigned word | straxbw string-du |
| A,HL | dec. to unsigned word | stradbw string-du |
| A,HL | dec. to signed word | stradsw string-du |
| byte to hex. | strbbax string-du,byte-a | |
| byte to dec. | strbbad string-du,byte-a | |
| unsigned word to hex. | strbwax string-du,number-h | |
| longword to hex. | strlwax string-du,address-hu | |
| unsigned word to dec. | strbwad string-du,number-h,number-a | |
| signed word to dec. | strswad string-du,number-h,number-a | |
| longword to dec. | strlwad string-du,address-hu,number-a | |
| File Operations | ||
| declare general file | filedef count[,letter][,name][,type][,password] | |
| declare console file | confile | |
| declare console output | msgfile | |
| declare printer output | lstfile | |
| declare aux. (pun.) output | auxfile | |
| flags,A | assign filespec to file | fassign file-d,string-hu,file-b,bitmap-a |
| get filespec as string | fgetspec file-d,string-hu[,bitmap-a] | |
| set fixed record length | freclen file-d,number-h | |
| flags | search CP/M directory | fdirbegn file-d,file-h |
| flags | search CP/M directory | fdircont file-d,file-h |
| set file attributes | fputattr file-d,bitmap-a | |
| A | get file attributes | fgetattr file-d |
| flags | open file for input | freset file-d |
| open file for output | frewrite file-d[,byte-a] | |
| open file for append | fappend file-d[,byte-a] | |
| flags | open file for direct access | fupdate file-d[,byte-a] |
| checkpoint file | fcheckpt file-d | |
| close file | fclose file-d | |
| flags,A | test impending end of file | feof? file-d |
| flags | test for read-only file | frdonly? file-d |
| flags | test for device file | fdevice? file-d |
| get file size as longword | fsize file-d,address-hu | |
| note position as longword | fnote file-d,address-hu | |
| flags | position file at byte | fseek file-d,address-hu |
| flags | position file at record | frecseek file-d,number-h |
| position file at start | frewind file-d | |
| flags,A | get binary byte | fgetbyte file-d |
| flags,HL | get binary word | fgetword file-d |
| flags | get binary longword | fgetlw file-d,address-hu |
| flags,A | get block of bytes | fgetblok file-d,address-hu,count-b |
| put binary byte | fputbyte file-d,byte-a | |
| put binary word | fputword file-d,number-h | |
| put longword | fputlw file-d,address-hu | |
| put block of bytes | fputblok file-d,address-hu,count-b | |
| flags,A | get character | fgetchar file-d |
| flags,A | get string (line) | fgetstr file-d,string-hu,count-b |
| flags,A | skip spaces, tabs | fskip file-d |
| flags,HL | get hex. as unsigned word | fgetaxbw file-d |
| flags,HL | get dec. as unsigned word | fgetadbw file-d |
| flags,HL | get dec. as signed word | fgetadsw file-d |
| put character | fputchar file-d,byte-a | |
| put string | fputstr file-d,string-hu | |
| put string, newline | fputline file-d,string-hu | |
| put byte as hex. | fputbbax file-d,byte-a | |
| put byte as dec. | fputbbad file-d,number-a | |
| put word as hex. | fputbwax file-d,number-h | |
| put longword as hex. | fputlwax file-d,address-hu | |
| put unsigned word as dec. | fputbwad file-d,number-h,number-a | |
| put signed word as dec. | fputswad file-d,number-h,number-a | |
| put longword as dec. | fputlwad file-d,address-hu,number-a | |